
Torta al cioccolato da morire
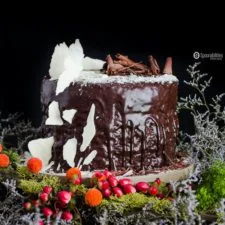
La torta al cioccolato da morire è composta da tre strati di deliziosa torta al cioccolato che si scioglie in bocca. Ogni strato viene ulteriormente ammorbidito spennellandolo con una salsa di marmellata di lamponi e brandy, poi gli strati vengono sovrapposti con una farcitura al cioccolato e ricoperti tutt’intorno e sopra con una ricca ganache al cioccolato fondente. Non dimenticate i riccioli di cioccolato in superficie! Adattata dal libro di cucina di Martha Day, «Glorious Desserts».
Ingredienti
- 8 oz. dark chocolate chips
- 1 Tablespoon instant coffee
- 1/2 cup unsalted butter
- 2/3 cup milk
- 1 1/4 cups light brown sugar
- 2 teaspoons vanilla extract. I prefer to use vanilla bean paste.
- 2 separated eggs
- 2/3 cup sour cream
- 2 cups self-rising flour
- 1 teaspoon baking powder
- 4 Tablespoons raspberry seedless preserves
- 4 Tablespoons brandy
- 14 oz. dark chocolate chips
- 1 cup unsalted butter
- 1 cup heavy cream
- 8 oz. dark chocolate chips
- 4 oz. semi-sweet chocolate chips
- 4 oz. white chocolate chips
Preparazione
- 1
Preheat: the oven to 350 F.
- 2
Grease: and line the bottom of a deep 9-inch springform cake pan.
- 3
--- To make the cake batter: ---
- 4
Place: the chocolate chips, butter, and milk in a saucepan. Heat gently until smooth. Remove from the heat, beat in the sugar, instant coffee, and vanilla, then cool.
- 5
Beat: the egg yolks and cream in a bowl, then beat into the chocolate mixture.
- 6
Sift: the flour and baking powder into the chocolate mixture and fold in.
- 7
Whisk: the egg whites in a bowl until stiff; fold into the chocolate batter.
- 8
Scrape: into the prepared pan and bake for 45-55 minutes or until a toothpick comes out clean.
- 9
Cool: in the pan for 15 minutes, then invert to a wire rack to cool.
- 10
Carefully slice: the cold cake into thirds across the middle to make three even layers.
- 11
--- To make the filling & ensemble ---
- 12
Warm the raspberry jam: in a small saucepan, with 1 Tablespoon of brandy. Then brush all of it on two of the layers. Note: Brush into the side of the cake that is cut.
- 13
Heat the remaining brandy in a saucepan with the chocolate and butter, stirring, until smooth. Cool until it begins to thicken.
- 14
Spread: the bottom cake layer with half of the chocolate filling, taking care not to disturb the jam-brushed filling.
- 15
Top: the bottom cake layer with a second cake layer, jam side up, and spread with the remaining filling. Top with the final layer and press lightly. Let set.
- 16
--- Make and apply the ganache topping ---
- 17
Heat: the cream and chocolate together in a saucepan over low heat, stirring frequently, until the chocolate has melted. Pour into a bowl, let cool, then whisk until mixture begins to hold its shape.
- 18
Spread: the top and sides of the cake with the chocolate ganache.
- 19
Decorate: with the semi-sweet chocolate curls and white chocolate shards.
- 20
--- How to make chocolate shards & curls. ---
- 21
Place: a small baking sheet in the refrigerator one hour before or in the freezer 15 minutes before.
- 22
Melt: the semi-sweet chocolate chips in the microwave, in a small bowl.
- 23
Pour: the melted chocolate onto the baking sheet. Spread the chocolate evenly and thinly until hardened. If needed, set it in the refrigerator for 5-10 minutes.
- 24
For Curls: Starting from the edge and using a spatula, scrape chocolate into curls. If chocolate is too hard, let it sit at room temperature for 1 to 2 minutes. If it gets too soft, return it to the refrigerator for a few minutes.
- 25
For Shards: Allow to fully harden in the refrigerator for 10-15 minutes. Crack into shard pieces.
Cucinala con la ricetta originale
Questa ricetta è di spoonabilities.com. Sul loro sito trovi le foto, le note e i consigli dell’autore: il posto migliore per cucinarla.
Apri la ricetta su spoonabilities.com