
Pane al miele e quinoa (senza glutine e latticini)
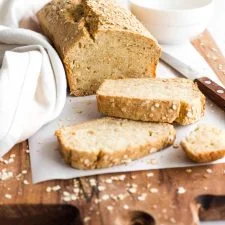
Facilissimo da preparare, questo pane al miele e quinoa è arricchito e decorato con fiocchi di quinoa, per una deliziosa dose extra di proteine, sapore e consistenza. Questo pane veloce alla quinoa cuoce in meno di un’ora ed è perfetto da tostare e mangiare con la marmellata: preparane una pagnotta ogni volta che vuoi del pane fatto in casa! È anche completamente senza glutine e latticini.
Ingredienti
- 2 1/3 cups gluten-free all-purpose flour
- 3/4 teaspoon xanthan gum (leave out if your flour blend already includes it)
- 1 cup + 2 tablespoons quinoa flakes, divided
- 2 1/2 teaspoons baking powder
- 1 teaspoon salt
- 1 cup plain coconut yogurt
- 1 large egg
- 1/4 cup coconut oil, melted
- 1/4 cup honey
- 3/4 cup water
Preparazione
- 1
Preheat and Grease: Preheat oven to 350F and grease a 9×4″ metal loaf pan and adjust the oven rack to the center position.
- 2
Whisk Dry Ingredients: Sift the gluten-free all-purpose flour, xanthan gum(if using), 1 cup quinoa flakes, baking powder, and salt together in a large bowl and whisk to combine.
- 3
Mix Wet Ingredients: Beat the egg, yogurt, melted coconut oil, water and honey together until well blended.
- 4
Form the Batter: Slowly add the wet ingredient to the bowl with the dry ingredients and stir until just the batter is just combined – it will be a thick batter (do not overmix or the batter may become too tough).
- 5
Transfer Batter to Pan: Transfer the batter to the prepared loaf pan and spoon the top with a spatula.
- 6
Sprinkle with Quinoa Flakes: Sprinkle the rest of the quinoa flakes evenly over the batter.
- 7
Bake Until Golden: Bake for 40 to 45 minutes until the quinoa bread is golden brown on top and a toothpick inserted in the middle comes out clean.
- 8
Cool Completely before Slicing: Let the bread cool for 10 minutes in the pan before removing and then completely on a cooling rack before slicing into it.
Cucinala con la ricetta originale
Questa ricetta è di dishbydish.net. Sul loro sito trovi le foto, le note e i consigli dell’autore: il posto migliore per cucinarla.
Apri la ricetta su dishbydish.net