
Panini da sandwich senza impasto con lievitazione notturna
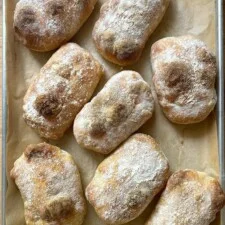
Questo impasto con quattro ingredienti si mescola in cinque minuti, poi il tempo fa il resto. Dopo una lievitazione notturna, l’impasto è pronto per essere diviso in porzioni, arrotondato e cotto. Croccanti fuori e con una mollica leggera e ariosa, questi panini sono perfetti per i sandwich! Note: aggiornamento del 5/9: poiché l’impasto è molto umido, ho ridotto l’acqua a 410 grammi. Se hai già preparato la ricetta e preferisci la quantità d’acqua maggiore, continua a usarla. Trovo che la quantità d’acqua inferiore, che porta l’idratazione all’80%, renda l’impasto un po’ più facile da maneggiare durante la formatura. Lievito: nei mesi più caldi puoi usare appena ¼ di cucchiaino di lievito istantaneo. Seconda lievitazione: se hai tempo, prolungare la seconda lievitazione a temperatura ambiente di 2-3 ore renderà la mollica più leggera e ariosa. Variante con lievito madre: usa 100 grammi di lievito madre al posto del lievito. Adoro questi panini per i sandwich con melanzane arrosto all’aceto balsamico e rucola.
Ingredienti
- 4 cups (512 g) unbleached bread or all-purpose flour + 1/4 cup (32 g) for shaping
- 2 teaspoons (12 g) kosher salt
- 1/4 to 1/2 teaspoon (1 g) instant yeast, see notes above
- 1.75 (410 grams) to 2 cups (439 g) cold water (tap is fine), see notes above
Preparazione
- 1
Make the dough: In a large bowl, whisk together the flour, salt, and instant yeast. Add the water. Using a rubber spatula, mix until the liquid is absorbed and the ingredients form a sticky dough ball. Cover the bowl, and let rest for 30 minutes, then stretch and fold the dough — this is an optional new step (1/14/2026), but if time permits, do it: I find it makes for an especially bubby dough. Fill a small bowl with water. Using a wet hand, grab an edge of the dough and pull it up and towards the center. Repeat this stretching and folding process 8 to 10 times, moving your hand around the edge of the dough with every set of stretches and folds. As you stretch and fold, you should feel the dough transform from being sticky and shaggy to smooth and cohesive. Find video guidance here.
- 2
Let it rise: Cover bowl with a tea towel or bowl cover and leave to rise at room temperature overnight or for up to 12 hours.
- 3
Prepare for baking: The following morning (or after about 12 hours), the dough will have risen, and its surface will be covered with bubbles.
- 4
Portion the dough: Spread the 1/4 cup flour over a work surface. Turn the dough out onto the surface. Using as much flour as necessary to keep the dough from sticking to the board and your knife or dough scraper, divide the dough into 6 (155 grams each) to 8 (116 grams each) roughly equal portions: I prefer the size of 8 rolls, and I like to use a scale to portion the dough.
- 5
Ball up the dough: Using as much flour as necessary on your hands and work surface, shape each portion into a ball. Transfer the portions to a floured vessel, ideally something like a lidded DoughMate, to rise. I use two of these DoughMates. Alternatively you could use two 9×13-inch vessels, which you can cover with a sheet pan or plastic wrap.
- 6
Proof: If time permits, allow the balls to rest for 2-3 hours or until they are light to the touch. If you are pressed for time, you can proof for less time.
- 7
Prepare a pan and the oven: Line a sheetpan with parchment paper or a Silpat. If you are baking 8 rolls, line two sheet pans with parchment paper. Preheat the oven to 475ºF.
- 8
Shape: Use two hands to stretch each ball gently into a rectangle—doesn’t have to be perfect—and transfer to the prepared sheetpan, spacing evenly. Let the shaped rolls rest for 20 minutes.
- 9
Bake the rolls: Transfer the pan to the oven. Bake 15 minutes. Remove the pan, and let the rolls cool completely on the pan. Repeat with the remaining sheetpan if baking two pans. Let cool completely before halving and using.
Cucinala con la ricetta originale
Questa ricetta è di alexandracooks.com. Sul loro sito trovi le foto, le note e i consigli dell’autore: il posto migliore per cucinarla.
Apri la ricetta su alexandracooks.com