
Slow Cooker Carnitas
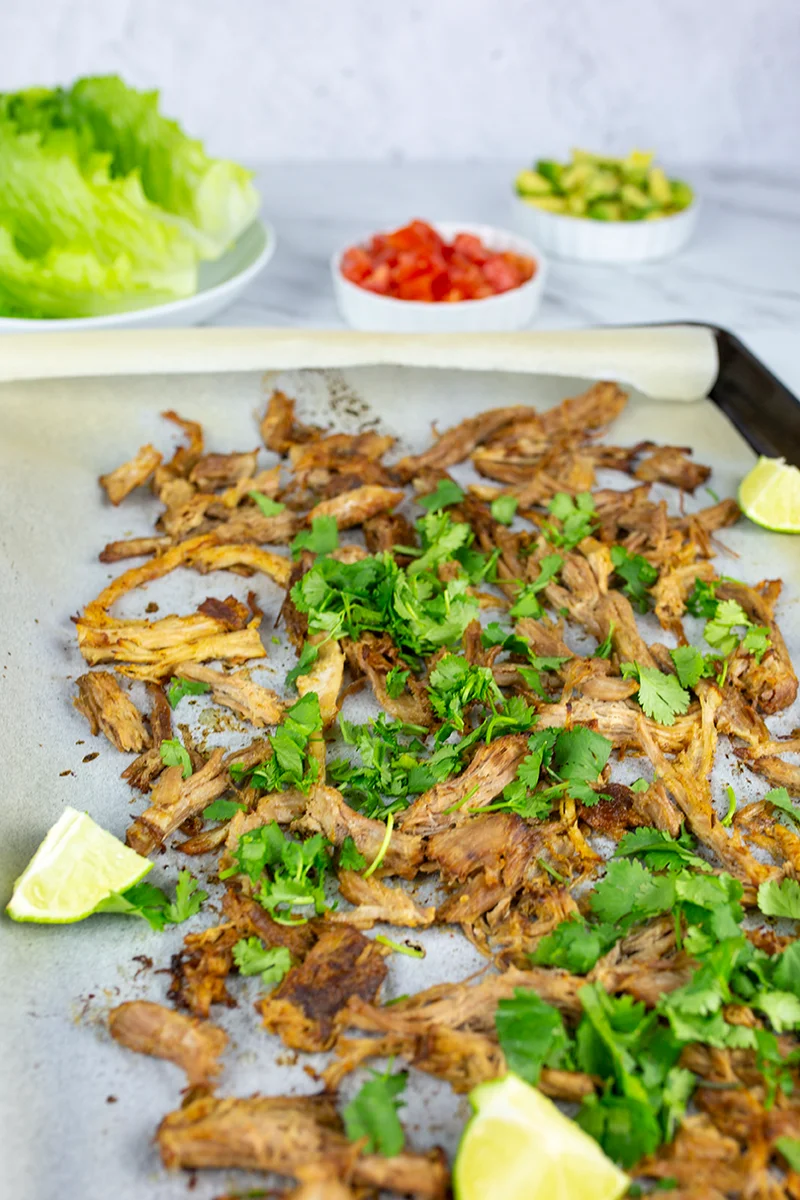
Slow-cooked pork shoulder is seasoned with citrus, onion and spices, then pulled apart and baked until its edges caramelise. Make it ahead and serve it in tacos, bowls or alongside your favourite sides.
Ingredients
- 3,402 g (7.5 lb)pork shoulder
- Juice of 1lime
- Juice of ½navel orange
- 1 mediumonion, chopped
- 6 clovesgarlic, minced
- 15 ml (1 tbsp)salt
- 15 ml (1 tbsp)ground cumin
- 15 ml (1 tbsp)chilli powder
- 15 ml (1 tbsp)oregano
- 15 ml (1 tbsp)black pepper
- 2bay leaves
- 15 ml (1 tbsp)olive oil
- 1 bunch, optionalfresh coriander, to serve
Instructions
- 1
Sear the pork
Heat the olive oil in a large pan and sear the pork shoulder on all sides. Transfer the pork to the slow cooker.
- 2
Add the seasonings
Distribute all the remaining ingredients evenly over the pork.
- 3
Slow cook
Cook on the low setting for 8 hours.
- 4
Pull and caramelise
Pull the pork apart with two forks and spread it on a baking sheet. Taste it for acidity and drizzle lime juice over the meat if needed. Bake at 220°C (425°F) until caramelised. Top with coriander and serve.
What are carnitas?
Carnitas is a Mexican way of preparing pork until it is tender enough to pull apart, then giving it browned, crisp edges. This slow-cooker version uses citrus, onion and warm spices to season the meat as it cooks.
Searing the pork first adds colour, while the final bake helps caramelise the shredded meat. Serve it as a filling or as the centrepiece of a meal.
Nutrition and macros by portion
The nutrition label shows one serving as written: 283 calories, 34g protein, 4g carbs, 14g fat.
| Portion | Adjustment | kcal | Protein | Carbs | Fat |
|---|---|---|---|---|---|
| Lighter | Serve with extra vegetables | 198 kcal | 24g | 3g | 10g |
| This serving | As written | 283 kcal | 34g | 4g | 14g |
| Hungry | Add rice and beans | 425 kcal | 51g | 6g | 21g |
The pork provides most of the protein and fat, while the onion and citrus contribute a small amount of carbohydrate. Serve a portion with vegetables or beans to add more fibre and make a balanced plate.
Why sear the pork first?
Browning: Sear the shoulder on all sides in the pan before it goes into the slow cooker. This adds colour and a savoury, browned flavour to the finished dish.
Handling: The shoulder is a large cut, so turn it carefully to brown each side without rushing the process.
Citrus and spice
Citrus: Lime and orange bring brightness to the pork as it cooks. The recipe also suggests tasting the meat after shredding and adding more lime if it needs extra acidity.
Seasoning: Cumin, chilli powder, oregano, black pepper, garlic and bay leaves give the pork its savoury, aromatic flavour. Spread them evenly over the meat before cooking.
How to tell when it is ready
Slow cooking: Cook on low for 8 hours, following the recipe's timing. The pork should be tender enough to pull apart with two forks.
Browning: Spread the shredded pork on a baking sheet and bake at 220°C (425°F) until its surface caramelises. Keep an eye on it during this final stage, as the recipe does not specify a baking time.
Ways to serve it
Tacos: Spoon the pork into warm tortillas and finish with the optional fresh coriander. Lime juice can add a sharper finish if the meat tastes rich.
Plates and bowls: Serve it with rice, beans or vegetables for a more complete meal. Its pulled texture also makes it easy to add to wraps or salads.
Planning the cooking time
Start with the sear, then allow 8 hours for cooking on low before shredding and baking. The recipe lists a total time of 490 minutes, but the final baking stage is given without a duration.
For serving, check that the pork is fork-tender before moving on to the baking sheet. The last bake is there to caramelise the surface, not to replace the slow-cooking stage.
Recipe notes & tips
- Sear the shoulder on all sides before transferring it to the slow cooker.
- Spread the seasonings over the pork so they are distributed across the cut.
- Use two forks to shred the pork while it is tender.
- Taste the pulled meat before adding extra lime juice.
- Spread the shredded pork across the baking sheet so it can caramelise.
Variations
- Extra citrus: Add a little more lime juice after shredding if you prefer a brighter finish.
- More heat: Increase the chilli powder for a spicier batch.
- Taco filling: Serve the pork in tortillas with your preferred toppings.
- Bowl meal: Pair it with rice and beans for a hearty serving.
- Fresh finish: Scatter chopped coriander over the pork just before serving.
Common mistakes to avoid
- Skipping the sear: Brown the pork on all sides in the pan before slow cooking.
- Uneven seasoning: Distribute the remaining ingredients over the whole surface of the pork.
- Shredding too soon: Cook for the full 8 hours on low so the pork can pull apart easily.
- Skipping the taste check: Taste the shredded meat and add lime juice if it needs more acidity.
- Crowding the baking sheet: Spread the pork out so its surface can caramelise.
How to store
Cool and refrigerate leftovers in a covered container for up to 3 days, or freeze them for longer storage. Reheat until piping hot; use the oven or a pan to help the edges brown again.
Frequently asked questions
Can I make carnitas ahead?
Yes. Cook and shred the pork ahead, then refrigerate it. Reheat it and finish in the oven to caramelise before serving.
Can I freeze the leftovers?
Yes. Freeze the cooked pork in a suitable sealed container. Thaw it in the fridge before reheating.
How do I know the pork is ready to shred?
After 8 hours on low, it should pull apart with two forks. If it is still firm, continue cooking until tender.
Why bake the pork after slow cooking?
The final bake caramelises the shredded meat, adding browned edges to its tender texture.
What can I serve with carnitas?
Try it in tacos, or serve it with rice, beans or vegetables. Fresh coriander and a squeeze of lime make suitable finishing touches.
Do I need to add more lime juice?
Not necessarily. Taste the meat after shredding and add a drizzle only if it needs more acidity.
Cook it from the original
This recipe comes from goodlifexplorers.com. Their page has the author’s own photos, notes and tips — the best place to cook it from.
Open the recipe on goodlifexplorers.com