
The Ultimate Beginner’s Guide to Making Baked Tacos
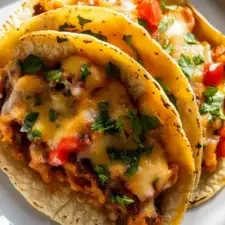
Baked tacos fill crisp hard shells with black beans, seasoned beef and melted cheddar. A quick bake finishes them in one tray, making them a handy dinner for taco night or a casual gathering.
Ingredients
- 8–10hard taco shells
- 170 g (1 cup)black beans, drained and rinsed
- 454 g (1 lb)ground beef
- 1yellow onion, finely diced
- 28 g (1 oz)taco seasoning
- 283 g (10 oz)diced tomatoes with green chillies, undrained
- 60 ml (1/4 cup)beef stock
- 15 g (1 tablespoon)softened cream cheese (optional)
- 140 g (1 1/4 cups)cheddar cheese, grated
Instructions
- 1
Prepare the shells
Drain and rinse the black beans, then set them on a plate lined with kitchen paper to remove excess moisture. Heat the oven to 200°C (400°F) and arrange the taco shells in a 23 x 33 cm (9 x 13-inch) casserole dish. Bake the shells for 5 minutes in a light-coloured dish, or 3 minutes in a dark dish, to help them stay crisp.
- 2
Cook the filling
Cook the ground beef and diced onion in a large frying pan over a medium-high heat, breaking up the meat and stirring often, for 8–10 minutes until the meat is cooked and the onion has softened. Drain off excess fat. Stir in the taco seasoning, undrained tomatoes and beef stock. Bring to the boil, then lower the heat and simmer for 1–2 minutes. If using cream cheese, stir it in until melted and combined; the filling should be moist but not overly liquid.
- 3
Fill the shells
Spoon a layer of black beans into the bottom of each shell, then add a generous amount of the meat mixture. Avoid overfilling the shells so they are less likely to break. Sprinkle the grated cheddar over the top.
- 4
Bake and serve
Return the filled tacos to the oven and bake uncovered for 7–10 minutes, until the cheese has melted and is beginning to bubble. Let them cool for a minute before adding any toppings you like, then serve straight away.
What are baked tacos?
Tacos are a Mexican dish built around a tortilla folded or filled with a savoury mixture. This baked version uses crisp hard shells and a familiar beef-and-cheese filling, then warms everything together in the oven.
The method is designed for an easy home-cooked meal rather than a traditional taco preparation. Briefly baking the empty shells first helps them hold their crunch after the moist filling is added.
Nutrition and macros by portion
The nutrition label shows one serving as written: 300 calories, 18g protein, 23g carbs, 15g fat.
| Portion | Adjustment | kcal | Protein | Carbs | Fat |
|---|---|---|---|---|---|
| Lighter | Use leaner beef | 210 kcal | 13g | 16g | 11g |
| This serving | As written | 300 kcal | 18g | 23g | 15g |
| Hungry | Add another taco | 450 kcal | 27g | 35g | 23g |
The shells and black beans provide most of the carbohydrates, while the beef and cheddar contribute much of the protein and fat. Serve a taco or two with a generous side of salad or vegetables for a plate with more fresh produce.
Build a well-balanced filling
Black beans: rinsing and draining them removes their canning liquid, and drying them a little helps keep extra moisture out of the shells.
Beef and onion: crumbling the beef as it cooks gives you a filling that is easier to spoon into the shells, while softened onion adds sweetness.
Tomatoes and stock: these bring moisture to the seasoned meat. Simmer the mixture briefly so it is juicy but not soupy.
Keep the shells crisp
Shells first: the short pre-bake gives the taco shells a head start before they meet the filling. Use the shorter time for a dark dish, as directed in the method.
Moisture matters: drain excess fat from the beef and avoid adding more liquid than specified. A loose filling can soften the shells and make them harder to serve.
Look for these doneness cues
Meat mixture: after simmering, it should look moist and cohesive rather than watery. Stir in the optional cream cheese until no separate lumps remain.
Cheese topping: the tacos are ready when the cheddar has melted and just begins to bubble, after 7–10 minutes in the oven. Give them a minute to settle before adding toppings.
Make filling the shells easier
Beans first: spread a layer in the base of each shell, then add the meat mixture. This keeps the filling portions easy to control.
Leave a little room: overfilled shells can crack during assembly or baking. Add enough filling for a generous taco without packing it down.
Serve them straight away
These tacos are at their crispest just after baking, so have any desired toppings ready before the tray comes out of the oven. Serve them as they are or with a simple salad or extra beans on the side.
For a meal with more fresh contrast, offer chopped vegetables or a crisp salad alongside. Add toppings after baking so they do not weigh down or soften the hot shells.
Recipe notes & tips
- Line up the shells snugly in the casserole dish so they stay upright while you fill them.
- Drain the cooked beef well to avoid a greasy filling.
- Keep the bean layer modest so there is room for the meat mixture and cheese.
- Have toppings prepared before baking, as the tacos are best served straight away.
- Use the cream cheese only if you want a creamier filling; the method works without it.
Variations
- Swap the beans: Use pinto beans instead of black beans, keeping them drained and rinsed.
- Change the meat: Replace the beef with cooked shredded chicken or turkey.
- Try a plant-based filling: Use a plant-based meat alternative in place of the ground beef.
- Mix the cheese: Combine cheddar with Monterey Jack for a different cheese topping.
- Make it creamier: Stir in the optional cream cheese, or use Greek yoghurt or sour cream as a substitute.
Common mistakes to avoid
- Skipping the shell pre-bake: The shells may soften more; bake them first for the time that suits your dish colour.
- Leaving excess fat in the pan: The filling can turn oily; drain the beef after cooking.
- Making the filling too wet: The shells can lose their crunch; simmer until the mixture is moist but not soupy.
- Overfilling the shells: They can break; leave a little space rather than packing them full.
- Baking for too long: The shells can become overly crisp; take the tray out once the cheese has melted and begun to bubble.
How to store
For the best texture, serve these tacos straight after baking. If you have leftovers, refrigerate the filling and shells separately in covered containers for up to 3 days, then reheat the filling in a pan or microwave and assemble just before serving.
Frequently asked questions
Can I use soft tortillas instead of hard shells?
The recipe allows for soft tortillas, though the texture will be different from crisp baked taco shells. Check them as they bake, since they may need a different time.
Can I make the filling ahead?
You can cook the meat mixture ahead and refrigerate it in a covered container. Reheat it before filling the shells, and bake the assembled tacos just before serving.
How do I stop the taco shells from breaking?
Avoid overfilling them and handle them gently during assembly. The brief initial bake helps the shells stay crisp, but they will still be brittle.
Do I have to use cream cheese?
No. It is optional and adds a creamier texture. Leave it out if you prefer a less creamy filling.
When are the tacos ready?
Bake for 7–10 minutes, until the cheddar has melted and begun to bubble. Let the tacos rest for a minute before adding toppings.
Cook it from the original
This recipe comes from carlarecipes.com. Their page has the author’s own photos, notes and tips — the best place to cook it from.
Open the recipe on carlarecipes.com