
Cream Egg Chocolate Dessert Cups - A Fun, Festive Treat in Minutes
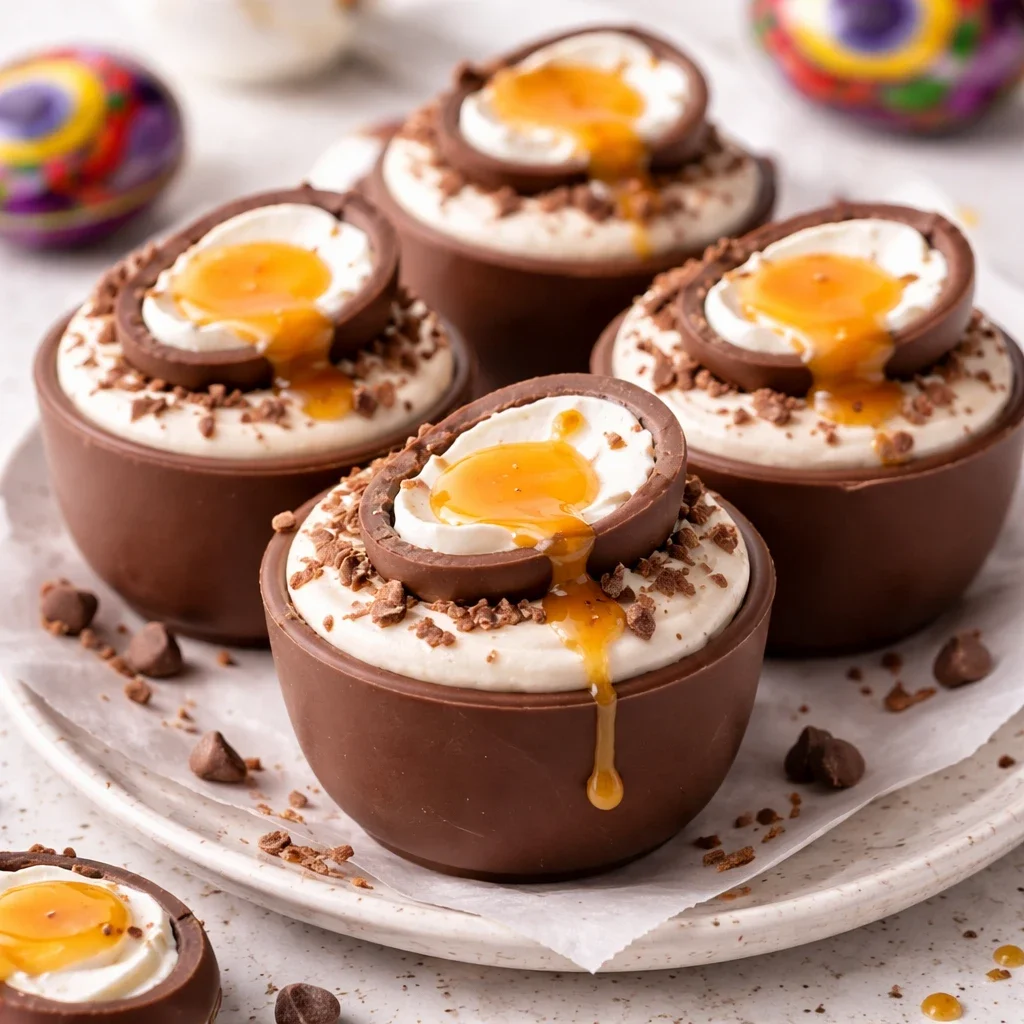
These no-bake dessert cups pair crisp chocolate shells with a fluffy vanilla cream-cheese filling and a little yellow centre for a cream-egg effect. They’re a festive make-ahead treat that needs only a short chill to set.
Ingredients
- 340 g (12 oz)semi-sweet or milk chocolate chips, or chopped chocolate bars
- 1–2 teaspoonscoconut oil or neutral oil (optional)
- 170 g (6 oz), softenedcream cheese
- 90 g (¾ cup), siftedpowdered sugar
- 1 teaspoonvanilla extract
- 180 ml (¾ cup), coldheavy cream
- A pinchsalt
- A few dropsyellow food colouring
- To tasteoptional toppings: crushed cookies, toffee bits, flaky salt or mini chocolate eggs
Instructions
- 1
Line the pan
Line a standard muffin pan with paper liners and set it aside.
- 2
Melt the chocolate
Put the chocolate in a microwave-safe bowl, adding the oil if using it. Heat in 20–30 second bursts, stirring between each, until smooth and glossy.
- 3
Make the shells
Spoon 1–1½ tablespoons of melted chocolate into each liner. Tilt and swirl the pan, or use a spoon or pastry brush, to coat the sides about halfway up. Chill for 10 minutes, add a thin second coat for sturdier shells, then chill again until firm.
- 4
Whip the filling
Beat the cream cheese, powdered sugar, vanilla and a pinch of salt until smooth. In a separate bowl, whip the cold cream to soft peaks, then fold it into the cream cheese mixture until fluffy.
- 5
Tint the centre
Scoop 60 ml (¼ cup) of the filling into a small bowl. Add a drop or two of yellow food colouring and stir until evenly tinted.
- 6
Fill the shells
Divide the white filling among the chocolate shells, leaving a little space at the top. Make a small indent in the centre of each with the back of a spoon and add a tiny dollop of yellow filling.
- 7
Add toppings
If using, sprinkle crushed cookies or flaky salt around the edge for texture. Chill for 30–45 minutes to set.
- 8
Unmould and serve
Peel off the paper liners and arrange the cups on a plate. Keep them chilled until serving.
What are cream egg dessert cups?
These are small, no-bake chocolate cups filled with a sweet, creamy mixture and finished with a yellow centre that suggests a yolk. They take inspiration from the familiar cream-egg combination, reworked as individual chilled desserts.
Chocolate shells: The two coats help contain the soft filling, while the whipped cream lightens the cream-cheese base. The contrast between a firm shell and a fluffy centre makes each cup feel like a complete treat.
Nutrition and macros by portion
The nutrition label shows one serving as written: 540 calories, 6g protein, 50g carbs, 38g fat.
| Portion | Adjustment | kcal | Protein | Carbs | Fat |
|---|---|---|---|---|---|
| Lighter | Use smaller cups | 378 kcal | 4g | 35g | 27g |
| This serving | As written | 540 kcal | 6g | 50g | 38g |
| Hungry | Serve two cups | 810 kcal | 9g | 75g | 57g |
Chocolate, powdered sugar and cream provide most of the carbohydrates, while the chocolate, cream cheese and heavy cream contribute most of the fat. Cream cheese and chocolate supply some protein, but these are primarily a sweet dessert; a practical way to balance the serving is to have one cup with fresh fruit.
Choosing the chocolate
Chocolate type: Semi-sweet chocolate gives a more pronounced cocoa flavour, while milk chocolate makes the cups sweeter and gentler. Chips or chopped bars both work.
Oil: The small optional amount can help the chocolate melt smoothly. Add it before microwaving, and stir thoroughly between bursts so the chocolate warms evenly.
Building sturdy shells
First coat: Spread the chocolate about halfway up the liners rather than only covering the base. A spoon or pastry brush gives you more control around the sides.
Second coat: Add a thin layer after the first coat has chilled for 10 minutes. Let the shells become firm before filling so they’re less likely to crack or lose their shape.
Getting a fluffy filling
Cream cheese: Let it soften before beating so it blends smoothly with the sugar and vanilla. Beat this mixture until no lumps remain.
Whipped cream: Stop at soft peaks, then fold it gently into the cream-cheese mixture. This keeps the filling airy; vigorous stirring can make it denser.
Making the yellow centre
Small portion: Set aside 60 ml (¼ cup) of the filling for the coloured centres. Use just a drop or two of colouring at first, then add more only if needed.
Indents: Make a shallow dip in the white filling before adding the yellow dollop. A small amount of the coloured mixture is enough to create the yolk-like finish without crowding the cup.
Chilling and serving
Setting time: The shells need to firm up between coats, and the filled cups need a final 30–45 minutes in the fridge. If the centres still feel soft, give them a little longer before removing the liners.
Serving: Keep the cups chilled until they’re ready to eat. Crushed cookies or flaky salt around the edge add a contrasting finish without changing the basic method.
What to serve alongside
Fresh fruit: Berries or sliced fruit offer a fresh contrast to the rich chocolate and cream filling. Serve them on the side rather than putting juicy fruit inside the cups.
Coffee or tea: A small cup of coffee or tea pairs well with the sweet filling. For a dessert spread, these cups can sit alongside simpler biscuits or fruit.
Recipe notes & tips
- Use paper liners so the shells are easier to release once chilled.
- Stir the chocolate after every microwave burst, even when it still looks partly solid.
- Brush chocolate up the sides evenly so there are no obvious gaps.
- Fold the whipped cream into the cheese mixture gently to keep the filling fluffy.
- Keep the finished cups refrigerated until serving.
Variations
- Use milk chocolate: Choose it for a sweeter shell with a softer cocoa flavour.
- Add toffee bits: Sprinkle a few around the rim for a crunchy finish.
- Try cookie crumbs: Use crushed cookies as the optional topping for extra texture.
- Finish with flaky salt: Add a light sprinkle around the edge to contrast with the sweet filling.
- Top with mini chocolate eggs: Add them just before serving for a festive decoration.
Common mistakes to avoid
- Thin shell: Coat the sides about halfway up, then add the second layer after the first has chilled.
- Overheated chocolate: Use 20–30 second bursts and stir between each one.
- Lumpy filling: Soften the cream cheese before beating it with the sugar and vanilla.
- Dense filling: Whip the cream to soft peaks and fold it in gently rather than beating it into the mixture.
- Too much colouring: Start with a drop or two and add more only if the filling needs a stronger yellow tint.
- Soft cups: Chill the filled shells for the full 30–45 minutes, or longer if they have not set.
How to store
Keep the cups covered in the fridge and serve them chilled. They are best enjoyed within 2–3 days; the chocolate may soften if left at room temperature, so reheating is not recommended.
Frequently asked questions
Can I make these cups ahead?
Yes. Prepare them ahead and keep them covered in the fridge until serving.
Can I use milk chocolate?
Yes. The recipe allows semi-sweet or milk chocolate; milk chocolate will make the shells sweeter.
Do I have to use oil with the chocolate?
No. The oil is optional and is included to help the chocolate melt smoothly.
How do I know when the chocolate shells are firm?
They should feel set rather than soft before you add the filling. Chill again after adding the second coat if needed.
Can I skip the yellow centre?
Yes. The cups can be filled with the white mixture alone, though they will no longer have the cream-egg-style finish.
Why does the cream need to be cold?
Cold cream whips more readily to soft peaks, giving the filling its light texture.
Cook it from the original
This recipe comes from bentorecipes.com. Their page has the author’s own photos, notes and tips — the best place to cook it from.
Open the recipe on bentorecipes.com