
aburi sushi
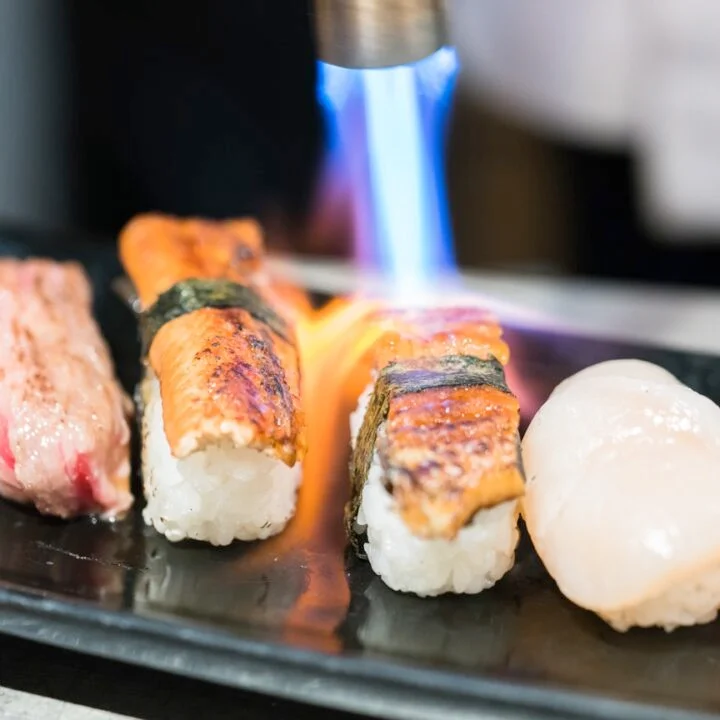
Aburi sushi pairs seasoned rice and fresh fish with a quick torch-seared finish, plus a sweet-savoury nikiri-style sauce. It makes a striking platter for sharing, with toppings and accompaniments to suit the table.
Ingredients
- 380 g (2 cups)sushi rice
- 590 ml (2½ cups)water
- 80 ml (⅓ cup)rice vinegar
- 25 g (2 tablespoons)sugar
- 5 g (1 teaspoon)salt
- 60 ml (¼ cup)soy sauce
- 30 ml (2 tablespoons)mirin (sweet rice wine)
- 15 ml (1 tablespoon)sake
- 4 g (1 teaspoon)sugar
- To tasteassorted fresh fish slices, such as salmon, tuna, yellowtail or white fish
- To tastenori (seaweed) sheets, cut into strips
- To tastesoy sauce, for dipping
- To tastewasabi and pickled ginger, for serving
- Optional, to tastethinly sliced green onions, sesame seeds, tobiko (fish roe) or microgreens
Instructions
- 1
Rinse the rice
Rinse the sushi rice until the water runs clear.
- 2
Cook the rice
Cook the rice according to the package instructions.
- 3
Mix the seasoning
Combine the rice vinegar, 25 g sugar and salt in a bowl. Microwave briefly to dissolve the sugar.
- 4
Season the rice
Gently fold the vinegar mixture into the cooked rice. Fan the rice as it cools to room temperature.
- 5
Mix the sauce
Combine the soy sauce, mirin, sake and 4 g sugar in a small saucepan.
- 6
Warm the sauce
Heat over medium-low heat until the sugar dissolves, then leave the sauce to cool.
- 7
Slice the fish
Cut the fish into thin pieces sized to fit on the rice.
- 8
Shape the rice
With damp hands, shape small portions of rice into bite-sized pieces.
- 9
Assemble the sushi
Place a strip of nori on each piece of rice, then add a slice of fish.
- 10
Torch the fish
Using a kitchen torch, quickly and carefully sear the top of the fish until lightly browned, with charred edges.
- 11
Add the sauce
Drizzle a little of the cooled nikiri sauce over the seared fish.
- 12
Finish with toppings
Add any optional green onions, sesame seeds or tobiko.
- 13
Arrange the sushi
Arrange the aburi sushi on a platter.
- 14
Serve with sides
Serve with soy sauce, wasabi and pickled ginger on the side.
What is aburi sushi?
Aburi means flame-seared: the fish is briefly torched after it is placed on seasoned sushi rice. The style is associated with Japanese sushi, where the quick sear adds a toasted surface while leaving the fish mostly uncooked.
This version combines the torch finish with nori, a simple sweet-savoury sauce and optional toppings. Each piece is small enough to eat in a bite, making the contrast of warm fish and cool rice part of the appeal.
Nutrition and macros by portion
The nutrition label shows one serving as written: 530 calories, 28g protein, 82g carbs, 8g fat.
| Portion | Adjustment | kcal | Protein | Carbs | Fat |
|---|---|---|---|---|---|
| Lighter | Use lean white fish | 371 kcal | 20g | 57g | 6g |
| This serving | As written | 530 kcal | 28g | 82g | 8g |
| Hungry | Add more sushi pieces | 795 kcal | 42g | 123g | 12g |
The rice and its sugar provide most of the carbohydrate, while the fish supplies protein and some of the fat; salmon will contribute more fat than lean white fish. Soy sauce is the main source of sodium. Balance the plate with cucumber or other fresh vegetables and use dipping sauce sparingly.
Get the rice ready
Rinse well: washing the rice until the water runs clear removes loose surface starch and helps the cooked grains stay distinct rather than overly sticky.
Season gently: fold the vinegar mixture through the cooked rice rather than stirring hard, which can mash the grains. Fanning as it cools helps the rice reach room temperature without becoming wet or claggy.
Choose and slice the fish
Fish choice: salmon, tuna, yellowtail and white fish are all listed options; use fresh fish suitable for serving raw. Keep it chilled until you are ready to assemble.
Even slices: cut the fish thinly and to a size that fits the rice. Similar-sized pieces are easier to torch evenly and make neat bites.
Torch with care
Quick sear: the aim is a lightly seared surface and some char at the edges, not to cook the fish through. Keep the flame moving and work carefully with the assembled pieces on a heat-safe surface.
Watch the texture: the fish should still look tender beneath its browned top. Torching too long can dry it out and soften the rice with excess heat.
Make the sauce
Dissolve the sugar: warm the soy sauce, mirin, sake and sugar over medium-low heat just until the sugar disappears. Let it cool before drizzling so it does not warm the fish and rice further.
Use a light hand: a little sauce adds savoury sweetness without covering the flavour of the fish. Keep extra soy sauce on the side for dipping.
Shape and finish each bite
Damp hands: wet your hands lightly before shaping the rice so it is less likely to stick. Press just enough to hold each bite together without compacting it.
Nori and toppings: use a strip of nori to secure the fish to the rice, then add optional green onions, sesame seeds, tobiko or microgreens. Wasabi and pickled ginger go alongside rather than being mixed into the rice.
Serve it fresh
Serve soon after torching, while the fish still has a warm, lightly seared surface and the rice is at room temperature. Arrange the pieces on a platter with dipping soy sauce, wasabi and pickled ginger.
A simple cucumber salad or steamed greens make a fresh accompaniment without competing with the sushi. Keep the platter modestly sized so the pieces can be eaten shortly after assembly.
Recipe notes & tips
- Keep the fish chilled until just before slicing and assembling.
- Fan the seasoned rice as it cools, but fold it gently to keep the grains intact.
- Dampen your hands before shaping each rice portion.
- Make sure the sauce has cooled before drizzling it over the fish.
- Use a heat-safe surface and keep the torch moving over the fish.
- Set out the toppings and sides before you begin torching.
Variations
- Salmon choice: use salmon for a richer, more buttery-tasting topping.
- Lean fish: choose white fish for a milder and leaner-tasting bite.
- Sesame finish: sprinkle sesame seeds over the seared fish for a nutty note.
- Tobiko topping: add a little tobiko for a briny pop of texture.
- Fresh garnish: finish with green onions or microgreens for a crisp, fresh contrast.
Common mistakes to avoid
- Skipping the rinse: the rice may turn overly sticky; rinse until the water runs clear.
- Roughly mixing the rice: hard stirring can break the grains; fold the seasoning through gently.
- Overheating the sauce: it only needs warming until the sugar dissolves; then let it cool.
- Torching too long: the fish can dry out; sear briefly and keep the flame moving.
- Using wet hands: rice can cling to your fingers; dampen your hands lightly before shaping.
- Adding too much sauce: it can overwhelm the fish; drizzle sparingly and serve extra soy sauce on the side.
How to store
For best texture, serve aburi sushi soon after assembling and torching. Refrigerate any leftovers promptly in a covered container and eat within 1 day; the rice will firm up, and reheating is not recommended because it can alter the fish and rice texture.
Frequently asked questions
Can I make the rice ahead?
You can cook and season the rice ahead, then let it cool as described. Keep it covered at room temperature only while preparing the sushi, and assemble close to serving.
Can I make aburi sushi without a kitchen torch?
The method calls for a kitchen torch to sear the fish quickly. Without one, this particular finish will be difficult to reproduce as written.
How thick should the fish slices be?
Slice the fish thinly enough to sit neatly on each rice portion, as the method specifies. Keeping the pieces similar in size helps them sear consistently.
What is the nikiri sauce?
Here it is a simple sauce made by warming soy sauce, mirin, sake and sugar until the sugar dissolves. Cool it before drizzling over the seared fish.
Can I leave off the nori?
The recipe uses nori strips to sit on the rice beneath the fish. You can omit them, though the assembled pieces may be less firmly held together.
What should I serve with aburi sushi?
Serve it with soy sauce, wasabi and pickled ginger as listed. Fresh vegetables such as cucumber or steamed greens also make a simple side.
Cook it from the original
This recipe comes from gluttodigest.com. Their page has the author’s own photos, notes and tips — the best place to cook it from.
Open the recipe on gluttodigest.com