
Gluten-free pita breads
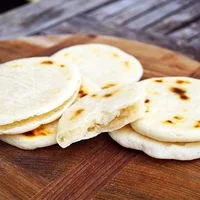
These homemade gluten-free pitas are made with self-raising flour and yeast, then baked until lightly golden. Serve them warm or cooled and fill with your favourite sandwich ingredients.
Ingredients
- 260 ggluten-free self-raising flour
- 3 gyeast
- 160 mllukewarm water
- 1 generous splasholive oil
- 1/2 teaspoonsalt
Instructions
- 1
Activate the yeast
Stir the yeast briefly into the lukewarm water and leave it for a few minutes.
- 2
Mix the dough
Add the salt to the flour, then pour in the olive oil and yeast water. Mix with a food processor or a mixer fitted with dough hooks until smooth; alternatively, knead by hand.
- 3
Leave to rise
Cover the dough with a damp tea towel and leave it in a warm place at 25–30°C for about 30 minutes.
- 4
Shape the pitas
Divide the dough into 6 equal balls and place them on a baking tray lined with parchment paper, leaving room between them. Roll each ball into a circle about 2 cm thick; avoid making the pitas too thin, or they may be difficult to cut open.
- 5
Bake until golden
Preheat the oven to 225°C. Bake the pitas for about 10 minutes, until golden brown, then let them cool thoroughly.
What are pita breads?
Pita is a round, often pocketed flatbread found in food traditions across the Middle East and the Mediterranean. This version uses gluten-free self-raising flour, with yeast for a short rise before baking.
The recipe is a straightforward home-baked adaptation rather than a traditional long-fermented dough. Keeping the rounds fairly thick helps make them easier to split and fill.
Nutrition and macros by portion
The nutrition label shows one serving as written: 170 calories, 2g protein, 34g carbs, 3g fat.
| Portion | Adjustment | kcal | Protein | Carbs | Fat |
|---|---|---|---|---|---|
| Lighter | Use less olive oil | 119 kcal | 2g | 24g | 2g |
| This serving | As written | 170 kcal | 2g | 34g | 3g |
| Hungry | Serve two pitas | 255 kcal | 3g | 51g | 4g |
Most of the carbohydrates come from the gluten-free flour, while the olive oil provides most of the fat; there is only a modest amount of protein from the flour. Pair a pita with a protein-rich filling and plenty of vegetables for a more balanced plate.
Choosing the flour
Flour blend: Gluten-free self-raising flour is the central ingredient, so blends can behave differently depending on their starches and binders. Use the same type specified in the recipe for the closest result.
Salt: Mixing it into the flour distributes the seasoning throughout the dough before the wet ingredients go in.
Mixing and kneading
Yeast water: Lukewarm water helps disperse the yeast; stir it briefly and give it a few minutes before combining it with the flour.
Dough texture: Mix until the dough looks smooth, using a mixer with dough hooks, a food processor or your hands. Gluten-free dough may feel different from wheat dough, so focus on an even, cohesive mixture rather than a stretchy texture.
The short rise
Warm spot: Leave the covered dough somewhere around 25–30°C for about 30 minutes, as directed. The damp tea towel helps stop the surface drying out.
Timing: This is a short rise, not a long proof. Once the half-hour is up, divide and shape the dough rather than waiting for a particular dramatic increase in volume.
Rolling and baking
Thickness: Shape the pitas into circles about 2 cm thick. If rolled too thin, they may not be sturdy enough to cut open after baking.
Doneness: Bake at 225°C for about 10 minutes and look for a golden-brown surface. Let them cool thoroughly before cutting or filling.
Ways to serve them
Fillings: Once cooled, split the pitas and add your preferred fillings, such as salad, cooked vegetables or a protein of your choice.
On the side: They also work alongside soups, dips or a substantial salad. If serving warm, let them cool enough to handle before opening.
Recipe notes & tips
- Measure the water and flour carefully so the dough is manageable.
- Leave the yeast in lukewarm water for a few minutes before mixing.
- Cover the dough with a damp tea towel during its rise to prevent a dry surface.
- Leave enough space between the dough balls to roll them out on the lined tray.
- Keep the pitas close to 2 cm thick so they are easier to split.
- Cool the baked breads thoroughly before cutting them open.
Variations
- Herb dough: Add dried herbs to the flour before mixing for a savoury note.
- Garlic oil: Use garlic-infused olive oil for a gentle garlic flavour.
- Seeded tops: Sprinkle seeds over the rounds before baking for added crunch.
- Sandwich filling: Fill cooled pitas with salad and your favourite protein.
- Dip serving: Cut the cooled breads into wedges and serve with a dip.
Common mistakes to avoid
- Water too hot: Very hot water can harm the yeast; use lukewarm water.
- Dry dough surface: Leaving the dough uncovered can form a skin; use a damp tea towel.
- Crowded tray: Pitas need room for rolling; space the balls out on the parchment.
- Rounds too thin: Thin pitas can be difficult to open; aim for about 2 cm thickness.
- Cutting while hot: The bread can be harder to handle straight from the oven; let it cool thoroughly.
How to store
Once completely cool, store the pitas in an airtight container at room temperature and eat within 1–2 days. Reheat briefly in a warm oven or a dry pan; freeze well wrapped for longer storage.
Frequently asked questions
Can I knead the dough by hand?
Yes. The recipe allows for hand-kneading as an alternative to a food processor or mixer with dough hooks.
How long should the dough rise?
Cover it and leave it in a warm spot at 25–30°C for about 30 minutes.
How thick should I roll the pitas?
Make them about 2 cm thick. The recipe advises against rolling them too thin, so they are easier to cut open.
How do I know when the pitas are done?
Bake for about 10 minutes at 225°C, until the breads are golden brown.
Can I prepare the dough ahead?
The recipe specifies a 30-minute rise and does not give instructions for an extended or overnight rise. For the intended method, shape and bake after that short rise.
Do the pitas need to cool before filling?
Yes. Let them cool thoroughly before cutting them open, as specified in the method.
Cook it from the original
This recipe comes from cookinglife.eu. Their page has the author’s own photos, notes and tips — the best place to cook it from.
Open the recipe on cookinglife.eu