
Chili Garlic Veggie Wraps
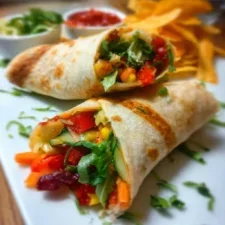
Ingredients
- For the Vegetable Filling: 1 tbsp Olive Oil or Avocado Oil: This is the base for sautéing our vegetables, helping them to cook evenly and not stick to the pan.
- 1 medium Red Onion, thinly sliced: Provides a sweet and slightly pungent foundation of flavor.
- 2 cloves Garlic, minced: An essential aromatic that infuses the entire dish with its savory, pungent character.
- 1 large Red Bell Pepper, thinly sliced: Adds a beautiful vibrant color, a satisfying crunch, and a lovely sweetness.
- 1 large Yellow Bell Pepper, thinly sliced: Complements the red pepper with more color and a milder, fruity sweetness.
- 1 medium Zucchini, julienned or thinly sliced into half-moons: Offers a tender texture and absorbs the surrounding flavors beautifully.
- 1 large Carrot, julienned or grated: Provides a firm texture, a touch of sweetness, and a boost of beta-carotene.
- 2 cups Shredded Cabbage (red or green): Lends a wonderful, hearty crunch and bulk to the filling.
- 1 (15-ounce) can Chickpeas, rinsed and drained: A fantastic source of plant-based protein and fiber, making the wraps substantial and filling.
- 2 tbsp Soy Sauce or Tamari: Adds a deep, savory, umami flavor that ties all the vegetables together.
- 2 tbsp Chili Garlic Sauce (store-bought or homemade): The star of the show, delivering a potent punch of spicy, garlicky, and slightly tangy flavor. Adjust to your preferred heat level.
- 1 tsp Grated Fresh Ginger: Introduces a warm, zesty spice that brightens up the entire dish.
- 1 tbsp Rice Vinegar: A splash of acidity to balance the richness of the soy sauce and the heat of the chili.
- 1/2 tsp Toasted Sesame Oil: Used at the end for its intense, nutty aroma and flavor.
- For the Creamy Yogurt Sauce & Assembly: 4-6 large Flour Tortillas or Wraps (whole wheat, spinach, or gluten-free work well): The vessel for our delicious filling. Choose your favorite!
- 1 cup Plain Greek Yogurt or a dairy-free alternative: Creates a cooling, creamy sauce that perfectly balances the spice of the filling.
- 1 tbsp Fresh Lime Juice: Adds a bright, citrusy tang to the yogurt sauce.
- 1/4 cup Fresh Cilantro, chopped, plus more for garnish: Brings a fresh, herbaceous note to both the sauce and the final wrap.
- 1 cup Fresh Spinach or Mixed Greens: A layer of fresh greens adds nutrients, texture, and a barrier to prevent sogginess.
- 1 medium Avocado, sliced (optional): For extra creaminess, healthy fats, and a luxurious feel.
- Salt and Black Pepper to taste: To season the vegetables and sauce to perfection.
Instructions
- 1
Prepare the Creamy Yogurt Sauce: In a small bowl, combine the Greek yogurt, fresh lime juice, and chopped cilantro. Whisk until smooth and well-incorporated. Season with a pinch of salt and black pepper to your liking. This sauce acts as a perfect cooling counterpoint to the spicy vegetable filling. Set it aside in the refrigerator to allow the flavors to meld together while you prepare the rest of the wrap.
- 2
Sauté the Aromatics and Harder Vegetables: Place a large skillet or wok over medium-high heat. Add the olive oil. Once the oil shimmers, add the thinly sliced red onion and sauté for 2-3 minutes until it begins to soften and become translucent. Add the minced garlic and grated ginger, and cook for another minute until fragrant. Be careful not to burn the garlic. Next, add the harder vegetables: the julienned carrots and sliced bell peppers. Stir-fry for 4-5 minutes. You want them to become crisp-tender, meaning they are cooked but still retain a bit of a bite and their vibrant color.
- 3
Add the Softer Vegetables and Chickpeas: Now, add the zucchini and shredded cabbage to the skillet. Continue to stir-fry for another 3-4 minutes. The cabbage will wilt slightly, and the zucchini will become tender. Add the rinsed and drained chickpeas to the pan, stirring to combine them with the vegetables. Cooking them for a minute or two helps them to warm through and absorb the flavors from the pan.
- 4
Create the Chili Garlic Sauce and Finish the Filling: In a small bowl, whisk together the soy sauce (or tamari), chili garlic sauce, and rice vinegar. Pour this sauce mixture over the vegetables in the skillet. Stir everything together thoroughly, ensuring every piece of vegetable is coated in the glossy, flavorful sauce. Let it bubble and cook for 1-2 minutes, allowing the sauce to thicken slightly and glaze the vegetables. Remove the skillet from the heat and stir in the toasted sesame oil. The aroma at this stage is absolutely incredible. Taste the filling and adjust seasoning if necessary, adding more salt, pepper, or chili garlic sauce to suit your preference.
- 5
Warm the Tortillas: For the best texture and pliability, it’s essential to warm your tortillas. You can do this one by one in a dry skillet over medium heat for about 30 seconds per side, or wrap a stack of tortillas in a damp paper towel and microwave them for 30-45 seconds until they are soft and warm.
- 6
Assemble the Chili Garlic Veggie Wraps: Lay a warm tortilla flat on a clean surface. Spread a generous layer (about 2 tablespoons) of the prepared creamy yogurt sauce down the center of the tortilla, leaving a border around the edges. This sauce will also act as a delicious “glue.” Top the sauce with a handful of fresh spinach or mixed greens. This creates a moisture barrier that helps prevent the wrap from becoming soggy. Spoon a hearty portion of the warm chili garlic vegetable filling over the greens. If using, arrange a few slices of creamy avocado on top of the filling. Garnish with a sprinkle of extra fresh cilantro.
- 7
Fold the Wrap: To fold, bring the bottom edge of the tortilla up and over the filling, tucking it in snugly. Then, fold in the left and right sides. Finally, roll the wrap upwards tightly to form a secure burrito-style wrap. The initial tuck is key to ensuring your filling stays inside.
- 8
Serve Immediately: Slice the wrap in half on a diagonal for a professional-looking presentation that reveals the beautiful, colorful layers inside. Serve immediately while the filling is warm and the tortilla is soft.
Cook it from the original
This recipe comes from betterhomerecipes.com. Their page has the author’s own photos, notes and tips — the best place to cook it from.
Open the recipe on betterhomerecipes.com