
Mini Veggie Spring Rolls
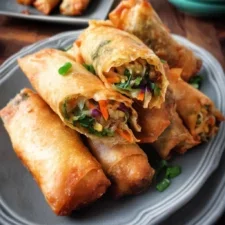
Ingredients
- 1 tbsp Sesame Oil: This isn’t just for cooking; it imparts a deep, nutty, and aromatic flavor that is essential to the filling’s taste profile.
- 2 cloves Garlic, minced: Provides a pungent, savory base note that mellows beautifully when cooked.
- 1 tsp Ginger, freshly grated: Adds a warm, zesty, and slightly spicy kick that brightens the entire filling.
- 2 cups Green Cabbage, finely shredded: Forms the bulk of the filling, offering a subtle sweetness and a tender-crisp texture.
- 1 large Carrot, julienned or finely grated: Lends a beautiful orange color, a touch of sweetness, and a pleasant bite.
- 1/2 cup Mushrooms, finely chopped (Shiitake or Cremini work best): Adds a wonderful earthy, umami depth and a “meaty” texture to the vegetarian filling.
- 4-5 Green Onions, thinly sliced: Provides a mild, fresh onion flavor that complements the other vegetables perfectly.
- 2 tbsp Soy Sauce (or Tamari for gluten-free): The primary source of salt and savory, umami flavor.
- 1 tsp Sugar: A small amount helps to balance the saltiness of the soy sauce and enhance the natural sweetness of the vegetables.
- 1/2 tsp White Pepper: Offers a distinct, earthy heat that is more nuanced than black pepper and is traditional in many Asian cuisines.
- 20-25 Spring Roll Wrappers (approx. 8×8 inch square): These thin sheets of dough are the vessel for our filling. Look for them in the refrigerated or frozen section of most Asian markets or larger grocery stores.
- 1 tbsp Cornstarch mixed with 2 tbsp Water: This simple slurry acts as an edible “glue” to seal the spring rolls tightly, preventing them from opening during cooking.
- Vegetable or Canola Oil, for frying: You’ll need a neutral oil with a high smoke point to ensure the spring rolls become golden and crispy without tasting greasy.
Instructions
- 1
Sauté the Aromatics: Heat the sesame oil in a large wok or skillet over medium-high heat. Once the oil is shimmering, add the minced garlic and grated ginger. Stir-fry for about 30-45 seconds until they become fragrant. Be careful not to let them burn.
- 2
Cook the Vegetables: Add the finely shredded cabbage, julienned carrots, and chopped mushrooms to the wok. Stir-fry for 4-5 minutes. You want the vegetables to become tender-crisp, not mushy. They will shrink down considerably.
- 3
Season the Filling: Pour in the soy sauce and sprinkle with sugar and white pepper. Continue to stir-fry for another 1-2 minutes, allowing the sauce to coat the vegetables evenly and cook off any excess liquid.
- 4
Finish and Cool: Turn off the heat and stir in the sliced green onions. Transfer the entire mixture to a large plate or baking sheet and spread it out in a thin layer. This is a crucial step that allows the filling to cool down completely and for any remaining moisture to evaporate. Do not attempt to wrap the spring rolls while the filling is still warm.
- 5
Prepare the Wrappers: Carefully separate one spring roll wrapper and place it on your work surface in a diamond shape, with one corner pointing towards you. Keep the rest of the wrappers covered with a damp cloth or paper towel to prevent them from drying out and cracking.
- 6
Add the Filling: Place about 1 to 1.5 tablespoons of the cooled vegetable mixture in a horizontal line near the bottom corner of the wrapper. Don’t overfill, or the wrapper will be difficult to roll and may burst.
- 7
The First Fold: Take the bottom corner (the one pointing at you) and fold it up and over the filling, tucking it in snugly.
- 8
Fold the Sides: Fold the left and right corners in towards the center, like you’re folding an envelope. This will create a neat, sealed package.
- 9
Roll it Up: Tightly roll the entire package upwards towards the top corner.
- 10
Seal the Edge: When you have about an inch of the top corner left, dip your finger in the cornstarch slurry and brush it along the edges of that final corner. Finish rolling to seal the spring roll completely. The slurry will act as a glue.
- 11
Repeat: Place the finished spring roll on a separate plate or baking sheet, seam-side down. Repeat the process with the remaining wrappers and filling, making sure to keep the finished rolls from touching each other to prevent sticking.
- 12
Heat about 2-3 inches of vegetable or canola oil in a heavy-bottomed pot or wok to 350-375°F (175-190°C). If you don’t have a thermometer, a small piece of wrapper should sizzle immediately and turn golden in about 30 seconds.
- 13
Carefully place 4-5 spring rolls into the hot oil, making sure not to overcrowd the pot.
- 14
Fry for 3-5 minutes, turning occasionally, until they are deep golden brown and crispy on all sides.
- 15
Use a slotted spoon or spider strainer to remove the cooked spring rolls and let them drain on a wire rack to allow excess oil to drip off. Draining on a wire rack instead of paper towels keeps the bottoms from getting soggy.
- 16
Preheat your air fryer to 400°F (200°C).
- 17
Lightly brush or spray the spring rolls on all sides with a little bit of oil. This is essential for getting that golden, crispy exterior.
- 18
Place the spring rolls in a single layer in the air fryer basket, ensuring they don’t touch. You will likely need to cook in batches.
- 19
Air fry for 8-12 minutes, flipping them halfway through, until they are golden brown and wonderfully crisp.
- 20
Preheat your oven to 425°F (220°C). Line a baking sheet with parchment paper.
- 21
Arrange the spring rolls in a single layer on the prepared baking sheet.
- 22
Brush all sides of the spring rolls generously with oil. This is crucial for them to crisp up in the oven.
- 23
Bake for 15-20 minutes, flipping them over after about 10 minutes, until they are golden brown and crisp to the touch. They may not be as uniformly brown as fried rolls, but they will be delicious.
Cook it from the original
This recipe comes from betterhomerecipes.com. Their page has the author’s own photos, notes and tips — the best place to cook it from.
Open the recipe on betterhomerecipes.com