
Christmas Red Velvet Layered Dessert Recipe
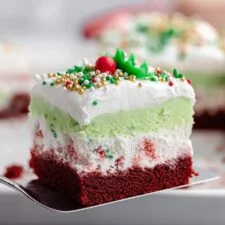
This festive layered dessert combines a chewy red velvet base with peppermint cream cheese, green vanilla pudding and whipped topping. It’s a make-ahead centrepiece for holiday gatherings, finished with colourful sprinkles just before serving.
Ingredients
- 1 boxred velvet cake mix
- 113 g (½ cup)butter, melted
- 1 largeegg
- 454 g (16 ounces)cream cheese
- 60 g (½ cup)icing sugar
- ¼ cup (about 30 g)crushed peppermint sweets
- 60 ml (¼ cup)milk
- 227 g (8 ounces)whipped topping
- 650 ml (2¾ cups), dividedmilk
- 2 boxes (5.1 ounces / about 145 g each)vanilla instant pudding mix
- 5–6 drops, or to desired colourgreen gel food colouring
- 227 g (8 ounces)whipped topping
- to tasteholiday-coloured sprinkles
Instructions
- 1
Heat and prepare
Heat the oven to 180°C (350°F). Grease a 33 × 23 cm (13 × 9 inch) baking pan.
- 2
Mix the base
In a large bowl, combine the red velvet cake mix, melted butter and egg. Beat with an electric mixer until the mixture forms a cookie-like batter; do not follow the cake mix box instructions.
- 3
Bake the base
Spread the batter evenly in the prepared pan and bake for 15 minutes. Remove it from the oven and leave to cool for 30 minutes, until completely cool.
- 4
Make the filling
In a medium bowl, beat the cream cheese and icing sugar together. Add 60 ml (¼ cup) milk, then stir in 227 g (8 ounces) whipped topping and the crushed peppermint sweets until combined.
- 5
Add the filling
Spread the cream cheese mixture evenly over the cooled red velvet base. Refrigerate for 30 minutes to help it set.
- 6
Mix the pudding
In a large bowl, whisk the remaining 590 ml (2½ cups) milk with the two boxes of vanilla instant pudding mix until thickened. Start with 5–6 drops of green gel food colouring and mix, adding more if needed to reach your preferred shade.
- 7
Add the pudding
Spread the green pudding evenly over the cream cheese layer. Refrigerate for at least 2 hours, until set.
- 8
Finish and decorate
When ready to serve, spread the remaining 227 g (8 ounces) whipped topping over the pudding. Finish with holiday-coloured sprinkles.
What is Christmas red velvet layered dessert?
This American-style holiday dessert is assembled in a rectangular pan in distinct layers, giving it the nickname “Christmas lasagna”. It is a festive variation on layered pudding desserts, with red velvet cake mix forming the base and peppermint, green pudding and whipped topping adding seasonal colours and flavours.
Cookie-like base: Butter and egg turn the cake mix into a firmer layer than a standard baked cake. Chilling between layers helps keep the cream cheese and pudding distinct when served.
Nutrition and macros by portion
The nutrition label shows one serving as written: 320 calories, 4g protein, 38g carbs, 16g fat.
| Portion | Adjustment | kcal | Protein | Carbs | Fat |
|---|---|---|---|---|---|
| Lighter | Serve smaller slices | 224 kcal | 3g | 27g | 11g |
| This serving | As written | 320 kcal | 4g | 38g | 16g |
| Hungry | Cut larger slices | 480 kcal | 6g | 57g | 24g |
The red velvet cake mix and pudding provide most of the carbohydrates, while butter, cream cheese and whipped topping contribute much of the fat. Cream cheese and the egg add some protein. Pair a slice with fresh fruit, or serve smaller portions after a meal with a protein-rich option.
Why the base is mixed differently
Cake mix choice: The mix is used as a convenient flavoured base, but its packet directions are not followed. Blending it with melted butter and an egg makes a dense batter that can support the soft layers above.
Cooling matters: Let the baked base cool completely before spreading on the filling. A warm base can soften the cream cheese layer and make the layers harder to keep neat.
Getting a smooth peppermint layer
Cream cheese: Beat it with the icing sugar before adding the milk and whipped topping, so the mixture is easier to spread. If the cream cheese is very cold, allow it to soften slightly first.
Peppermint: Stir the crushed sweets through the filling so their flavour and crunch are spread throughout. Keep the pieces small enough to make the layer easy to slice.
Setting the green pudding
Pudding texture: Whisk the instant pudding with the specified remaining milk until it thickens, then spread it over the chilled cream cheese layer. Chill for at least 2 hours so the pudding firms up before the topping goes on.
Colour control: Begin with 5–6 drops of green gel colouring and mix thoroughly before adding more. Gel colouring can be intense, so increase it gradually to avoid a shade darker than you want.
Making tidy slices
Layer order: Keep the base fully cool and give the cream cheese layer its 30-minute chill before adding pudding. These pauses make the soft layers less likely to blend together.
Serving: Add the final whipped topping and sprinkles shortly before serving for a fresh finish. Use a sharp knife and wipe it between cuts for cleaner portions.
Serving it for a celebration
This rich, sweet dessert suits a holiday table after a meal, where small slices can be served alongside coffee or tea. Its red, green and white layers make it especially suited to Christmas gatherings.
The recipe serves 18, so cut the pan into even portions before serving. Keep the dessert chilled while it waits to be brought to the table.
Recipe notes & tips
- Grease the pan thoroughly so the base is easier to lift out and serve.
- Cool the red velvet base completely before adding the cream cheese mixture.
- Beat the cream cheese and icing sugar until smooth before stirring in the other filling ingredients.
- Add green gel colouring a little at a time and mix well between additions.
- Give the pudding at least 2 hours in the fridge to set before topping.
- Add the sprinkles close to serving so they stay colourful and crisp.
Variations
- Extra peppermint: Add a little more crushed peppermint to the cream cheese layer for a stronger mint flavour.
- Different sprinkles: Use colours to match another celebration or holiday.
- Paler green: Use fewer drops of gel colouring for a softer pudding shade.
- Chocolate finish: Scatter chocolate shavings over the whipped topping instead of sprinkles.
- Individual portions: Assemble the layers in serving glasses, allowing for shorter chilling only if each layer is already firm.
Common mistakes to avoid
- Using a warm base: It can soften the filling; let the base cool completely before layering.
- Skipping the first chill: The cream cheese layer may shift under the pudding; refrigerate it for 30 minutes as directed.
- Adding too much colouring at once: The pudding may become darker than intended; start with 5–6 drops and adjust gradually.
- Serving before the pudding sets: The layers can slump; chill for at least 2 hours.
- Overmixing the peppermint sweets: The filling can lose its little crunchy pieces; fold them in until just combined.
How to store
Cover and refrigerate leftovers, keeping them chilled between servings. For the best texture, eat within 3 days; serve cold rather than reheating.
Frequently asked questions
Can I make this dessert ahead?
Yes. The layered dessert needs at least 2 hours to set, so it suits advance preparation. Add the final whipped topping and sprinkles when you are ready to serve.
How do I know when the pudding layer is set?
After at least 2 hours in the fridge, it should be thick enough to hold its shape beneath the topping. If it still looks loose, chill it for longer.
Can I use liquid food colouring?
The recipe specifies green gel food colouring, which gives you more control over the colour without adding as much liquid. If using another type, add it gradually and check the shade as you mix.
Can I use homemade whipped cream instead of whipped topping?
The recipe is written for prepared whipped topping, which helps keep the layers consistent. Homemade whipped cream may have a different firmness, so the finished dessert may not hold its layers as well.
Can I freeze the layered dessert?
Freezing may change the texture of the cream cheese, pudding and whipped topping layers. Refrigeration is the better choice for storing leftovers.
How should I cut neat portions?
Make sure the dessert is well chilled and use a sharp knife. Wipe the blade between cuts to reduce smearing between the coloured layers.
Cook it from the original
This recipe comes from bakingwithmaya.com. Their page has the author’s own photos, notes and tips — the best place to cook it from.
Open the recipe on bakingwithmaya.com