
No-Bake Cereal Clusters
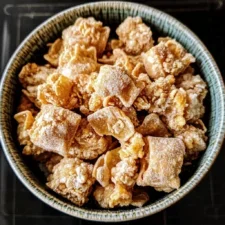
These no-bake cereal clusters combine crunchy toasted oat cereal with a smooth peanut butter and honey mixture, finished with chocolate chips. They are a simple make-ahead treat that sets in the fridge without turning on the oven.
Ingredients
- 120–140 g (4 cups)toasted oat cereal, such as Cheerios or similar
- 250 g (1 cup)creamy peanut butter
- 120 ml (170 g; ½ cup)honey
- 50 g (¼ cup)unsalted butter or coconut oil
- 1 teaspoonvanilla extract
- 85 g (½ cup)semi-sweet chocolate chips
- ¼ teaspoon, optionalsalt
Instructions
- 1
Prepare the tray
Line a large baking sheet or tray with baking parchment or waxed paper, then set it aside.
- 2
Measure the cereal
Put the cereal in a large mixing bowl, leaving enough room to stir in the other ingredients.
- 3
Warm the binders
Add the peanut butter, honey and butter or coconut oil to a medium saucepan. Set it over a medium-low heat.
- 4
Stir until smooth
Stir continuously as the mixture warms, taking care not to scorch it on the bottom of the pan. Once the butter has melted and the mixture is smooth and combined, heat until it just begins to bubble gently at the edges; do not let it boil vigorously.
- 5
Add the flavourings
Take the pan off the heat and immediately stir in the vanilla extract and salt, if using.
- 6
Coat the cereal
Pour the warm peanut butter mixture over the cereal in the mixing bowl.
- 7
Fold together
Use a sturdy spatula or wooden spoon to fold until the cereal is evenly coated, trying not to crush it.
- 8
Stir in chocolate
Gently mix in the chocolate chips. Some may soften in the residual heat and streak through the mixture; to keep them whole, let the mixture cool for a minute or two before adding them.
- 9
Shape the clusters
Drop spoonfuls of mixture onto the prepared tray using a spoon, cookie scoop or clean hands. Lightly grease your hands if the mixture is very sticky, and make the clusters as small or large as you like.
- 10
Chill until firm
Refrigerate the tray for at least 30 minutes, until the clusters have set. For a faster set, place them in the freezer for about 10–15 minutes.
- 11
Store the clusters
Once set, transfer the clusters to an airtight container. Keep them at room temperature for a few days if the kitchen is not too warm, or refrigerate for up to a week for the best freshness and firmness.
What are no-bake cereal clusters?
They are small, chilled treats made by coating cereal in a sweet, nutty mixture and letting it firm up without baking. This version uses toasted oat cereal, peanut butter, honey and chocolate chips.
The approach is a straightforward home-kitchen take on cereal bars and clusters: a warm binder holds crisp cereal together, while refrigeration sets the shape. Keeping the mixture warm rather than boiling helps it stay smooth and easy to mix.
Nutrition and macros by portion
The nutrition label shows one serving as written: 180 calories, 5g protein, 0g carbs, 10g fat.
| Portion | Adjustment | kcal | Protein | Carbs | Fat |
|---|---|---|---|---|---|
| Lighter | Make smaller clusters | 126 kcal | 4g | 0g | 7g |
| This serving | As written | 180 kcal | 5g | 0g | 10g |
| Hungry | Take a larger portion | 270 kcal | 8g | 0g | 15g |
The cereal and honey supply most of the carbohydrates, while peanut butter and butter or coconut oil contribute much of the fat; peanut butter also provides the main protein. Balance a cluster or two with fresh fruit or plain yoghurt for a more rounded snack.
Choosing the cereal and binder
Cereal: Toasted oat rings give these clusters a mild, grainy crunch. Corn flakes, rice crispies or a mixture can also be used, though the shape and texture will vary.
Binder: Creamy peanut butter and honey coat the cereal and bring the clusters together. Almond, cashew or sunflower seed butter can replace the peanut butter; maple syrup or agave can stand in for honey, with a different flavour.
Keep the mixture gentle
Low heat: Warm the peanut butter, honey and butter or coconut oil over medium-low heat, stirring all the while. Stop once the mixture is smooth and just bubbling at the edges; a rolling boil is not needed.
Careful folding: Use a sturdy spatula or wooden spoon to coat the cereal without crushing it. A large bowl makes this easier and helps keep the cereal contained.
When to add the chocolate
Warm mixture: Adding the chips straight away may soften some of them and leave chocolatey streaks through the clusters. This gives a more blended finish.
Whole chips: For more distinct chocolate pieces, wait a minute or two after combining the warm binder with the cereal, then fold in the chips gently.
Shape and set
Even portions: A cookie scoop makes similarly sized clusters, while a spoon gives a more relaxed shape. Lightly greased hands can help if the mixture sticks when shaping.
Firmness: Refrigerate for at least 30 minutes, checking that the clusters feel set before transferring them. The freezer can shorten the setting time to about 10–15 minutes.
Serving and timing
The listed total time is 45 minutes, including the minimum 30-minute chill. Plan on a little extra time if the clusters are large or your fridge is crowded.
Serve them as a sweet snack or alongside fruit and plain yoghurt. Let chilled clusters sit briefly at room temperature if you prefer them less firm.
Recipe notes & tips
- Use a large bowl so you can fold the cereal into the binder without spilling.
- Stir the saucepan continuously to reduce the risk of scorching.
- Keep the heat low and remove the pan once the mixture is smooth and gently bubbling at the edges.
- Fold rather than beat the cereal to preserve its crunch.
- Let the mixture cool briefly before adding chocolate chips if you want them to stay whole.
- Use a cookie scoop for clusters of a more even size.
Variations
- Change the cereal: Use corn flakes, rice crispies or a mixture for a different crunch.
- Swap the nut butter: Try almond, cashew or sunflower seed butter instead of peanut butter.
- Change the sweetener: Use maple syrup or agave nectar in place of honey for a different flavour.
- Choose another chocolate: Use milk, dark or white chocolate chips instead of semi-sweet.
- Use coconut oil: Replace the butter with coconut oil for a dairy-free version.
- Add salt: Include the optional salt when both the peanut butter and butter are unsalted.
Common mistakes to avoid
- Boiling the binder: High heat can make it scorch; keep the pan over medium-low heat and stop at gentle bubbles around the edges.
- Crushing the cereal: Vigorous stirring breaks up the pieces; fold gently with a sturdy spoon or spatula.
- Adding chips too early: The residual warmth can melt them; let the mixture cool for a minute or two if you want whole chips.
- Skipping the lining: Clusters may stick to the tray; cover it with baking parchment or waxed paper first.
- Chilling for too little time: Soft clusters can fall apart when moved; refrigerate for at least 30 minutes or freeze for 10–15 minutes.
How to store
Keep the set clusters in an airtight container at room temperature for a few days if the kitchen is cool, or refrigerate for up to a week. For a firmer texture, serve them straight from the fridge; they can soften if left somewhere warm.
Frequently asked questions
Can I use a different cereal?
Yes. Corn flakes, rice crispies or a mixture can replace the toasted oat cereal. The clusters may have a different texture or shape.
How do I keep the chocolate chips whole?
After coating the cereal, wait a minute or two before folding in the chips. The mixture will still be warm, so stir gently.
How long do the clusters need to chill?
Refrigerate them for at least 30 minutes, until firm. For a quicker set, put the tray in the freezer for about 10–15 minutes.
Can I make these dairy-free?
Use coconut oil in place of the butter and check that your chocolate chips are dairy-free. The recipe also allows sunflower seed butter instead of peanut butter.
Why are my clusters too sticky to shape?
The mixture can be sticky before it chills. Use a spoon or cookie scoop, or lightly grease your hands before shaping.
How should I store them?
Keep them in an airtight container. They last for a few days at room temperature in a cool kitchen, or up to a week in the fridge.
Cook it from the original
This recipe comes from betterhomerecipes.com. Their page has the author’s own photos, notes and tips — the best place to cook it from.
Open the recipe on betterhomerecipes.com