
No-Fry Honey-Sesame Chicken
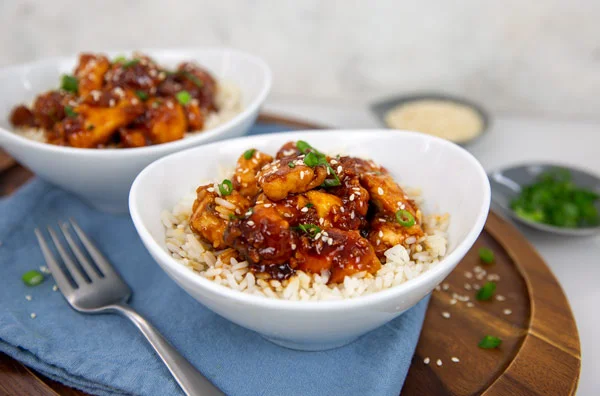
This no-fry honey-sesame chicken pairs crisp, oven-baked chicken with a sweet, savoury and tangy sauce. It makes a crowd-pleasing meal served over cooked rice, without needing to deep-fry the chicken.
Ingredients
- 60 g (1 cup)Kikkoman gluten-free panko-style coating
- 680 g (1½ pounds)boneless, skinless chicken breasts
- 120 ml (½ cup)mayonnaise
- to tastegluten-free non-stick cooking spray
- 80 ml (⅓ cup)Kikkoman gluten-free soy sauce
- 80 ml (⅓ cup)honey
- 80 ml (⅓ cup)ketchup
- 3 tablespoonsbrown sugar
- 2 tablespoonsKikkoman rice vinegar
- 2 teaspoonsKikkoman sesame oil
- 2 teaspoonscornflour
- 2 teaspoonsvegetable oil
- 1 teaspoonminced garlic
- 1 tablespoonwhite sesame seeds
- 1green onion, thinly sliced
- to servecooked rice
Instructions
- 1
Prepare the oven
Heat the oven to 200°C. Line a baking tray with baking parchment.
- 2
Toast the coating
Toast the panko in a dry frying pan over a medium heat until lightly golden. Leave it to cool.
- 3
Coat the chicken
Cut the chicken into 2.5 cm pieces. Put the mayonnaise in a mixing bowl, add the chicken and toss to coat. Toss the chicken in the toasted panko until well covered, then arrange the pieces with space between them on the prepared tray. Spray with cooking spray and bake for 15 minutes.
- 4
Mix the sauce
While the chicken bakes, whisk the soy sauce, honey, ketchup, brown sugar, rice vinegar, sesame oil and cornflour together in a mixing bowl.
- 5
Cook and serve
Heat the vegetable oil in a large pan over a medium heat. Add the garlic and cook for 30 seconds. Pour in the soy sauce mixture and bring it to a simmer; cook for 3–4 minutes, until heated through and thickened. Add the chicken and stir to coat. Finish with sesame seeds and green onion, and serve over rice.
What is honey-sesame chicken?
Honey-sesame chicken is a sweet-and-savoury chicken dish associated with Chinese-American and wider Asian-inspired restaurant cooking. This version uses a glossy soy, honey and sesame sauce with a tang from rice vinegar and ketchup.
Rather than deep-frying, the chicken is coated in mayonnaise and crisp panko, then baked. Toasting the crumbs first helps them colour in the oven, while the sauce brings the finished pieces together.
Nutrition and macros by portion
The nutrition label shows one serving as written: 501 calories, 27g protein, 47g carbs, 23g fat.
| Portion | Adjustment | kcal | Protein | Carbs | Fat |
|---|---|---|---|---|---|
| Lighter | Use less mayonnaise | 351 kcal | 19g | 33g | 16g |
| This serving | As written | 501 kcal | 27g | 47g | 23g |
| Hungry | Add extra rice | 752 kcal | 41g | 71g | 35g |
The rice, panko, honey and brown sugar contribute most of the carbohydrates, while mayonnaise and the cooking oils supply much of the fat. Chicken provides most of the protein. Serve with a generous portion of vegetables alongside the rice and chicken to make the meal more balanced.
Why toast the panko first?
Dry crumbs: Toast the panko in a dry pan until lightly golden, stirring or moving it around so it colours evenly. Let it cool before coating the chicken.
Even coating: Cut the chicken into similarly sized 2.5 cm pieces and space them apart on the tray. This gives the pieces room to bake rather than steam against one another.
Getting the coating to stick
Mayonnaise: Tossing the chicken in mayonnaise gives the panko a surface to cling to. Coat each piece well before transferring it to the crumbs.
Gentle handling: Roll or turn the chicken in the toasted panko instead of pressing hard. A light spray of cooking oil helps the crumb coating bake up more evenly.
How to thicken the sauce
Whisk first: Combine the sauce ingredients with the cornflour before heating, whisking until the mixture looks smooth. This helps avoid lumps as it thickens.
Simmer gently: Add the sauce mixture to the pan with the garlic and bring it to a simmer. Cook for 3–4 minutes, until it is heated through and thickened, then stir in the chicken to coat.
Checking the chicken
Size matters: Pieces cut to about 2.5 cm will cook more evenly than a mixture of large and small chunks. Keep them spaced out on the tray.
Doneness: The method gives a 15-minute bake, but the safest check is that the chicken is cooked through before it goes into the sauce. If needed, continue baking until done.
Serving ideas
Rice base: Serve the coated chicken over cooked rice so it can catch the glossy sauce. A plain rice base balances the sweet, salty and tangy flavours.
Fresh finish: Scatter over the sesame seeds and sliced green onion just before serving. Add a simple vegetable side if you want more colour and crunch on the plate.
Recipe notes & tips
- Toast the panko until just lightly golden, as it will continue to colour while baking.
- Let the toasted panko cool before using it to coat the chicken.
- Cut the chicken into evenly sized pieces for more consistent baking.
- Leave space between the chicken pieces on the baking tray.
- Whisk the cornflour thoroughly into the sauce ingredients before heating.
- Add the sesame seeds and green onion just before serving for a fresh finish.
Variations
- Add heat: Stir chilli flakes into the sauce for a spicy edge.
- Use chicken thighs: Cut boneless, skinless thighs into similar-sized pieces and cook until done.
- Add vegetables: Serve with steamed broccoli or stir-fried vegetables alongside the rice.
- Try extra ginger: Add a little minced fresh ginger with the garlic.
- Make it less sweet: Reduce the honey or brown sugar to suit your taste.
Common mistakes to avoid
- Skipping the panko toast: The crumbs may stay pale; toast them first until lightly golden.
- Crowding the tray: The chicken can steam instead of crisping; space the pieces apart.
- Uneven chicken pieces: They may finish cooking at different times; cut them to a similar size.
- Lumpy sauce: Cornflour can clump if added to hot liquid; whisk it into the sauce mixture before heating.
- Adding the chicken too early: The coating can soften in the sauce; toss it in once the sauce has thickened.
How to store
Refrigerate leftovers in an airtight container for up to 3 days. Reheat thoroughly in a pan or microwave; the panko coating will soften after it has been stored in the sauce. Store rice separately if possible.
Frequently asked questions
Can I use regular panko?
Yes, regular panko can replace the gluten-free coating if you do not need the dish to be gluten-free. Check the labels on the other ingredients too if gluten avoidance matters.
Can I make the chicken ahead?
You can toast the panko and mix the sauce ingredients ahead of time. For the best texture, bake the chicken and combine it with the sauce shortly before serving.
How do I know when the sauce is thick enough?
After 3–4 minutes of simmering, it should be heated through and thickened enough to coat the back of a spoon. Stir it as it cooks so it thickens evenly.
Can I use chicken thighs instead of breasts?
Yes. Cut boneless, skinless thighs into pieces of a similar size and make sure they are cooked through before coating them in the sauce.
Can I serve it without rice?
Yes. Serve the chicken with another cooked grain or with vegetables instead. Rice is the suggested accompaniment, but the sauce also works with other simple sides.
Cook it from the original
This recipe comes from glutenfreeandmore.com. Their page has the author’s own photos, notes and tips — the best place to cook it from.
Open the recipe on glutenfreeandmore.com