
Gluten-Free Christmas Cupcakes in a Jar
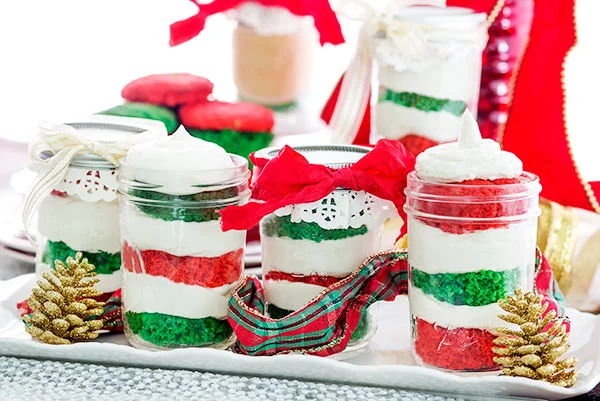
These gluten-free cupcakes are baked in festive red and green, then layered with vanilla frosting in jars for a portable Christmas dessert. The jars make the layers easy to see and are handy for gifting or serving at a holiday gathering.
Ingredients
- 1 cangluten-free non-stick cooking spray
- 2 packages (323 g each)Swerve Sweets Vanilla Cake Mix
- 6 largeeggs
- 160 mlvegetable oil
- 160 mlwater
- 45 ml, dividedpure vanilla extract
- A few dropsred food colouring gel
- A few dropsgreen food colouring gel
- 340 gvegetable shortening
- 540 gSwerve Confectioners
- 45–90 mldairy-free milk
- 12wide-mouth pint canning jars and lids
Instructions
- 1
Preheat the oven
Heat the oven to 175°C. Spray 18 standard muffin cups thoroughly with the gluten-free cooking spray.
- 2
Mix and bake
In a large mixing bowl, combine the cake mixes, eggs, vegetable oil, water and 30 ml of the vanilla. Mix well, then divide the batter equally between two bowls. Colour one portion red and the other green, stirring a few drops of gel into each. Divide the red batter between 9 prepared muffin cups and the green batter between the other 9. Bake for 15–20 minutes, until a toothpick inserted in the centre comes out clean. Cool in the pans for 10 minutes, then transfer the cupcakes to a wire rack to cool completely.
- 3
Make the frosting
Put the shortening and Swerve Confectioners in the bowl of an electric mixer, preferably fitted with a paddle attachment. Beat until combined, scraping down the sides of the bowl as needed. Beat in the remaining 15 ml of vanilla. Add the dairy-free milk 15 ml at a time until the frosting is smooth and spreadable.
- 4
Layer the jars
Cut the cooled cupcakes in half horizontally. In each jar, layer half a cupcake of one colour, frosting, a cupcake layer of the other colour, more frosting, then another half cupcake matching the first layer. If there is space, finish with frosting. Repeat until the cupcakes and frosting have been used.
- 5
Close and decorate
Screw the lids onto the jars and decorate as desired.
What are cupcakes in a jar?
Cupcakes in a jar are individual desserts assembled in layers rather than served as whole frosted cakes. This version uses the familiar American cupcake format, with red and green cake and vanilla frosting arranged in wide-mouth canning jars.
The coloured layers give the dessert its Christmas look, while the jar keeps the portions together for serving or packing. A gluten-free cake mix and dairy-free milk in the frosting help meet the recipe's specified ingredient choices.
Nutrition and macros by portion
The nutrition label shows one serving as written: 600 calories, 5g protein, 43g carbs, 46g fat.
| Portion | Adjustment | kcal | Protein | Carbs | Fat |
|---|---|---|---|---|---|
| Lighter | Use less frosting | 420 kcal | 4g | 30g | 32g |
| This serving | As written | 600 kcal | 5g | 43g | 46g |
| Hungry | Add another cupcake layer | 900 kcal | 8g | 65g | 69g |
The cake mix and sugar substitute provide most of the carbohydrate, while the vegetable oil and shortening account for much of the fat. Eggs add some protein, though the dessert is not a major protein source. Serve a jar alongside fresh fruit or after a meal with a protein-rich main course for a more balanced plate.
Colouring the batter
Even division: split the batter into two equal portions before colouring so you have a similar amount of each shade. Add the gel a few drops at a time and stir until the colour is evenly distributed.
Separate pans: keep the red and green batters in separate muffin cups. This makes it easier to build distinct colours into the jar layers.
Getting the frosting consistency right
Start mixing: beat the shortening and confectioners sweetener until they are combined, scraping the bowl so no dry mixture remains at the edges. Add the vanilla before adjusting the texture with milk.
Add milk gradually: begin with 15 ml and continue in 15 ml additions until the frosting is smooth and spreadable. The recipe gives a range of 45–90 ml, so stop when it is easy to layer without being runny.
Checking the cupcakes for doneness
Toothpick cue: test a cupcake in the centre after 15 minutes. It is ready when a toothpick inserted in the middle comes out clean; if it does not, continue baking and check again within the stated 15–20-minute window.
Cool completely: leave the cupcakes in their pans for 10 minutes, then move them to a wire rack. Cooling fully before cutting helps the halves keep their shape and prevents the frosting from softening.
Building neat layers
Cut horizontally: use a steady hand to split each cupcake into two layers. Keep the halves paired so the colour sequence is easier to repeat.
Layer gently: place the cake in the jar without pressing it down hard, then add frosting and alternate colours as directed. Leave room at the top if you want to finish with a frosting layer and fit the lid.
Planning the timing
The stated total time is 60 minutes, but the cupcakes need time to cool before assembly. Allow them to cool completely on the rack before cutting and layering, so the frosting stays spreadable.
You can make the cupcakes first and assemble the jars once they are cool. Have the jars, lids and frosting ready before you start layering.
Serving the jars
These jars can be served as individual desserts at a Christmas meal or set out for guests to take away. A spoon makes it easy to reach the cake and frosting layers together.
For a less sweet plate, serve a jar after a meal with fresh fruit alongside. Keep the lids on until serving if the jars are being transported or held for later.
Recipe notes & tips
- Measure the dairy-free milk in small additions so the frosting does not become too loose.
- Use a wide-mouth jar to make layering the cupcake halves easier.
- Let the cupcakes cool fully before slicing them horizontally.
- Keep the red and green cupcakes separate as they cool to make colour selection straightforward.
- Scrape down the mixer bowl while making the frosting to incorporate the shortening and sweetener evenly.
Variations
- Change the colours: use different food colouring gels to suit another celebration.
- Add a topping: finish the top frosting layer with a small amount of festive sprinkles.
- Use a different extract: replace some of the vanilla with another flavouring that pairs well with the cake.
- Make smaller jars: assemble the layers in smaller jars and adjust the amount in each to fit.
- Vary the layers: alternate the colours in a different order while keeping the frosting between cake layers.
Common mistakes to avoid
- Uneven colouring: add gel a few drops at a time and stir thoroughly before adding more.
- Overbaking: start checking at 15 minutes and remove the cupcakes when a toothpick comes out clean.
- Warm cupcakes: cool them fully before cutting so the cake is less likely to crumble and the frosting stays firm.
- Runny frosting: add the milk gradually and stop once the frosting is smooth and spreadable.
- Crowded jars: leave room for the lid and skip the optional final frosting layer if needed.
How to store
Close the jars with their lids and refrigerate them for up to 3 days. Let a jar stand briefly at room temperature before serving so the frosting is easier to scoop; do not reheat.
Frequently asked questions
Can I make the cupcakes ahead of time?
Yes. Bake the cupcakes ahead and let them cool completely before storing or assembling the jars. Add the frosting and layers once the cupcakes are cool.
How do I know when the cupcakes are baked?
Insert a toothpick into the centre of a cupcake. It should come out clean; the recipe gives a baking time of 15–20 minutes.
Can I use a hand mixer for the frosting?
Yes. The recipe prefers an electric mixer with a paddle attachment, but a hand mixer can also beat the shortening and confectioners sweetener together. Scrape down the bowl as you mix.
How much dairy-free milk should I add?
The recipe calls for 45–90 ml. Add it a tablespoon at a time and stop when the frosting is smooth and spreadable.
Do I have to add frosting on top?
No. The final frosting layer is optional if there is room in the jar. You can close the jar after the last cupcake layer instead.
Can I transport the jars?
Yes. Screw the lids on securely before transporting them, and keep the jars chilled until serving.
Cook it from the original
This recipe comes from glutenfreeandmore.com. Their page has the author’s own photos, notes and tips — the best place to cook it from.
Open the recipe on glutenfreeandmore.com