
Roman white pizza
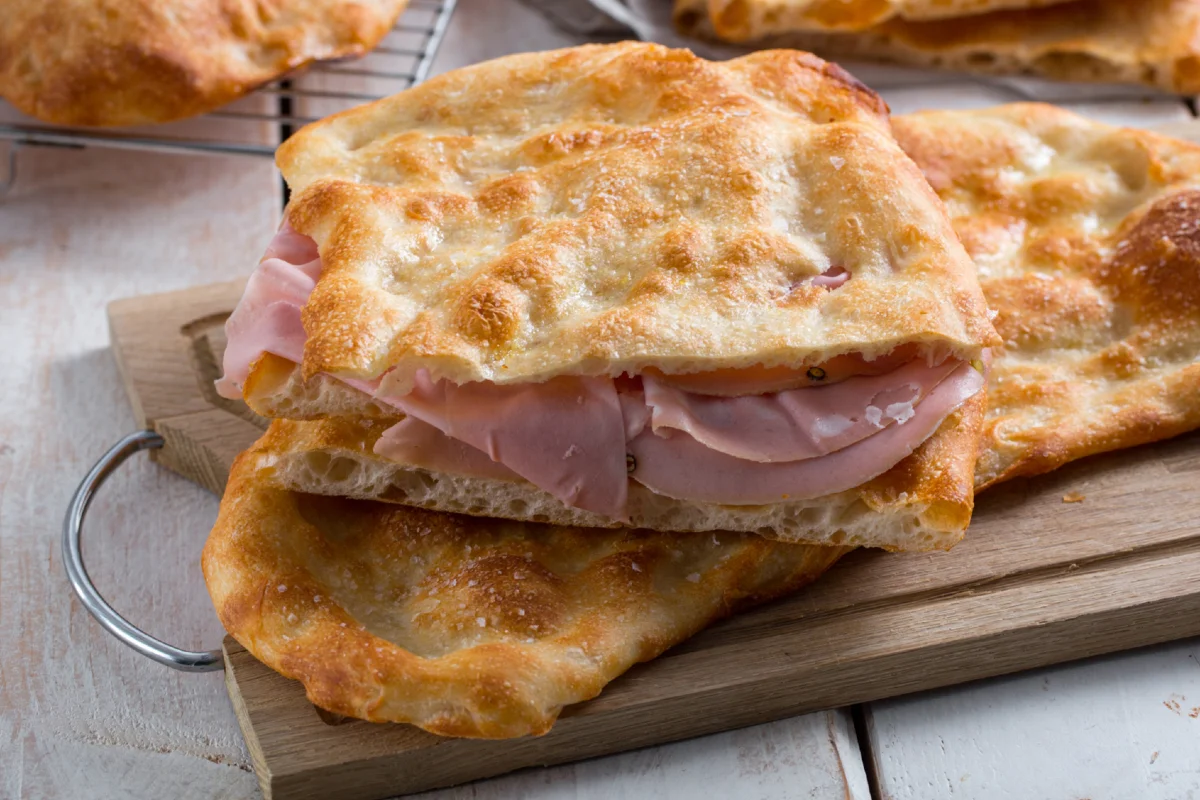
Roman white pizza is a crisp, airy flatbread made from a high-hydration dough, baked plain and finished with olive oil and flaky salt. Its long cold rest develops flavour and makes it a good base for mortadella or other fillings.
Ingredients
- 1 kgstrong white flour, type 0 (W 350)
- 750 gcold water
- 20 gfine salt
- 6 gfresh baker’s yeast
- as neededextra-virgin olive oil
Instructions
- 1
Mix flour and water
Use well-chilled water. Put the flour in a bowl, add 650 g of the cold water and mix slowly with a wooden spoon until all the flour is hydrated and the dough looks rough.
- 2
Rest and add yeast
Cover the flour-and-water mixture with a cloth and leave it for 30 minutes. Crumble in the fresh yeast.
- 3
Add water and salt
Gradually pour in almost all the remaining cold water, then add the salt and mix it in thoroughly. Move the dough to the work surface if needed and slowly incorporate the rest of the cold water, then knead again.
- 4
Work the dough
Once the water is absorbed, the dough will be sticky; do not add flour. Lift it with both hands and slap it onto the work surface, turning it and repeating 3–4 times.
- 5
Fold in the bowl
When the dough forms a smooth ball, return it to the bowl, cover with a cloth and leave for 10 minutes. Dampen your hands, lift one edge of the dough into the centre, and repeat around the dough in four places.
- 6
Repeat and stretch
Turn the dough so the seam is underneath. Repeat the folds three times, leaving 5–10 minutes between each round. Then lightly wet your hands and the work surface, turn out the dough and stretch it into a very thin rectangle, thin enough to see through.
- 7
Fold into a parcel
Bring the edges of the stretched dough gradually into the centre, as if folding a handkerchief.
- 8
Seal and chill
Bring all the edges to the centre and turn the dough seam-side down onto the work surface. Shape it to seal the seam, then cover the bowl with cling film and leave the dough at room temperature for 1 hour. Refrigerate for 24 hours.
- 9
Divide the dough
Take the dough out of the fridge, turn it onto the work surface and cut it into 6 portions of about 280 g each. Shape each portion into a rectangle.
- 10
Shape the rolls
Fold each portion without overworking it to make a sealed roll. Pinch the seam closed.
- 11
Prove the rolls
Keep the seam against the work surface and roll each piece towards you with a circular motion to seal it further. Put the rolls seam-side down in a well-oiled container, oil their tops and leave them to prove for 90 minutes, until doubled in volume.
- 12
Shape the pizzas
Meanwhile, heat the oven to its highest setting with an upturned baking tray inside. Coat the work surface and each roll generously with oil. Gently pull the edges and press along the dough with your index, middle and ring fingers to form elongated dimples. Sprinkle with flaky salt.
- 13
Bake until crisp
Carefully lift each pizza onto the hot tray and brush the top with more oil. Bake at the oven’s highest setting in conventional mode for about 8 minutes. Transfer the pizza to the oven rack and bake for another 3 minutes at the same temperature on the fan setting, until golden and crisp. Leave it to dry on the rack, then serve plain or filled as you like.
What is Roman white pizza?
Roman white pizza, or pizza bianca, is an Italian bakery-style flatbread usually served without tomato. It can be eaten on its own or split and filled, often with mortadella.
This version relies on a wet dough, a long refrigerated rest and a very hot bake. Those stages help create an open, tender crumb beneath a crisp, well-browned surface.
Nutrition and macros by portion
The nutrition label shows one serving as written: 700 calories, 20g protein, 125g carbs, 13g fat.
| Portion | Adjustment | kcal | Protein | Carbs | Fat |
|---|---|---|---|---|---|
| Lighter | Use less olive oil | 490 kcal | 14g | 88g | 9g |
| This serving | As written | 700 kcal | 20g | 125g | 13g |
| Hungry | Add mortadella filling | 1050 kcal | 30g | 188g | 20g |
Most of the carbohydrates come from the flour, while the olive oil supplies most of the fat; the flour provides the bulk of the protein. Pair a portion with a generous salad or vegetables, and add a protein-rich filling if serving it as a main meal.
Choosing the flour and water
Strong flour: the W 350 flour specified here is suited to a dough that needs to hold a high proportion of water and withstand a long rest.
Cold water: chilling the water helps keep the dough cool as it is mixed. Add it gradually, since adding it all at once makes this sticky dough harder to handle.
Building strength without extra flour
Autolysis: the initial 30-minute rest of flour and water gives the dough time to begin developing structure before the yeast and salt go in.
Folds: slap-and-folds and the repeated folds in the bowl help organise the dough. Wet your hands lightly instead of adding flour, which would change the dough’s hydration.
The thin stretch and seal
Lamination: stretch the dough as thinly as you can without tearing it, until light can show through. Fold the edges into the centre to gather it back into a parcel.
Seam: keep the closure underneath while shaping and proving, and pinch it firmly shut. A well-sealed dough ball is easier to handle when you stretch it for baking.
Allow time for proving
Room-temperature rest: after shaping the large dough ball, leave it covered for 1 hour before refrigerating it for 24 hours.
Final prove: after dividing and shaping, the rolls need 90 minutes in an oiled container. Look for dough that has doubled in volume rather than relying on the clock alone.
Bake for a crisp finish
Hot surface: heating the upturned tray while the oven reaches its highest setting gives the dough a properly hot base as soon as it goes in.
Two-stage bake: start on the tray in conventional mode for about 8 minutes, then finish on the rack for 3 minutes with the fan setting. The rack helps the base dry and crisp.
Serving ideas
Plain: serve the pizza warm, with its olive-oil finish and flakes of salt, as a snack or alongside a meal.
Filled: let it cool enough to handle, then split it and add mortadella. Keep fillings simple so the bread’s crisp crust and airy middle remain easy to enjoy.
Recipe notes & tips
- Chill the water ahead of time so it is cold when you start mixing.
- Keep the dough covered during rests to prevent its surface from drying out.
- Use lightly damp hands for the folds instead of dusting the dough with flour.
- Oil the container and the dough surface well before the final prove to help prevent sticking.
- Heat the upturned tray thoroughly before baking the first pizza.
- Let baked pizzas rest directly on the oven rack so steam can escape from underneath.
Variations
- Mortadella filling: split the baked pizza and fill it with mortadella before serving.
- Plain snack: serve it warm without a filling to enjoy the olive oil and flaky salt.
- Herb finish: scatter chopped rosemary over the oiled dough before baking.
- Garlic oil: brush the surface with garlic-infused olive oil before it goes into the oven.
- Cheese filling: add a few slices of mild cheese after baking, while the bread is still warm.
Common mistakes to avoid
- Adding all the water at once: the dough becomes difficult to manage, so incorporate it gradually.
- Adding flour to sticky dough: this changes its hydration; use damp hands and continue with the folds instead.
- Skipping the rests: the dough needs its stated resting and proving times to develop and rise.
- Stretching too forcefully: pulling hard can tear the thin dough, so ease it out gently from the edges.
- Using a cool tray: the base may not crisp properly, so preheat the upturned tray with the oven.
- Leaving the pizza on the tray after baking: transfer it to the rack so the underside can dry.
How to store
Keep cooled pizza in an airtight container at room temperature for up to 1 day, or refrigerate for up to 2 days. Reheat on a hot baking tray or in a hot oven until warmed through and crisp; avoid sealing it away while still warm, as trapped steam softens the crust.
Frequently asked questions
Can I make the dough without a stand mixer?
Yes. The method is designed around mixing by hand, with slap-and-folds and folds in the bowl helping to build strength.
Why is the dough so sticky?
It contains a high proportion of water, which helps give the finished bread its airy texture. Resist adding flour and use lightly damp hands when handling it.
Can I skip the 24-hour fridge rest?
The recipe includes this long cold rest as part of the dough’s development. Skipping it would change the timing and result, so plan ahead if possible.
How do I know when the rolls are ready to bake?
After their 90-minute prove, they should have doubled in volume. If they have not, allow them more time rather than shaping them straight away.
What if my oven does not have a fan setting?
The recipe uses the fan setting for the final 3 minutes to help crisp and brown the pizza. If your oven lacks one, continue in conventional mode and watch the colour closely.
Can I freeze the baked pizza?
Yes. Cool it completely, wrap it well and freeze it. Reheat from frozen in a hot oven until crisp and hot through.
Cook it from the original
This recipe comes from giallozafferano.es. Their page has the author’s own photos, notes and tips — the best place to cook it from.
Open the recipe on giallozafferano.es