
"Candy Corn" Halloween Treat
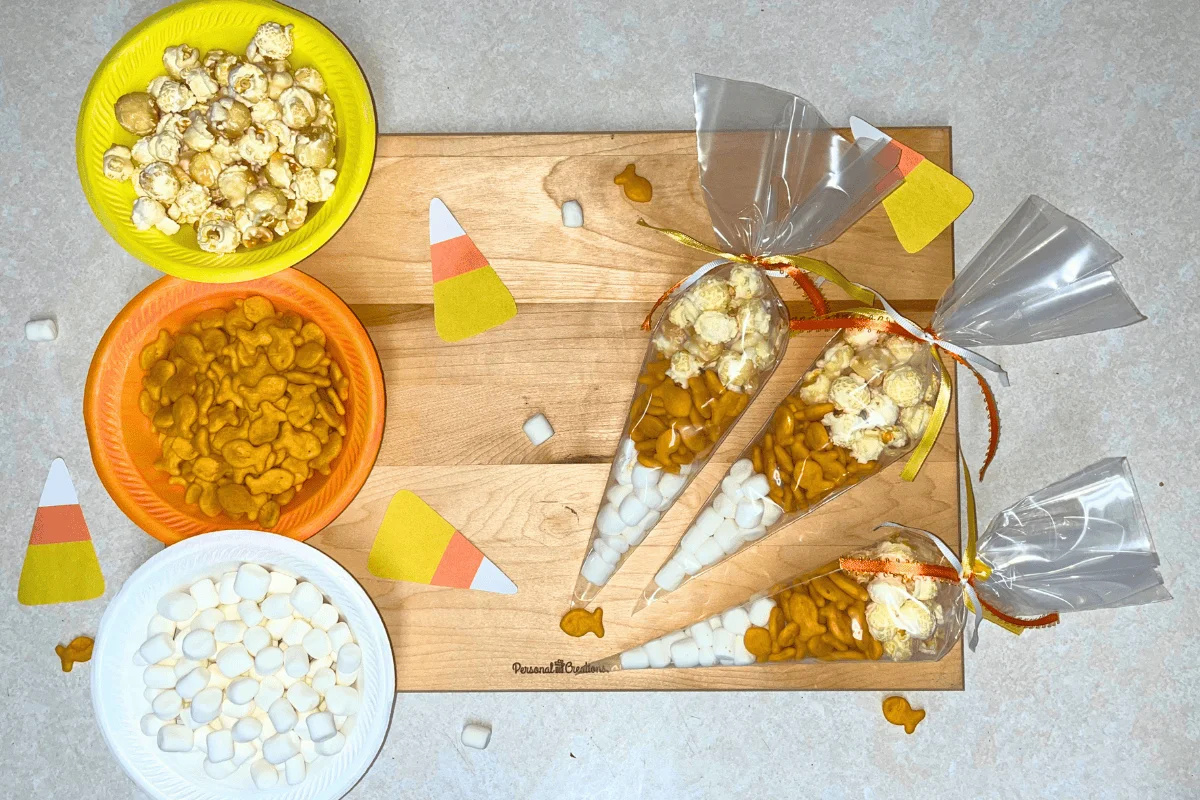
These no-bake Halloween treat bags layer mini marshmallows, Goldfish crackers and sweet-and-salty popcorn in candy-corn colours. They are quick to assemble for a party, classroom celebration or individually portioned snack.
Ingredients
- 1 bagmini marshmallows
- 2 bagsGoldfish crackers
- 1 bagsweet-and-salty popcorn
Instructions
- 1
Gather everything
Set out all the ingredients and the materials you will use to fill and close the bags.
- 2
Sort the snacks
Prepare the white, orange and yellow snack items for their separate layers.
- 3
Add marshmallows
Put the mini marshmallows into a bag first, filling the top 1–2 inches.
- 4
Layer the crackers
Add Goldfish on top of the marshmallows, filling the next 2–3 inches.
- 5
Add popcorn
Pile the popcorn on top of the Goldfish, filling the next 2–3 inches.
- 6
Tie the bag
Once all three snack layers are in the bag, close the end with a twist tie or string.
- 7
Finish decorating
Add ribbon, string or a festive note to finish the treat bag.
What is a candy-corn treat bag?
Candy corn is a familiar American Halloween sweet, and its white, orange and yellow bands inspire the look of these snack bags. This version uses marshmallows, Goldfish crackers and popcorn to echo the colours without making a batch of sweets from scratch.
The layers do the decorating for you, so clear bags make the effect easiest to see. The recipe is also simple to assemble in batches for a party or seasonal gathering.
Nutrition and macros by portion
The nutrition label shows one serving as written: 296 calories, 4g protein, 51g carbs, 10g fat.
| Portion | Adjustment | kcal | Protein | Carbs | Fat |
|---|---|---|---|---|---|
| Lighter | Use smaller treat bags | 207 kcal | 3g | 36g | 7g |
| This serving | As written | 296 kcal | 4g | 51g | 10g |
| Hungry | Make a fuller bag | 444 kcal | 6g | 77g | 15g |
The popcorn and marshmallows contribute most of the carbohydrates, while the crackers and popcorn provide much of the fat; the Goldfish add some protein. Pair a treat bag with fruit or a more substantial savoury option if you want a more balanced snack.
Choose clear bags
Bag size: use bags with enough room for three visible layers and a little space at the top for tying. If the bags are too small, the snacks may compress and the colour bands will be harder to distinguish.
Materials: have your twist ties, string or ribbon ready before filling. This keeps the open bags from sitting around while you search for a way to close them.
Keep the layers distinct
White layer: add the marshmallows first and fill the top 1–2 inches as directed. A gentle shake can help them settle into a neat band.
Orange and yellow layers: add the Goldfish next, followed by the popcorn, filling 2–3 inches for each. Pour slowly so the snacks stay in their own sections rather than mixing.
Work gently
Fill: pour the snacks rather than pushing them down; pressing can crush the crackers and popcorn. If a layer looks uneven, lightly tap the bottom of the bag on the work surface to settle it.
Close: leave enough space above the top layer to gather the bag securely. Tie it snugly without squeezing the snacks.
Make them ahead
Assembly: the bags take little hands-on time, and the layering is straightforward enough to do shortly before serving. Decorating after tying helps keep ribbons and notes away from loose snacks.
Timing: prepare them close to the event for the freshest popcorn texture. Keep the finished bags sealed until they are ready to hand out.
Serve as a party snack
These bags work as individual grab-and-go treats at a Halloween party or as part of a snack table. For a fuller spread, pair them with fresh fruit or savoury options that are not already represented by the crackers and popcorn.
Because each bag is a mix of sweet and salty snacks, serve them as a treat rather than as the only food at a gathering.
Recipe notes & tips
- Use clear bags so the three colour bands are easy to see.
- Keep the snack bags upright while filling to help the layers stay level.
- Pour each snack slowly to reduce mixing between colours.
- Prepare the ties and decorations before you start assembling the bags.
- Check that the popcorn has cooled before bagging it if it was freshly prepared.
Variations
- Use orange crackers: swap in another orange-coloured cracker if you want a different crunch.
- Change the popcorn: choose a different sweet-and-salty popcorn to suit the snacks you have.
- Add a note: attach a festive message to personalise each bag.
- Try a different tie: finish with seasonal ribbon or coloured string.
- Make smaller portions: divide the layers among more bags for bite-sized treats.
Common mistakes to avoid
- Using opaque bags: the colour bands disappear; choose clear bags for the candy-corn effect.
- Pouring too quickly: the layers can mix; add each snack slowly.
- Overfilling: there is no room to close the bag; leave space at the top for tying.
- Packing too firmly: crackers and popcorn can break; let the snacks settle without pressing.
- Leaving bags open: popcorn can lose its crispness; tie each bag once filled.
How to store
Keep the bags tied and stored in a cool, dry place, and serve them within a few days for the best popcorn texture. Avoid refrigerating them, as moisture can soften the snacks; these treat bags do not need reheating.
Frequently asked questions
Can I make these treat bags ahead?
Yes. Assemble them shortly before your event, then keep them tied in a cool, dry place until serving.
Do I need to cook anything?
No. The method uses ready-to-eat marshmallows, Goldfish and sweet-and-salty popcorn.
How do I keep the layers separate?
Add the snacks one at a time and pour slowly. Keep the bag upright and avoid shaking it after filling.
What can I use instead of a twist tie?
String or ribbon can close the bag, as in the method. Tie it securely without squeezing the snacks.
Can I use a different popcorn?
Yes. Another popcorn variety can work, though the flavour and colour may differ from the sweet-and-salty version.
How many bags does this make?
The recipe is listed for 12 servings. The exact number of bags depends on their size and how much snack you put in each one.
Cook it from the original
This recipe comes from eventstocelebrate.net. Their page has the author’s own photos, notes and tips — the best place to cook it from.
Open the recipe on eventstocelebrate.net