
Tawa Pulao Recipe | Tava Pulao | Pav Bhaji Pulao Recipe
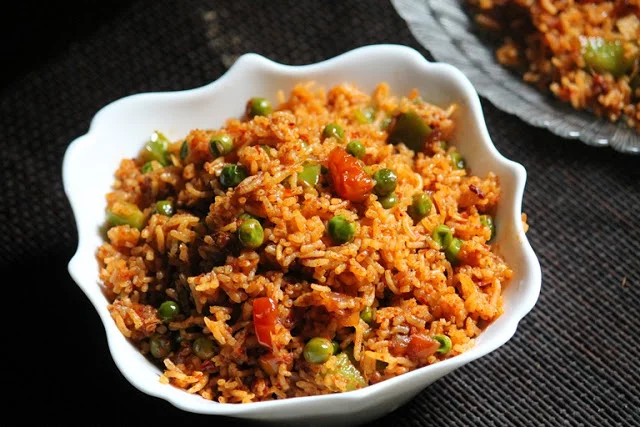
Tawa pulao is a buttery Mumbai-style rice dish flavoured with pav bhaji masala, chilli and garlic. It is a useful way to turn cooked basmati rice and vegetables into a quick meal, and is often served with raita.
Ingredients
- 1 cup (about 200 g)basmati rice
- 1onion, finely chopped
- 2tomatoes, finely chopped
- 1capsicum, chopped
- 1 cup (about 150 g)green peas (frozen, if using)
- 1green chilli, finely chopped
- 2 tbsp (30 ml)homemade pav bhaji masala
- 3 tbsp (45 ml)homemade chilli garlic paste
- to tastesalt
- 1/2 tsp (about 2 g)sugar
- 4 tbsp (about 57 g)butter
- to garnishcoriander leaves
Instructions
- 1
Soak the rice
Wash the basmati rice and soak it for 30 minutes. Bring plenty of water to the boil and add salt.
- 2
Cook the rice
Add the rice to the boiling water and cook for 7–8 minutes, until done. Drain it, set it aside and leave it to cool completely.
- 3
Cook the paste
Melt the butter in a kadai, add the chilli garlic paste and cook until the oil separates.
- 4
Soften the vegetables
Add the onion, green chilli and tomatoes. Cook until the mixture turns mushy.
- 5
Season the mixture
Add salt and a little sugar, then mix well.
- 6
Add the masala
Stir in the pav bhaji masala until it is well mixed.
- 7
Cook peas and capsicum
Add the peas and capsicum, then stir-fry for 2 minutes.
- 8
Coat the rice
Add the cooked rice and mix until the masala coats each grain.
- 9
Serve the pulao
Serve hot with raita.
What is tawa pulao?
Tawa pulao is a Mumbai street-food-style rice dish associated with the large griddle, or tawa, used by street vendors. It borrows the punchy, buttery seasoning of pav bhaji and brings it together with rice and vegetables.
This version builds its flavour with pav bhaji masala and chilli garlic paste, then folds in separately cooked basmati. Cooling the rice before mixing helps it stay distinct as it takes on the masala.
Nutrition and macros by portion
The nutrition label shows one serving as written: 300 calories, 5g protein, 43g carbs, 12g fat.
| Portion | Adjustment | kcal | Protein | Carbs | Fat |
|---|---|---|---|---|---|
| Lighter | Use less butter | 210 kcal | 4g | 30g | 8g |
| This serving | As written | 300 kcal | 5g | 43g | 12g |
| Hungry | Serve a larger portion | 450 kcal | 8g | 65g | 18g |
The rice supplies most of the carbohydrates, while butter contributes much of the fat. The vegetables add some fibre and the rice and peas contribute a little protein; serve a portion with raita for a cooler, complementary side.
The rice makes the difference
Basmati: rinse and soak it for 30 minutes as directed, then cook it in plenty of boiling salted water. Drain it as soon as it is done so it does not continue cooking in the hot water.
Cooling: let the drained rice cool completely before adding it to the masala. This helps the grains hold their shape when stirred.
Build the masala base
Chilli garlic paste: cook it in the butter until the oil separates, as the method specifies. Keep it moving so the paste cooks without catching on the pan.
Onion and tomato: cook them with the green chilli until mushy, then add salt, sugar and pav bhaji masala. This creates a soft, well-seasoned base for the rice.
Get the texture right
Vegetables: give the peas and capsicum 2 minutes in the masala before adding the rice. The capsicum should still have some bite, while the peas warm through.
Mixing: fold the cooked rice through until each grain is coated. Use a gentle hand to avoid crushing the rice into a paste.
Timing and serving
The recipe includes a 30-minute rice soak, followed by 7–8 minutes of boiling and 2 minutes for the peas and capsicum. Cool the rice completely before combining it with the masala; the listed total time is 40 minutes.
Serve the pulao hot with raita, as suggested. Coriander leaves add a fresh finish just before serving.
Recipe notes & tips
- Start soaking the rice before preparing the vegetables.
- Drain the rice promptly once it is cooked.
- Allow the rice to cool completely before mixing it into the masala.
- Cook the chilli garlic paste until the oil separates, watching closely so it does not catch.
- Stir the rice gently to keep the grains intact.
- Add coriander leaves just before serving for a fresh finish.
Variations
- Adjust the heat: use less green chilli or chilli garlic paste for a milder pulao.
- Use fresh peas: cook them until tender before adding the capsicum.
- Add carrots: chop them small and cook them with the peas.
- Make it vegetarian-friendly: check that the pav bhaji masala and chilli garlic paste suit your requirements.
- Change the garnish: finish with extra coriander leaves to taste.
Common mistakes to avoid
- Overcooking the rice: drain it once done so the grains do not turn soft and clumpy.
- Mixing in warm rice: let it cool completely before adding it to the masala.
- Skipping the paste cook: cook the chilli garlic paste until the oil separates for the step's intended texture.
- Leaving the vegetables too long: stir the peas and capsicum for 2 minutes as directed.
- Stirring too roughly: fold the rice through gently to keep the grains whole.
How to store
Cool leftovers promptly and refrigerate them in a covered container for up to 2 days. Reheat until piping hot, adding a small splash of water if the rice seems dry.
Frequently asked questions
Can I use rice cooked earlier?
Yes. Use cooked basmati that has cooled completely, then add it when the masala is ready.
Can I skip the 30-minute soak?
The recipe specifies soaking the rice for 30 minutes. If you skip it, the rice may cook differently, so check it closely as it boils.
How do I know when the rice is done?
Cook it for 7–8 minutes, as directed, and check that it is cooked before draining. It should hold its shape when stirred into the masala.
What can I serve with tawa pulao?
Raita is the suggested accompaniment. Serve it alongside the pulao while the rice is hot.
Can I use frozen peas?
Yes. The recipe uses frozen peas, which can go straight into the pan with the capsicum.
Cook it from the original
This recipe comes from yummytummyaarthi.com. Their page has the author’s own photos, notes and tips — the best place to cook it from.
Open the recipe on yummytummyaarthi.com