
The EASIEST Whole-Roasted Butternut Squash {no pre-peeling, chopping, or deseeding!}
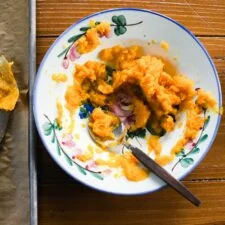
A medium butternut squash is roasted whole until tender, with no peeling, chopping or deseeding beforehand. It is a hands-off way to prepare soft squash for mashing or using in soups, fillings and baking.
Ingredients
- 1 (medium-sized)butternut squash
Instructions
- 1
Prepare the oven
Heat the oven to 200°C (400°F). Line a baking tray with parchment paper or foil. Scrub the squash clean, dry it thoroughly and set it aside.
- 2
Place the squash
Set the squash whole on the lined tray. Leave it uncut and do not add oil, herbs or seasoning.
- 3
Roast until tender
Bake for 1 hour, until soft. It is ready when a knife slides out easily after piercing the squash and the skin has started to collapse. Roast for longer if needed, depending on the squash’s size.
- 4
Cool and scoop
Take the squash out of the oven and let it cool for about 20 minutes. Peel away the skin, cut the squash in half and scoop out the seeds.
- 5
Mash and store
Mash the cooked squash with a fork, then divide it between individual containers. Refrigerate for up to 3 days or freeze for up to 3 months.
What is whole-roasted butternut squash?
Butternut squash is a winter squash used widely in American cooking, and roasting is a simple way to soften its firm flesh. Here, the squash goes into the oven whole, so you can skip the awkward job of peeling and cutting it while raw.
Whole roasting also leaves the seeds inside until the squash is cooked. Once tender, the flesh is easy to scoop out and mash for soup, ravioli filling or baking.
Nutrition and macros by portion
The nutrition label shows one serving as written: 270 calories, 6g protein, 70g carbs, 1g fat.
| Portion | Adjustment | kcal | Protein | Carbs | Fat |
|---|---|---|---|---|---|
| Lighter | Smaller squash portion | 189 kcal | 4g | 49g | 1g |
| This serving | As written | 270 kcal | 6g | 70g | 1g |
| Hungry | Add a protein-rich side | 405 kcal | 9g | 105g | 2g |
Most of this portion’s carbohydrates come from the squash itself; it also provides a little protein and very little fat. Pair it with a protein-rich food and other vegetables for a more rounded plate, or use the mash as an ingredient in a larger meal.
Why roast it whole?
No peeling: the skin can be removed after roasting, when the flesh has softened. A thorough scrub beforehand is still important.
No seasoning: this method keeps the squash plain and versatile. Add flavour later to suit the dish you are making.
How to tell when it is done
Knife test: pierce the squash and check that the knife slides out easily. If it meets resistance, return the squash to the oven and give it more time.
Skin cue: the skin should begin to collapse as the flesh softens. Squash size varies, so use these signs rather than relying on the hour alone.
Peeling and removing the seeds
Cooling: leave the squash to cool for about 20 minutes before handling it. If it is still too hot to manage comfortably, let it cool a little longer.
Scooping: cut the cooked squash in half and remove the seeds with a spoon. Peel away the skin, then mash the flesh with a fork.
Ways to use the squash
For soup: stir the mashed squash into a seasoned soup base and add liquid until it reaches the texture you like. A simple green salad or crusty bread makes a handy accompaniment.
For other recipes: use the plain mash in ravioli filling or muffins, adjusting seasoning and other ingredients to the recipe. Keeping it unseasoned here makes it easier to adapt.
Recipe notes & tips
- Dry the squash well after scrubbing so it is not wet on the tray.
- Line the tray to catch any moisture released as the squash roasts.
- Use a medium-sized squash for the stated hour as a starting point, then check its tenderness.
- Let the squash cool enough to handle before peeling and scooping.
- Keep the mash plain if you plan to use it in different recipes.
Variations
- Season after roasting: stir in salt, pepper or spices once the squash is mashed.
- Make it savoury: add herbs and a little olive oil to the mash for a side dish.
- Use it in soup: blend or stir the plain mash into your preferred soup base.
- Try a sweet use: add the mash to a muffin recipe that calls for cooked squash.
- Save the seeds: clean and cook them separately if you would like a crunchy topping.
Common mistakes to avoid
- Cutting it first: the point of this method is to roast it whole, so leave the squash intact.
- Skipping the scrub: clean the skin before roasting, even though you will peel it afterwards.
- Relying only on the timer: squash size affects cooking time; check that a knife slips out easily.
- Handling it too soon: allow about 20 minutes of cooling before peeling and cutting.
- Storing it uncovered: divide the mash into containers and chill or freeze it promptly after preparation.
How to store
Refrigerate the cooked squash in individual containers for up to 3 days, or freeze it for up to 3 months. Thaw frozen squash in the refrigerator and reheat gently, stirring as needed.
Frequently asked questions
Do I need to cut or pierce the squash before roasting?
This method roasts it whole and uncut, with no preparation beyond scrubbing and drying. The recipe does not call for piercing it before it goes into the oven.
How do I know the squash is cooked?
A knife should slide out easily when the squash is pierced, and the skin should start to collapse. If not, roast it for longer and check again.
Can I use a squash that is larger or smaller?
Yes, but the cooking time may change. Treat 1 hour as a guide and judge doneness by the knife test and the softened skin.
Can I roast it without parchment or foil?
The method suggests lining the tray with parchment paper or foil. Either makes the tray easier to clean.
How long does cooked butternut squash keep?
Store it in the refrigerator for up to 3 days or freeze it for up to 3 months.
What can I make with the mash?
Use it in creamy butternut squash soup, ravioli filling or muffins. Keeping the mash plain makes it adaptable to different recipes.
Cook it from the original
This recipe comes from theclevercarrot.com. Their page has the author’s own photos, notes and tips — the best place to cook it from.
Open the recipe on theclevercarrot.com