
Light Whole Wheat Sourdough Bread
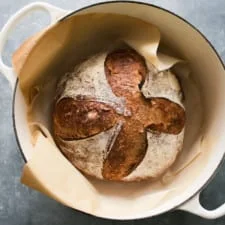
This light whole wheat sourdough loaf combines bread flour with 20% whole wheat for a flavourful crumb that is less dense than an all-whole-wheat loaf. Make the dough ahead, chill it overnight and bake it the next day for sandwiches, crostini or toast.
Ingredients
- 50 gbubbly, active sourdough starter (100% hydration)
- 350–375 gwarm water (27–29°C [80–85°F])
- 400 gbread flour
- 100 gwhole wheat flour
- 9 gfine sea salt
Instructions
- 1
Plan the rise
Whole wheat dough can rise faster than white dough, particularly in warm weather. Starting the mixing in the afternoon, around 2–3 pm, makes it easier to attend to the folds; adjust the rise times to suit your room temperature.
- 2
Mix the dough
Combine the starter and water in a large bowl, then add the bread flour, whole wheat flour and salt. Mix with a fork, finishing by hand until the flour is incorporated; the dough will be wet and sticky. Cover with a damp towel or wrap and rest on the counter for 1 hour, working it into a rough ball after the first 30 minutes.
- 3
Fold the dough
After the 1-hour rest, lift part of the dough upwards and fold it towards the centre. Turn the bowl a quarter turn and repeat three more times to complete one set of four folds. If the dough still feels slack after the first set, do four more folds.
- 4
Continue bulk rise
Complete four sets of folds in total, spacing them 30 minutes apart and keeping the covered dough in a warm spot between sets. After the folds, cover the bowl and leave the dough undisturbed at 24–26°C (75–78°F) for about 2–3 hours, until it has nearly doubled. Cover and chill the whole bowl overnight; the dough may rise a little more in the fridge if it is still warm.
- 5
Make a warm spot
To create a warm spot, heat the oven at its lowest setting for 30–45 seconds, then switch it off and place the covered bowl inside. Keep the temperature at 24–26°C (75–78°F), and no higher than 27°C (80°F); check it with an oven thermometer. A proofing box is another option.
- 6
Prepare to shape
The following morning, check that the dough has doubled; if it has not, give it more time to rise. Line a small bowl or proofing basket with a cotton or linen cloth and dust it with flour. The dough will be shaped twice to build strength.
- 7
Preshape the dough
Turn the cold dough out onto a floured surface and leave it for 10–15 minutes to lose some of its chill. Shape it into a loose ball using the envelope method: stretch and fold the top, bottom, left and right sides towards the centre. Use a bench scraper to flip it smooth-side up, cover it and rest for 20–30 minutes.
- 8
Shape the loaf
Flip the dough smooth-side down and repeat the envelope folds, then turn it back over. With floured hands, cup the dough gently and draw it towards you in a circle to tighten the shape. Place it seam-side up in the lined bowl or basket and cover with the cloth overhang.
- 9
Proof the loaf
Leave the dough in the warm spot for 30 minutes to 1 hour. It is ready when it looks puffy and has risen slightly, but has not doubled; it should not be very cold before baking. Towards the end of this rise, heat the oven to 230°C (450°F). Cut non-stick parchment to fit the baking pot, leaving enough extra at the sides to lift out the loaf.
- 10
Score the dough
Lay the parchment over the dough and invert the bowl to release it. Dust the surface with flour and rub it in gently. Use a bread lame, small serrated knife or razor blade to make four shallow cuts, each about 10 cm (4 inches) long, at the 3, 6, 9 and 12 o’clock positions. Lift the dough by the parchment into a Dutch oven or other oven-safe lidded pot.
- 11
Bake the bread
Bake on the centre rack, covered, for 20 minutes. Remove the lid and bake for a further 40 minutes, until golden brown. Transfer the loaf to a wire rack and cool for 1 hour before slicing for the best texture.
What is light whole wheat sourdough bread?
Sourdough is bread leavened with a naturally fermented starter rather than commercial yeast. This loaf uses a mostly bread-flour base with 20% whole wheat flour, giving it whole-grain flavour while keeping the dough lighter than one made entirely with whole wheat.
The overnight chill makes it practical to prepare in advance, while the folds and two-stage shaping help the wet dough hold its form.
Nutrition and macros by portion
The nutrition label shows one serving as written: 1880 calories, 67g protein, 390g carbs, 8g fat.
| Portion | Adjustment | kcal | Protein | Carbs | Fat |
|---|---|---|---|---|---|
| Lighter | Smaller, thinner slices | 1316 kcal | 47g | 273g | 6g |
| This serving | As written | 1880 kcal | 67g | 390g | 8g |
| Hungry | Larger, thicker slices | 2820 kcal | 101g | 585g | 12g |
Most of the carbohydrates and energy come from the bread flour and whole wheat flour, while those flours also provide most of the protein. The starter adds a smaller amount of flour-based nutrients, and the salt supplies nearly all the sodium; the recipe contains very little fat. Pair a slice with eggs, beans or another protein-rich topping and some vegetables for a more rounded plate.
Why use two flours?
Bread flour: It provides the main structure for the loaf, helping the dough hold the gas produced during fermentation.
Whole wheat flour: Its fuller flavour complements the white flour. Keeping it to one fifth of the flour blend helps the loaf stay relatively light.
Working with sticky dough
The dough starts out very wet, so resist the temptation to add flour while mixing. Resting gives the flour time to absorb water, and the repeated folds gradually make the dough easier to handle.
Use the bowl to support the dough during each fold and turn it a quarter turn between stretches. If it still feels slack after the first set, the method allows one extra set of four folds.
Watch the fermentation
Warmth: The bulk rise is specified at 24–26°C (75–78°F), with 27°C (80°F) as the upper limit. A warmer dough can become harder to handle, and whole wheat dough may rise faster, so use the dough’s appearance as well as the clock.
Readiness: After the bulk rise, look for a dough that has nearly doubled. After shaping, the final proof is shorter: the loaf should look puffy and rise a little, but not double.
Shape for a stronger loaf
The first shaping creates a loose ball, followed by a short rest. A second round of envelope folds and gentle tightening builds a more defined shape before the dough goes into its cloth-lined bowl or basket.
Keep the seam facing up in the basket. When you turn the dough out to bake, the smooth side will be on top, ready for scoring.
Scoring and baking
The four shallow cuts around the loaf give the surface places to open as the bread bakes. Score gently rather than pressing down on the dough, and transfer it to the pot using the parchment.
The covered stage is followed by an uncovered bake, which allows the crust to turn golden brown. Let the loaf cool on a wire rack for a full hour before slicing so the crumb can set.
When to serve it
The mild whole wheat flavour works well in sandwiches and as a base for crostini. For breakfast, serve slices toasted with jam.
It also pairs well with a bowl of soup or a plate of eggs and vegetables. Slice only what you need once the loaf has cooled.
Recipe notes & tips
- Use an active, bubbly starter for reliable fermentation.
- Begin with 350 g water and add more only if needed to incorporate the flour.
- Keep the dough covered between folds so its surface does not dry out.
- Check the warm spot with an oven thermometer rather than relying on the oven setting.
- Use a bench scraper to handle the sticky dough during shaping.
- Cool the loaf fully before slicing to help the crumb keep its shape.
Variations
- More whole wheat: Replace some bread flour with whole wheat flour, knowing the loaf may turn out denser.
- Seeded crust: Press seeds onto the shaped loaf before scoring.
- Herb flavour: Add dried herbs to the flour before mixing.
- Garlic toast: Toast slices and top them with garlic and olive oil.
- Crostini: Slice the cooled loaf thinly and toast until crisp.
Common mistakes to avoid
- Adding too much flour: The dough is meant to feel wet and sticky, so use the folds to build strength instead.
- Overheating the dough: Keep the warm spot below 27°C (80°F) and monitor it with a thermometer.
- Rushing the bulk rise: Wait until the dough has nearly doubled before chilling it.
- Overproofing: During the final rise, bake when the dough looks puffy and has risen slightly rather than waiting for it to double.
- Cutting too soon: Cool the loaf on a wire rack for 1 hour before slicing.
- Scoring too deeply: Make four shallow cuts so the dough can open without being cut apart.
How to store
Once completely cool, store the loaf in a bread bag or wrapped at room temperature and use within 2–3 days for best quality. Reheat slices in a toaster; freeze extra slices in an airtight bag for longer storage and toast from frozen.
Frequently asked questions
Can I use all-purpose flour instead of bread flour?
Bread flour is specified for the loaf’s structure. All-purpose flour may work, but the dough can feel softer, so handle it gently and watch its rise.
How much water should I use?
The recipe gives a range of 350–375 g. Start at the lower amount and add more if needed to bring the flour together; the dough will still be sticky.
Can I skip the overnight chill?
The method includes an overnight chill after the bulk rise. It also gives the dough time to fit a next-day bake, so skipping it would change the schedule and dough temperature.
How do I know when the dough is ready to bake?
After the overnight bulk rise, it should have doubled. After shaping, it should look puffy and have risen slightly, but not doubled.
Do I need a Dutch oven?
The recipe calls for a Dutch oven or another oven-safe pot with a lid. The pot needs to be large enough for the loaf and parchment.
Why does the bread need to cool before slicing?
The recipe recommends a 1-hour cooling period for the best texture. Slicing while it is still hot can make the crumb seem gummy.
Cook it from the original
This recipe comes from theclevercarrot.com. Their page has the author’s own photos, notes and tips — the best place to cook it from.
Open the recipe on theclevercarrot.com