
Muesli bread
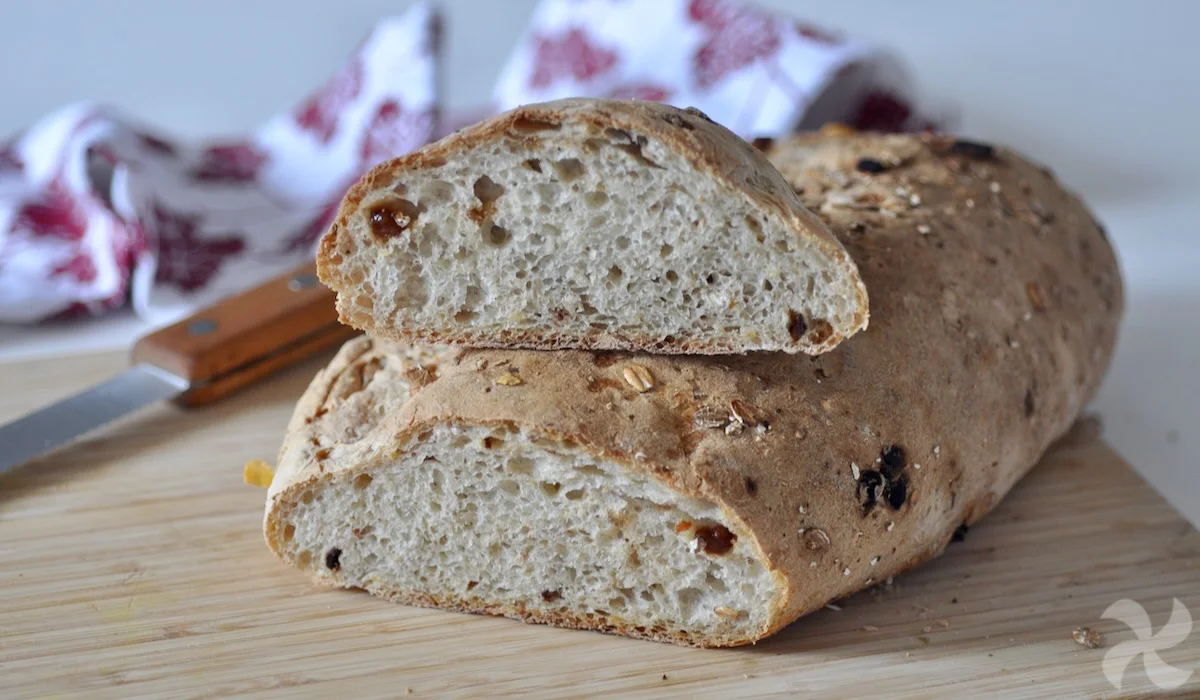
This homemade muesli bread has a chewy crumb and a topping of toasted cereal, making it a good loaf to serve alongside meals or slice for toast. It takes time to rise, but the dough itself uses a short list of everyday ingredients.
Ingredients
- 350 gplain flour
- 150 gstrong bread flour
- 10 gfresh baker’s yeast
- 75 g, plus a little extra for coatingmuesli
- 350 gwater
- 1 teaspoonsalt
Instructions
- 1
Mix the dry ingredients
Put both flours, the yeast and 75 g of muesli into the mixing bowl. Mix for 4 seconds at speed 4.
- 2
Knead and rise
Add the water and salt. Knead for 5 minutes using the dough setting, then leave the dough to rise in the bowl for about 1 hour.
- 3
Shape the dough
Turn the dough out onto the work surface and knead it for a few minutes. Leave it to rest for another 5 minutes.
- 4
Form the loaf
Shape the dough as you like.
- 5
Coat and prove
Coat the loaf with a little muesli; if needed, dampen its surface with water first to help the muesli stick. Place it on a baking tray lined with baking paper and leave it to rise for 1–2 hours.
- 6
Heat the oven
Preheat the oven to 220°C.
- 7
Score the loaf
Make a cut in the top of the loaf with a razor blade or a very sharp knife.
- 8
Bake the bread
Put the tray on the lowest oven shelf and bake for 10 minutes. Move it up to the lower-middle shelf and bake for a further 20 minutes.
What is muesli bread?
Muesli bread is a loaf made with cereal mixed into the dough and often scattered over the outside. It is a modern, adaptable style of bread rather than a single traditional formula.
Here, a blend of plain and strong bread flour gives the loaf structure, while muesli adds texture and a little crunch to the crust. Its mild flavour suits both savoury meals and breakfast toast.
Nutrition and macros by portion
The nutrition label shows one serving as written: 175 calories, 0g protein, 0g carbs, 0g fat.
| Portion | Adjustment | kcal | Protein | Carbs | Fat |
|---|---|---|---|---|---|
| Lighter | Serve a smaller slice | 122 kcal | 0g | 0g | 0g |
| This serving | As written | 175 kcal | 0g | 0g | 0g |
| Hungry | Serve a larger slice | 263 kcal | 0g | 0g | 0g |
The flour supplies most of the loaf’s carbohydrates, while the muesli contributes additional carbohydrate and some fat and protein depending on its mix. Serve a slice with eggs, yoghurt or another protein-rich food, and add fruit or vegetables to round out the plate.
The flour and muesli
Flour blend: plain flour makes up most of the dough, with strong bread flour helping it hold its shape as it rises.
Muesli: the 75 g mixed into the dough gives the crumb texture; a little extra coats the outside. If your muesli contains large pieces, the loaf may have a more uneven surface.
Getting a good rise
First rise: leave the dough in the mixing bowl for about 1 hour, as directed. The method gives a time rather than a visual test, so allow it to rise without disturbing it.
Second rise: the shaped loaf needs 1–2 hours on the tray. A longer or shorter prove within that range can depend on how warm the room is.
Shaping and coating
Shaping: form the dough into a loaf that fits your baking tray. After shaping, the brief 5-minute rest gives it a pause before the final prove.
Coating: dampen the surface lightly with water if the muesli does not adhere readily. Use just enough to help it stick rather than soaking the dough.
Baking in two stages
Lower shelf: bake the loaf on the lowest shelf for the first 10 minutes, then move it to the lower-middle shelf.
Finish: bake for a further 20 minutes. Scoring the loaf just before baking gives it a deliberate opening as it expands in the oven.
Serving the loaf
This bread works with soups, salads and other meals, or sliced and toasted for breakfast. Its muesli topping adds texture, so it also pairs well with simple spreads.
Recipe notes & tips
- Weigh the flour and water for consistent dough proportions.
- If the muesli topping will not stick, lightly dampen the loaf surface before coating it.
- Use a very sharp knife or razor blade to make a clean score.
- Move the tray after the first 10 minutes as directed so the loaf finishes on the lower-middle shelf.
- Let the loaf cool before slicing to help the crumb hold together.
Variations
- Seeded muesli: use a seed-rich muesli for a more pronounced crunch.
- Dried fruit: choose a muesli with dried fruit for a sweeter slice.
- Oat topping: coat the loaf with extra oats for a simple, understated crust.
- Smaller rolls: divide the dough into rolls and keep an eye on them, as smaller pieces may bake faster.
- Toast serving: slice and toast the bread, then pair it with a savoury or sweet topping.
Common mistakes to avoid
- Skipping the first rise: leave the dough in the bowl for about 1 hour before shaping.
- Forgetting the second prove: allow the coated loaf 1–2 hours on the tray before baking.
- Dry topping: dampen the loaf surface lightly so the muesli adheres.
- Blunt scoring blade: use a razor blade or very sharp knife for the cut.
- Leaving the tray too low: move it to the lower-middle shelf after the first 10 minutes.
How to store
Once completely cool, store the loaf in a bread bag or wrapped at room temperature and use within a few days. Toast slices to refresh them, or freeze sliced bread in a sealed freezer bag for longer storage.
Frequently asked questions
Can I make this without a Thermomix?
Yes. Mix the ingredients in a large bowl and knead the dough by hand or with a stand mixer until combined and elastic. Keep the rising and baking times from the recipe.
How long does the dough need to rise?
The first rise is about 1 hour in the mixing bowl. After shaping and coating, leave it to rise on the tray for 1–2 hours.
Why dampen the loaf before adding the muesli?
A lightly damp surface helps the muesli cling to the dough. Use only a little water.
Why is the oven tray moved during baking?
The method starts the loaf on the lowest shelf for 10 minutes, then moves it to the lower-middle shelf for the remaining 20 minutes.
Can I use dried yeast instead of fresh yeast?
The recipe specifies 10 g of fresh baker’s yeast. Dried yeast may require a different quantity, so follow the conversion guidance on its packaging.
Cook it from the original
This recipe comes from thermorecetas.com. Their page has the author’s own photos, notes and tips — the best place to cook it from.
Open the recipe on thermorecetas.com