
Chocolate Sourdough Noir
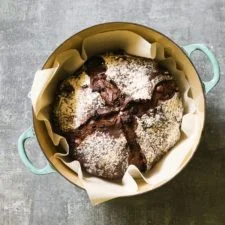
Chocolate Sourdough Noir is a cocoa-rich sourdough loaf studded with chocolate chips, walnuts and raisins. Make it when you want a chewy, naturally leavened bread that can be served as a sweet breakfast or treat.
Ingredients
- 150 gbubbly, active sourdough starter
- 350 gwater, preferably filtered
- 50 gsugar (vanilla sugar is nice)
- 1 tspvanilla extract or 1 vanilla pod, seeds scraped
- 500 gbread flour
- 50 gcocoa powder
- 9 gfine sea salt
- 65 gchopped walnuts
- 65 graisins
- 150 gsemi-sweet chocolate chips
- to tasteicing sugar, for decoration
Instructions
- 1
Mix the dough
In a large bowl, stir the starter, water, sugar and vanilla with a fork. Sift the bread flour and cocoa powder together, then add them to the bowl. Use your hands to bring everything together until no dry flour remains. Cover with plastic wrap and leave to rest for 1 hour. If you like, soak the raisins in a splash of vanilla extract during this rest; drain and pat them dry before using.
- 2
Add the fillings
Add the salt, walnuts, raisins and chocolate chips. Lift and fold the dough over itself several times, squeezing gently to distribute the additions. It may tear slightly; keep working it as best you can until it forms a rough ball.
- 3
Let it rise
Cover the bowl with plastic wrap and a clean tea towel, then leave it somewhere warm until the dough looks less dense and has grown to about 1.5–2 times its original volume. This may take around 10 hours at 20°C, 5–6 hours at 24°C, or 3–4 hours at 27°C; the starter and room conditions affect the timing. Optionally, begin stretching and folding about 30 minutes into this rise.
- 4
Stretch and fold
For extra dough strength, stretch and fold every 30 minutes during the first 2 hours of the bulk rise. Lift one portion of dough upwards and fold it over itself, then turn the bowl a quarter turn and repeat until you have made four folds. Keep the fillings tucked inside rather than on the dough’s surface so they are less likely to burn.
- 5
Shape the loaf
Lightly flour one half of your work surface and leave the other half clean. Turn out the dough onto the floured area; there is no need to punch it down. Divide it into two loaves or leave it whole. Use a bench scraper to move it to the clean area, brushing away any excess flour first. Fold each side into the centre, turn the dough seam-side down, then cup and rotate it in quarter turns until shaped as desired; you can also pull it towards you to even it out.
- 6
Proof the dough
Put the shaped dough into a cloth-lined 8-inch bowl or a floured or lined proofing basket. Leave it to rise for about 30 minutes to 1 hour, until slightly puffy but not doubled in size. Towards the end of this rise, heat the oven to 204°C and cut non-stick baking parchment to fit your baking pot, leaving enough extra at the sides to lift out the bread.
- 7
Score the surface
Lay the parchment over the dough and invert the bowl to release it. With a bread lame, small serrated knife or razor blade, make four shallow cuts, each about 10 cm long, at the 3, 6, 9 and 12 o’clock positions. Use the parchment to transfer the dough to the baking pot.
- 8
Bake the bread
Cover the pot with its lid and bake for 20 minutes. Remove the lid and bake uncovered for a further 40 minutes. For the last 10 minutes, leave the oven door slightly ajar to let moisture escape and help the crust crisp. If checking the centre with a thermometer, the bread should read about 96°C.
- 9
Cool and serve
Remove the bread from the oven and cool it on a wire rack for at least 1 hour before slicing. Dust with icing sugar just before serving.
What is chocolate sourdough?
Sourdough is bread leavened with a fermented starter rather than commercial baker’s yeast. This American-style sweet loaf brings cocoa, chocolate chips, raisins and walnuts into that traditional method.
Cocoa gives the crumb its dark colour and chocolate flavour, while the active starter provides the rise. The mix of soft fruit, crunchy nuts and chocolate makes each slice varied in texture.
Nutrition and macros by portion
The nutrition label shows one serving as written: 3900 calories, 95g protein, 650g carbs, 125g fat.
| Portion | Adjustment | kcal | Protein | Carbs | Fat |
|---|---|---|---|---|---|
| Lighter | Smaller, thinner slices | 2730 kcal | 67g | 455g | 88g |
| This serving | As written | 3900 kcal | 95g | 650g | 125g |
| Hungry | Larger slice with yoghurt | 5850 kcal | 143g | 975g | 188g |
The flour, sugar, raisins and chocolate chips provide most of the carbohydrates, while the walnuts and chocolate chips contribute much of the fat. Flour, walnuts and starter contribute protein, though the loaf’s overall macros depend on how it is sliced and shared. Pair a slice with yoghurt and fruit for a more balanced plate.
Choosing the ingredients
Active starter: Use it when bubbly and lively, as the recipe depends on it to raise the dough. The starter’s strength and the temperature around the bowl both affect how quickly the dough rises.
Chocolate and cocoa: Sifting the cocoa with the flour helps distribute it evenly. Semi-sweet chips add pockets of chocolate, while the cocoa flavours the dough throughout.
Raisins and walnuts: Chopped walnuts provide crunch, and raisins bring sweetness. Soaking the raisins in a splash of vanilla extract is optional; drain and dry them before adding.
Working with the dough
Initial mixing: Bring the flour and liquid together by hand until the flour is absorbed, then let the dough rest for 1 hour. This rest gives the flour time to hydrate before the salt and fillings go in.
Folding: The dough may tear as you work in the additions, so use repeated gentle folds rather than trying to knead it smooth. During the optional stretch-and-folds, keep the chocolate, nuts and fruit tucked inside.
Reading the rise
Bulk rise: Look for a dough that is less dense and about 1.5–2 times its starting volume. The stated timings are guides, not a fixed schedule: warmer conditions and a more vigorous starter can shorten the wait.
Second rise: After shaping, the dough should look slightly puffy but should not double. Start preheating the oven towards the end of this shorter proof.
Shaping and scoring
Surface: The clean section of the worktop helps the dough grip as you rotate it into a rounded shape. Brush away excess flour before shaping, as a floury surface can make the dough slide rather than tighten.
Cuts: Make four shallow cuts around the loaf at the marked clock positions. The parchment helps move the shaped dough into the hot baking pot without handling it directly.
Getting the crust right
Covered bake: The lid stays on for the first 20 minutes of baking at 204°C. Then bake uncovered for another 40 minutes so the crust can colour and set.
Finish: Crack the oven door open for the final 10 minutes to release moisture. Allow at least 1 hour of cooling before slicing so the loaf has time to settle.
How to serve it
Dust the cooled loaf with icing sugar for a simple finish. Serve slices on their own, or pair them with yoghurt or fresh fruit for breakfast.
For a more dessert-like serving, warm a slice gently and enjoy it with a spoonful of thick yoghurt or a little nut butter.
Recipe notes & tips
- Use a lively starter and check the dough’s appearance rather than relying only on the clock.
- Pat the optional vanilla-soaked raisins dry before mixing them in.
- Keep the work surface clean where you shape the loaf so the dough can grip.
- Tuck exposed fillings into the dough during folds to reduce the chance of scorching.
- Cut the parchment with enough overhang to lift the loaf into and out of the baking pot.
- Wait at least 1 hour before slicing to give the crumb time to settle.
Variations
- Extra vanilla: Use the seeds from one vanilla pod instead of the vanilla extract.
- Richer raisins: Soak the raisins in a splash of vanilla extract before adding them.
- Two loaves: Divide the dough in half during shaping to make two smaller loaves.
- No walnuts: Leave out the walnuts for a smoother loaf with fewer crunchy pieces.
- Less chocolate: Reduce the chocolate chips for a less sweet, more cocoa-forward loaf.
Common mistakes to avoid
- Rushing the bulk rise: Wait for the dough to look less dense and grow to about 1.5–2 times its size.
- Adding wet raisins: Drain and pat soaked raisins dry so they do not bring extra liquid into the dough.
- Flouring the shaping area: Brush excess flour away so the dough can grip as you shape it.
- Leaving fillings exposed: Fold the dough so the chocolate, raisins and walnuts are tucked inside.
- Overproofing the second rise: Bake when the dough is only slightly puffy, not doubled.
- Slicing too soon: Cool the loaf on a rack for at least 1 hour before cutting.
How to store
Once completely cool, store the loaf wrapped or in an airtight container at room temperature for about 2–3 days. Rewarm slices briefly in a low oven or toaster; freeze well-wrapped slices for longer storage and thaw before reheating.
Frequently asked questions
Can I make this loaf without a sourdough starter?
This recipe relies on active sourdough starter for its rise, so a direct swap would change the dough and timing. Use a recipe written for commercial yeast if you do not have starter.
How do I know when the bulk rise is finished?
The dough should look less dense and have grown to about 1.5–2 times its original volume. The time varies with the starter and the temperature of the ingredients and room.
Do I have to stretch and fold the dough?
The recipe marks the stretch-and-folds as optional. They help strengthen the dough, and you can do them every 30 minutes during the first 2 hours of the bulk rise.
Can I make one loaf or two?
Either works: keep the dough whole for one loaf or divide it in half to make two. Shape the dough as described and use the stated proofing and baking instructions.
Why does the oven door open during the final 10 minutes?
The recipe uses this step to let moisture escape and help the crust crisp. Keep the door only slightly ajar.
When should I slice the bread?
Let it cool on a wire rack for at least 1 hour first. Slicing sooner can make the still-warm crumb harder to handle cleanly.
Cook it from the original
This recipe comes from theclevercarrot.com. Their page has the author’s own photos, notes and tips — the best place to cook it from.
Open the recipe on theclevercarrot.com