
Ricotta rolls
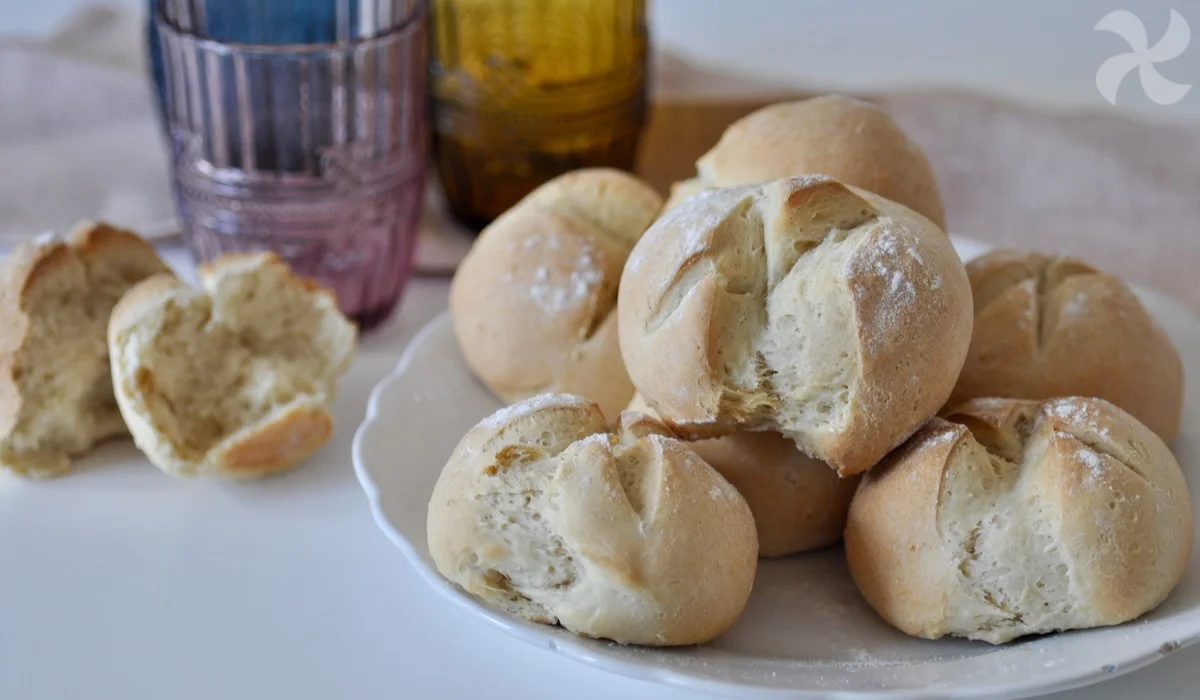
These soft homemade rolls get their tender crumb from ricotta and butter. They take time to rise, but the hands-on work is simple and they make a lovely addition to breakfast or a meal.
Ingredients
- 250 gmilk
- 5 gfresh baker’s yeast
- 500 gplain flour
- 80 gricotta
- 50 gbutter, cut into pieces
- 7 gsalt
Instructions
- 1
Warm the yeast
Put the milk and fresh yeast in the mixing jug. Heat for 1 minute at 37°C on speed 2.
- 2
Add the flour
Add the flour and knead for 1 minute using the dough setting.
- 3
Mix in additions
Add the ricotta, butter and salt, then knead for 2 minutes using the dough setting.
- 4
Let the dough rise
Leave the dough to rise in the jug or in a bowl. The time depends on the temperature of your kitchen; allow about 3 hours.
- 5
Shape the rolls
Knead the dough briefly by hand and divide it into 8 portions. Shape each portion into a roll and arrange them on a baking tray lined with baking paper.
- 6
Proof the rolls
Dust a little flour over each roll. Use a knife to cut a cross in the top, then leave the rolls to rise for about 1 hour.
- 7
Bake until golden
Bake at 180°C for 20 minutes, or until the rolls are golden.
What are ricotta rolls?
These are small yeast-raised bread rolls enriched with ricotta and butter. The recipe is a modern take on homemade rolls rather than a named traditional style.
Ricotta brings moisture and a gentle dairy flavour, while the long first rise gives the dough time to expand. A second rise after shaping helps the rolls bake up light.
Nutrition and macros by portion
The nutrition label shows one serving as written: 300 calories, 0g protein, 0g carbs, 0g fat.
| Portion | Adjustment | kcal | Protein | Carbs | Fat |
|---|---|---|---|---|---|
| Lighter | Smaller roll portion | 210 kcal | 0g | 0g | 0g |
| This serving | As written | 300 kcal | 0g | 0g | 0g |
| Hungry | Two rolls per portion | 450 kcal | 0g | 0g | 0g |
The flour supplies most of the carbohydrates, while the butter and ricotta contribute fat; the milk and ricotta also provide some protein. Serve a roll with a protein-rich topping and fruit or vegetables to make a more rounded plate.
The dough ingredients
Milk and yeast: warming them together to 37°C starts the process without overheating the yeast.
Ricotta and butter: add these after the flour has been incorporated, as directed. Cut the butter into pieces so it can mix through the dough more evenly.
Flour and salt: the flour forms the structure, while the salt seasons the dough. Measure both carefully for a balanced result.
Give the dough time
First rise: the dough rests in the mixing jug or a bowl for about 3 hours in the original method. The exact time varies with room temperature, so look for a visibly risen, airy dough rather than relying only on the clock.
Second rise: once shaped and cut, the rolls need about 1 hour to puff up again. Leave enough space between them on the tray.
Shaping and scoring
Portions: divide the dough into 8 pieces, keeping them roughly even so they bake at a similar rate. Shape each piece into a ball or compact roll.
Cross cuts: use a sharp knife to score a cross in each top before the final rise. Keep the cuts neat and avoid pressing down hard on the rolls.
How to tell they are baked
The recipe gives a guide of 20 minutes at 180°C. Check for an evenly golden surface at the end of that time.
Ovens can vary, so use the colour as well as the timer to judge doneness. Let the rolls cool before tearing or slicing, as the crumb is still setting straight out of the oven.
Serving the rolls
Serve them warm or at room temperature with butter, cheese or a savoury spread. Their mild flavour also works alongside soup or a main meal.
For breakfast, pair a roll with fruit or yoghurt; for lunch, use one as the bread alongside a salad or bowl of soup.
Recipe notes & tips
- Use milk at 37°C for the yeast mixture, not hotter.
- If your kitchen is cool, allow the first rise to continue until the dough looks noticeably expanded.
- Keep the 8 portions as even as you can so the rolls bake consistently.
- Line the tray with baking paper to make the rolls easier to lift off.
- Check the rolls at 20 minutes and use their golden colour as the doneness cue.
Variations
- Seeded tops: sprinkle seeds over the rolls before their second rise.
- Herb flavour: mix finely chopped herbs into the dough with the ricotta and butter.
- Cheese topping: add a little grated cheese over the rolls before baking.
- Smaller rolls: divide the dough into more portions and begin checking them earlier in the bake.
- Sandwich rolls: shape the portions slightly longer for a more oblong finish.
Common mistakes to avoid
- Overheating the milk: excessive heat can affect the yeast, so keep it to 37°C.
- Rushing the first rise: the dough may be dense if it has not had time to expand; wait until it looks airy.
- Uneven portions: rolls of different sizes can bake at different rates; divide the dough as evenly as possible.
- Cutting too deeply: deep scoring can flatten the rolls; make a light cross on each top.
- Crowding the tray: rolls need space to rise; arrange them with room between each one.
How to store
Once cool, store the rolls in an airtight container at room temperature and eat within 2 days. Warm them briefly in a low oven to refresh, or freeze them for longer storage and thaw before reheating.
Frequently asked questions
Can I make the dough without a mixing machine?
Yes. Mix and knead by hand, following the same order: milk and yeast, then flour, then ricotta, butter and salt. Knead until the dough is combined and elastic.
How long should the first rise take?
The method allows about 3 hours, but room temperature affects the timing. Let the dough’s expansion guide you rather than treating the time as exact.
Can I use dried yeast instead of fresh?
The recipe specifies 5 g of fresh baker’s yeast. If substituting dried yeast, use the conversion recommended on its packaging.
Can I prepare the rolls ahead?
You can make them earlier in the day and store them once cooled. For a freshly baked finish, warm them briefly before serving.
Can I freeze these rolls?
Yes. Freeze them after they have cooled, in a suitable sealed container or bag. Thaw them and warm briefly before serving.
Cook it from the original
This recipe comes from thermorecetas.com. Their page has the author’s own photos, notes and tips — the best place to cook it from.
Open the recipe on thermorecetas.com