
Cheesy Garlic Dinner Rolls
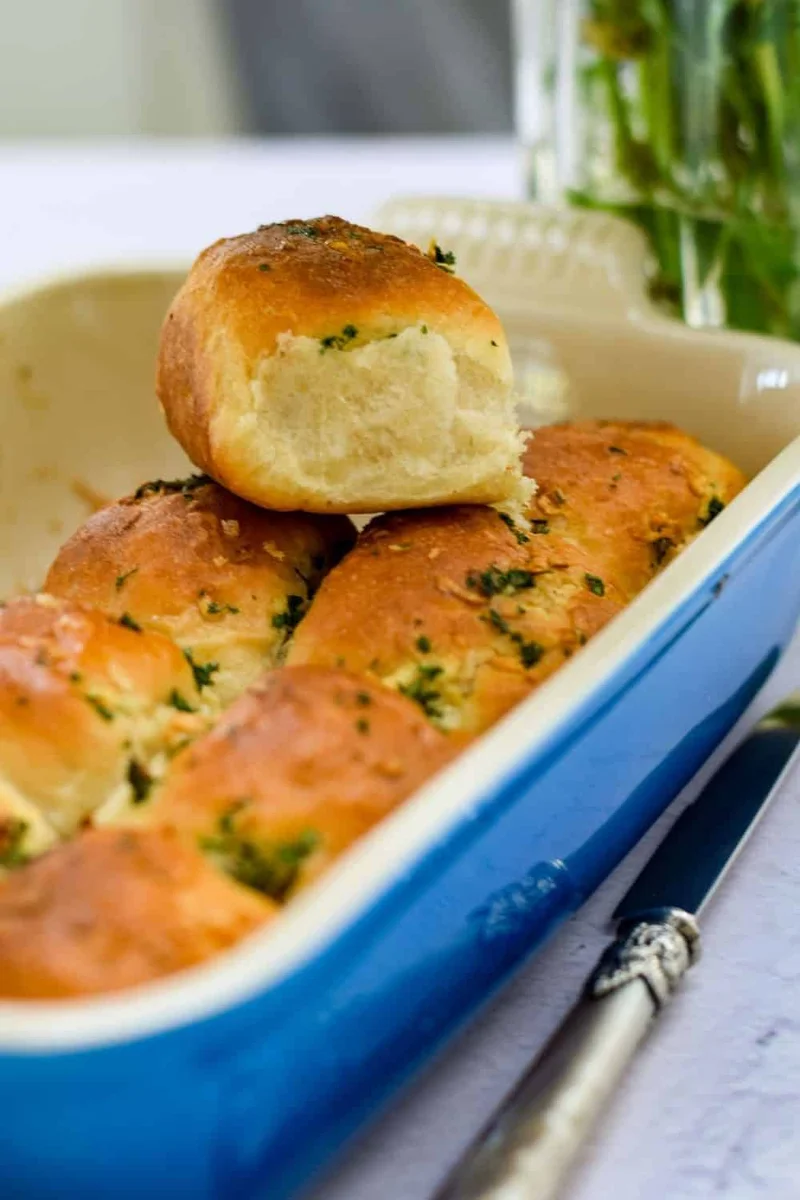
Soft, lightly sweet dinner rolls hide a melted cheese centre and are brushed with garlic, herbs and butter. They make a cosy side for soup or a savoury addition to a shared meal.
Ingredients
- 250 g (2 cups)bread flour, cake wheat flour or plain flour
- 3 g (1 tsp)dry instant yeast
- 25 g (2 tbsp)granulated sugar
- 3 g (½ tsp)salt
- 28 g (2 tbsp)butter, melted
- 240 ml (1 cup)lukewarm milk
- To tastemozzarella or cheddar cheese
- 28 g (2 tbsp)soft butter
- 2 large clovesgarlic, minced
- 1 tbspfresh parsley
- ½ tspfresh thyme
Instructions
- 1
Mix dry ingredients
Combine the flour, yeast, sugar and salt in a large bowl.
- 2
Make the dough
Make a well in the centre and add the melted butter. Gradually add the lukewarm milk until you have a soft, sticky dough. With a stand mixer, you can add all the milk at once; if mixing by hand, begin with 120 ml (½ cup) and add the rest gradually.
- 3
Knead the dough
Oil your hands and lightly flour a clean work surface, then knead the dough for 10 minutes. It should become less sticky after about 5 minutes, so avoid adding more flour; after 10 minutes it should be soft and smooth.
- 4
Let dough rise
Oil a bowl and lightly coat the dough with oil. Cover the bowl with cling film or a clean tea towel and leave it in a warm place to rise.
- 5
Shape the rolls
Divide the dough into 12 equal portions and roll each into a ball.
- 6
Rise in the dish
Set the dough balls in a lightly greased ovenproof dish. Cover with cling film or a clean tea towel and leave to rise for 30 minutes.
- 7
Heat the oven
Preheat the oven to 180°C.
- 8
Fill with cheese
After the 30-minute rise, gently flatten each ball in your palms. Put a small square of cheese in the centre, bring the dough edges together and pinch to seal. Return each roll to the dish seam-side down.
- 9
Prepare garlic butter
Mix the soft butter with the garlic, parsley and thyme, then brush the mixture over the rolls.
- 10
Bake until golden
Bake for 25 minutes, or until the rolls are golden brown.
- 11
Brush with butter
Brush the rolls with more butter if you wish.
What are cheesy garlic dinner rolls?
Dinner rolls are small, soft bread rolls served alongside a meal or shared at the table. This version takes a familiar yeast dough and fills each roll with cheese, then finishes it with garlic, parsley and thyme butter.
The recipe draws on the broad tradition of enriched, yeasted breads rather than one particular regional style. A soft dough and sealed cheese centre make these rolls tender outside and gooey within.
Nutrition and macros by portion
The nutrition label shows one serving as written: 165 calories, 6g protein, 23g carbs, 6g fat.
| Portion | Adjustment | kcal | Protein | Carbs | Fat |
|---|---|---|---|---|---|
| Lighter | Use less butter | 115 kcal | 4g | 16g | 4g |
| This serving | As written | 165 kcal | 6g | 23g | 6g |
| Hungry | Serve two rolls | 248 kcal | 9g | 35g | 9g |
The flour and sugar provide most of the carbohydrates, while the butter and cheese contribute much of the fat; the cheese and milk also supply protein. Serve one roll with vegetables and a protein-rich main to make a more balanced plate.
Choosing the flour and cheese
Flour: Bread flour gives the dough more structure, while plain flour or cake wheat flour can also be used as listed. Since different flours absorb liquid differently, add the milk gradually when mixing by hand.
Cheese: Mozzarella melts into a stretchy centre, while cheddar gives a more pronounced savoury flavour. Cut it into small pieces so each portion can be enclosed and sealed.
Getting a soft dough
Milk: Lukewarm milk helps bring the dough together; avoid using it hot. Start with half the milk if kneading by hand and add more until the dough is soft and sticky.
Kneading: Oil your hands and work surface rather than correcting the stickiness with extra flour. The dough should become smoother as you knead, which helps keep the finished rolls soft.
Sealing the cheese inside
Filling: Flatten each risen ball just enough to make room for its cheese piece. Keep the filling modest so the edges can meet without stretching the dough too thin.
Seam: Pinch the edges together firmly and place each roll seam-side down. A well-sealed join helps keep the melted cheese inside as the rolls bake.
Rising and baking cues
First rise: The recipe asks for a warm place but does not specify a duration, so let the dough rise until it looks expanded. The time can vary with the warmth of the room.
Second rise: Leave the shaped rolls covered for 30 minutes, then bake at 180°C for 25 minutes. Look for a golden surface as the main doneness cue.
Serving the rolls
These rolls are best served warm, while the cheese centre is still soft. They pair well with soup, salad or a simple main meal.
For a fuller spread, serve them alongside a vegetable dish and a source of protein. The garlic-herb butter gives them plenty of flavour without needing an additional dip.
Recipe notes & tips
- Use oil on your hands during kneading to manage the sticky dough without adding extra flour.
- Add the milk gradually when mixing by hand, since flour types can absorb liquid differently.
- Divide the dough into 12 similar portions so the rolls bake at a similar rate.
- Pinch each filled roll closed and set it seam-side down in the dish.
- Brush on the garlic-herb butter evenly so every roll gets some flavour.
- Check for a golden-brown surface at the 25-minute mark.
Variations
- Use cheddar: Fill the rolls with small pieces of cheddar for a sharper savoury centre.
- Use mozzarella: Choose mozzarella for a softer, stretchier melted filling.
- Add more herbs: Increase the parsley or thyme in the butter for a stronger herbal finish.
- Make them smaller: Divide the dough into more portions and use smaller cheese pieces.
- Serve plain: Leave off the optional extra butter after baking for a less buttery finish.
Common mistakes to avoid
- Adding too much flour: The dough is meant to be sticky; oil your hands and keep kneading instead.
- Pouring in all the milk by hand: Start with half and add the rest gradually to judge the dough texture.
- Overfilling the rolls: Use a small cheese piece so the dough edges can seal properly.
- Leaving the seam open: Pinch the dough together firmly and place the join underneath.
- Skipping the second rise: Cover the shaped rolls and give them the full 30 minutes before baking.
- Relying only on the timer: Bake until the tops are golden, as ovens can vary.
How to store
Cool the rolls, then store them covered in the fridge for up to 3 days. Reheat in a 160°C oven until warmed through; the cheese centre may firm up as it cools and soften again when reheated.
Frequently asked questions
Can I use plain flour instead of bread flour?
Yes. The recipe also allows cake wheat flour or plain flour, though the dough texture may vary slightly.
Which cheese works best?
Mozzarella gives a stretchy melted centre, while cheddar has a stronger flavour. Use small pieces of either so they are easy to seal inside the dough.
How sticky should the dough be?
It should be soft and sticky at first. The recipe advises kneading for 10 minutes and avoiding extra flour as it becomes less sticky.
How long does the first rise take?
The method does not specify a time. Leave the covered dough in a warm place until it has risen and looks expanded.
Can I prepare the rolls ahead?
They can be baked ahead and reheated before serving. For best texture, serve them warm after reheating.
How do I know when they are baked?
Bake at 180°C for 25 minutes, or until the rolls are golden brown.
Cook it from the original
This recipe comes from tamarindnthyme.com. Their page has the author’s own photos, notes and tips — the best place to cook it from.
Open the recipe on tamarindnthyme.com