
Maple Apple Ricotta Cake
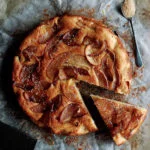
This custard-like cake combines creamy ricotta with tender apples simmered in maple syrup and a nutty note from browned butter. Serve it warm or at room temperature for an easy dessert or afternoon bake.
Ingredients
- 15 g (1 tbsp)butter
- 340 g (12 oz), thinly sliced (about 2 large apples)apples
- 1 pinchsalt
- 120 ml (½ cup)maple syrup
- 113 g (1 stick; 4 oz)butter
- 180 g (1½ cups)plain flour
- 100 g (½ cup)sugar
- 10 ml (2 tsp)baking powder
- 5 ml (1 tsp)kosher salt
- 3eggs
- 340 g (1½ cups; 12 oz)whole-milk ricotta
- 5 ml (1 tsp)pure vanilla extract
- to tasteraw sugar, for garnish
- to tastewarm maple syrup, to drizzle
Instructions
- 1
Prepare the tin
Heat the oven to 180°C (350°F). Grease a 23 cm (9-inch) cake tin and line it with a piece of baking parchment.
- 2
Cook the apples
Warm a large frying pan over a medium heat and melt 15 g (1 tbsp) butter in it. Add the sliced apples, season with a pinch of salt and sauté for about 5–6 minutes, until they are beginning to caramelise.
- 3
Simmer with maple
Pour in the maple syrup and bring it to a simmer. Reduce the heat and simmer for 2 minutes, then turn off the heat and transfer the apples and syrup to a bowl. Leave to cool slightly and wipe out the pan.
- 4
Brown the butter
Add 113 g (1 stick; 4 oz) butter to the pan and melt over a medium heat. Reduce the heat to low and cook for a couple of minutes, until the butter is browned and fragrant. Leave to cool slightly.
- 5
Mix the batter
Whisk the flour, sugar, baking powder and salt together in a mixing bowl. In a separate bowl, beat the eggs, then whisk in the ricotta, browned butter and vanilla.
- 6
Fold in apples
Fold the dry ingredients into the wet mixture in two batches with a rubber spatula, stopping once smooth and taking care not to overmix. Fold in three-quarters of the apples and all their maple syrup. Pour the batter into the prepared tin and smooth the top, then arrange the remaining apples over it.
- 7
Bake the cake
Bake on the middle shelf for about 40–45 minutes, or until just cooked through. Remove the tin from the oven and leave the cake to cool for 10 minutes, then lift it out using the parchment.
- 8
Finish and serve
Cut the cake into slices and serve warm or at room temperature, sprinkled with raw sugar and drizzled with warm maple syrup.
What is maple apple ricotta cake?
Ricotta cakes are associated with Italian baking traditions, where fresh cheese lends cakes a tender, moist texture. This version pairs ricotta with apples cooked in maple syrup, giving the crumb a soft, almost custard-like quality.
Browned butter adds a toasted, nutty note, while a layer of apples on top makes the fruit visible and gives each slice a sweet finish.
Nutrition and macros by portion
The nutrition label shows one serving as written: 845 calories, 18g protein, 102g carbs, 37g fat.
| Portion | Adjustment | kcal | Protein | Carbs | Fat |
|---|---|---|---|---|---|
| Lighter | Smaller slice, less syrup | 592 kcal | 13g | 71g | 26g |
| This serving | As written | 845 kcal | 18g | 102g | 37g |
| Hungry | Larger slice | 1268 kcal | 27g | 153g | 56g |
The flour, sugar, maple syrup and apples provide most of the carbohydrates, while butter and ricotta contribute much of the fat; eggs and ricotta supply protein. Balance a slice with plain yoghurt and fresh fruit, or serve a smaller slice after a meal.
Why cook the apples first?
Apple slices: sautéing them in butter starts to soften the fruit and encourages light caramelisation before it goes into the cake.
Maple syrup: simmering the apples briefly lets them take on its flavour. Keep all the syrup from the bowl for the batter, as it adds sweetness and moisture.
Getting the browned butter right
Watch the butter closely over low heat once it has melted. It is ready when it smells fragrant and has browned, but take it off the heat before the milk solids turn very dark.
Let it cool slightly before mixing it with the eggs and ricotta. Adding it while very hot can make the mixture harder to combine smoothly.
Fold gently for a tender crumb
Dry ingredients: adding them in two batches makes them easier to incorporate without beating the mixture.
Stop folding as soon as no dry flour is visible. Overmixing can make the cake less tender, so use a spatula and gentle strokes rather than whisking at this stage.
How to judge when it is baked
The cake should be just cooked through after about 40–45 minutes on the middle shelf. Begin checking towards the earlier end of that range, since ovens and tins can affect the timing.
Let it rest in the tin for 10 minutes before lifting it out. The cake is delicate while hot, and this short rest helps it hold together for slicing.
Serving and timing
The cake is served warm or at room temperature, so it works both as a freshly baked dessert and as a make-ahead afternoon treat. Add the raw sugar and warm maple syrup just before serving.
For a simple accompaniment, serve slices with unsweetened tea or coffee. If you want something alongside the cake, a spoonful of plain yoghurt offers a cool, tangy contrast.
Recipe notes & tips
- Slice the apples thinly so they soften quickly in the pan and sit neatly on top of the cake.
- Measure the browned butter after cooking only if your original amount has not already been weighed; use the full 113 g before browning.
- Let the browned butter cool slightly so it blends smoothly into the ricotta and eggs.
- Fold the flour mixture in gently and stop as soon as the batter is smooth.
- Reserve about a quarter of the cooked apples for arranging over the top before folding the rest into the batter.
- Use the parchment to lift the cake only after its 10-minute rest in the tin.
Variations
- Use pears: replace the apples with thinly sliced pears and cook them in the same way.
- Add cinnamon: stir a little ground cinnamon into the dry ingredients for a warm spice note.
- Add lemon zest: mix finely grated zest into the ricotta and egg mixture for a brighter flavour.
- Try toasted nuts: scatter chopped toasted walnuts over the top before serving.
- Serve with yoghurt: add a spoonful of plain yoghurt alongside each slice for a tangy contrast.
Common mistakes to avoid
- Overcooking the butter: it can turn bitter; keep the heat low and remove it once browned and fragrant.
- Skipping the apple cooling time: very hot apples and syrup can make the batter harder to handle; let them cool slightly first.
- Overmixing the batter: this can make the cake less tender; fold only until the flour is incorporated.
- Adding all the apples to the batter: reserve about a quarter for the top so the slices remain visible.
- Removing the cake immediately: it may be fragile while hot; leave it in the tin for 10 minutes before lifting it out.
- Overbaking: the cake can lose its soft texture; check it at around 40 minutes and bake only until just cooked through.
How to store
Keep the cooled cake covered in the fridge for up to 3 days. Bring a slice to room temperature or warm it gently in a low oven before serving; add the maple drizzle just before eating.
Frequently asked questions
Can I make the cake ahead?
Yes. Bake it ahead and keep it covered in the fridge once cool. Serve at room temperature or warm gently, then add the garnish and maple drizzle.
How do I know the cake is cooked?
Bake for about 40–45 minutes, until just cooked through. Start checking around 40 minutes, as oven timings can vary.
Can I use part-skim ricotta?
Whole-milk ricotta is specified and gives the cake a richer, creamier texture. Part-skim ricotta may work, but the result can be less rich.
Can I use a different apple?
Yes. Choose an apple that holds its shape when cooked and slice it thinly. The exact sweetness may vary, but the method stays the same.
Can I freeze this cake?
It should freeze well wrapped in individual slices, though the texture may be slightly softer after thawing. Defrost in the fridge and warm gently if desired.
Cook it from the original
This recipe comes from theoriginaldish.com. Their page has the author’s own photos, notes and tips — the best place to cook it from.
Open the recipe on theoriginaldish.com