
Peruvian lemon chicken
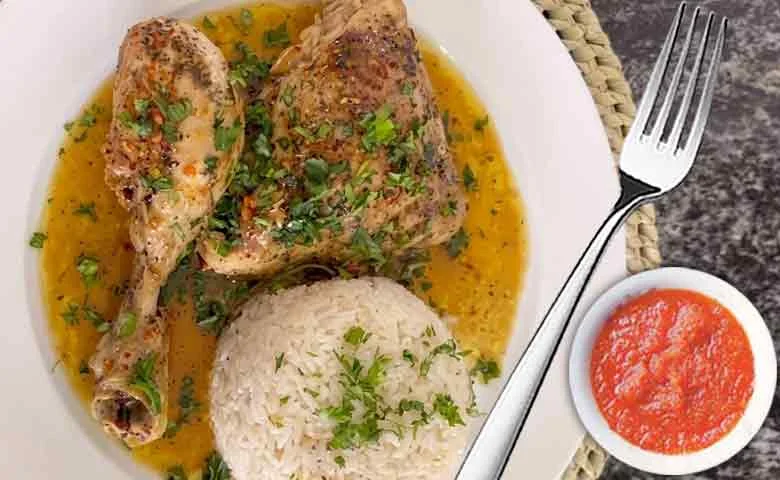
Peruvian lemon chicken is browned chicken simmered in a bright lemon, garlic and ají amarillo sauce. Marinating the chicken first gives it time to take on the citrus and spices, while the pan sauce keeps it juicy as it cooks.
Ingredients
- 4chicken pieces (leg, thigh or breast)
- Juice of 3fresh lemons
- Zest of 1lemon
- 3garlic cloves, finely chopped
- 30 ml (2 tablespoons)butter
- 30 ml (2 tablespoons)vegetable oil
- 240 ml (1 cup)chicken stock
- To tastesalt
- To tasteblack pepper
- 5 ml (1 teaspoon)ground cumin
- 5 ml (1 teaspoon)dried oregano
- 1 mediumred onion, sliced into thin strips
- 15 ml (1 tablespoon)ground ají amarillo
- 5 ml (1 teaspoon)mustard
- 5 ml (1 teaspoon), optionalsillao (Peruvian soy sauce)
- To tastefresh parsley, chopped
- As preferredsubtle lime or Tahitian lime, for a milder flavour
- As preferredfresh coriander, as an alternative to parsley
- As preferredskinless chicken breast, for a lighter version
- To servefluffy white rice
- To servefried potatoes
- To servemashed potatoes
- To servelettuce and tomato salad
- To servesteamed vegetables
- To serveboiled cassava
- To servesliced avocado
Instructions
- 1
Mix the marinade
Allow 5 minutes. Combine the lemon juice and zest, garlic, cumin, oregano, salt and pepper in a bowl, then mix well.
- 2
Marinate the chicken
Add the chicken pieces and coat them all over with the marinade. Cover and refrigerate for 30 minutes; if you have more time, you can leave them for up to 2 hours.
- 3
Brown the chicken
Heat the oil and butter in a large frying pan. Let excess marinade drip from the chicken, then brown each piece for about 5–6 minutes per side. The aim is to colour the outside, not cook the chicken through.
- 4
Cook the dressing
Allow 8 minutes. In the same pan, cook the onion until translucent. Stir in the ají amarillo, mustard and, if using, sillao; cook for a few minutes, stirring until aromatic and combined.
- 5
Add the liquid
Pour in the chicken stock and the remaining marinade. Stir carefully and let the sauce come to a gentle simmer.
- 6
Simmer the chicken
Return the chicken pieces to the pan, cover and cook over medium-low heat for about 20 minutes. Baste them with the sauce from time to time.
- 7
Reduce the sauce
Once the chicken is fully cooked, uncover the pan and simmer until the sauce has reduced slightly and looks creamier. For a thicker sauce, you can stir in a small teaspoon of cornflour dissolved in cold water.
- 8
Finish with herbs
Scatter over chopped fresh parsley and a little extra lemon zest, then turn off the heat.
What is Peruvian lemon chicken?
This dish brings together chicken, citrus and seasonings in a pan sauce, drawing on ingredients and flavours associated with Peruvian cooking. Lemon gives it a fresh, tangy edge, while ají amarillo adds a distinctive chilli flavour.
The method works by browning the chicken before gently simmering it in stock and the leftover marinade. That sequence builds flavour in the pan and lets the chicken finish cooking in the sauce.
Nutrition and macros by portion
The nutrition label shows one serving as written: 480 calories, 0g protein, 0g carbs, 0g fat.
| Portion | Adjustment | kcal | Protein | Carbs | Fat |
|---|---|---|---|---|---|
| Lighter | Use skinless chicken breast | 336 kcal | 0g | 0g | 0g |
| This serving | As written | 480 kcal | 0g | 0g | 0g |
| Hungry | Add a larger rice portion | 720 kcal | 0g | 0g | 0g |
The chicken provides most of the protein, while rice, potatoes or cassava contribute most of the carbohydrates when served alongside it. Butter and oil supply much of the fat in the dish, so pair a serving with salad or steamed vegetables and choose one starch.
The citrus marinade
Fresh lemon juice and zest provide both sharpness and fragrance. Use freshly squeezed juice for the marinade, and reserve any extra zest for the finishing step.
Thirty minutes in the fridge is the stated marinating time; the recipe allows up to 2 hours if you want to prepare ahead. Keep the chicken covered while it rests.
Building the pan flavour
Brown the chicken in the butter and oil, then use the same pan for the onion. The browned bits left behind add depth to the sauce as the onion softens.
Ají amarillo, mustard and optional sillao go in with the onion. Stir them together for a few minutes so the dressing is aromatic before adding stock.
Getting the chicken cooked through
The initial browning is for colour rather than cooking the chicken all the way through. Avoid rushing this stage, but take the pieces out of the pan once both sides are browned.
Return the chicken to the sauce, cover the pan and simmer over medium-low heat for about 20 minutes. Check that the thickest part is cooked through before serving.
The sauce texture
The sauce should simmer gently while the chicken cooks; a hard boil can make it reduce too quickly. Baste the chicken occasionally so the surface stays coated.
Uncover the pan at the end and let the sauce reduce slightly. If you choose the optional cornflour thickening suggested in the method, dissolve it in cold water first to help it blend in.
Choosing sides
Serve the chicken with fluffy white rice, potatoes or boiled cassava to make the most of the citrus sauce. A lettuce and tomato salad or steamed vegetables add a fresh contrast.
Sliced avocado is another listed accompaniment. Choose one starchy side and add vegetables if you want a more balanced plate.
Recipe notes & tips
- Use freshly squeezed lemon juice for a brighter marinade.
- Let excess marinade drip from the chicken before browning to help it colour in the pan.
- Brown the chicken in batches if the pan is crowded.
- Keep the sauce at a gentle simmer while the chicken finishes cooking.
- Baste the chicken occasionally with the sauce.
- Add the parsley and final lemon zest just before turning off the heat.
Variations
- Milder citrus: Use subtle lime or Tahitian lime instead of the lemons.
- Herb swap: Use fresh coriander in place of parsley.
- Skinless breast: Choose skinless chicken breast for the lighter version suggested in the recipe.
- Optional sillao: Add the teaspoon of sillao for an extra savoury note, or leave it out.
- Side dishes: Serve with rice, potatoes, cassava, salad, steamed vegetables or avocado.
Common mistakes to avoid
- Cooking the chicken through while browning: Brown it for colour, then finish cooking it covered in the sauce.
- Skipping the marinade time: Refrigerate the chicken for at least the stated 30 minutes.
- Crowding the pan: Brown the pieces in batches so they have room to colour.
- Boiling the sauce hard: Keep it at a gentle simmer so it does not reduce too quickly.
- Adding cornflour dry: If thickening the sauce, dissolve it in cold water first.
How to store
Refrigerate leftovers in a covered container and use within 3 days. Reheat gently in a covered pan until piping hot, adding a splash of water or stock if the sauce has thickened too much.
Frequently asked questions
Can I marinate the chicken for longer?
Yes. The recipe gives 30 minutes as the standard time and allows up to 2 hours in the refrigerator.
Can I use chicken breast?
Yes. The recipe lists breast as an option, and suggests skinless breast for a lighter version. Adjust the cooking as needed for the size and thickness of the pieces, checking that they are cooked through.
What can I use instead of parsley?
Fresh coriander is suggested as an alternative. Add it at the end as you would the parsley.
Is sillao essential?
No. It is listed as optional, so you can leave it out and follow the rest of the method.
How can I thicken the sauce?
The method suggests reducing it uncovered until it thickens slightly. For a thicker result, it also suggests adding a small teaspoon of cornflour dissolved in cold water.
What should I serve with the chicken?
The suggested sides include fluffy white rice, fried or mashed potatoes, boiled cassava, lettuce and tomato salad, steamed vegetables and sliced avocado.
Cook it from the original
This recipe comes from recetascocinaperuana.com. Their page has the author’s own photos, notes and tips — the best place to cook it from.
Open the recipe on recetascocinaperuana.com