
Mini Halloween Charcuterie Boards
Nutrition per Serving
834
Calories
20g
Protein
81g
Carbs
49g
Fat
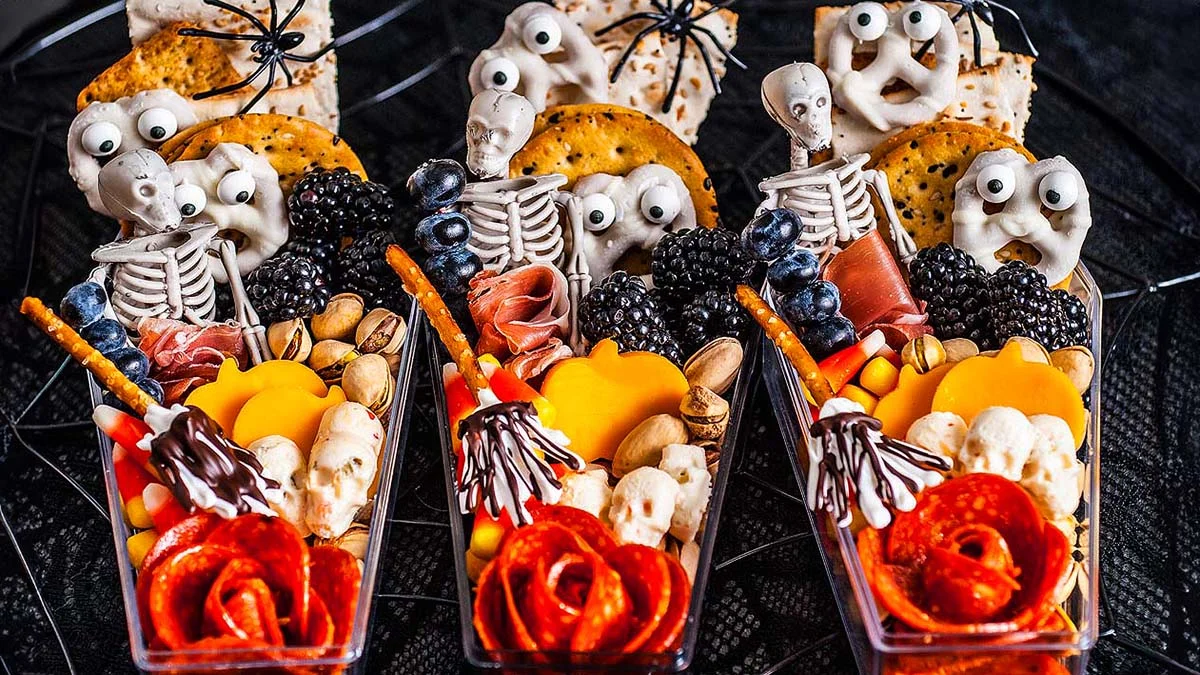
These mini Halloween charcuterie boards are super-cute. They're not difficult to make and are sure to be the talk of your Halloween party.
📝 Ingredients
- 4 Tablespoons soft cheese (eg Boursin or a cheese spread)
- 4 pretzel sticks
- 1/4 Cup melting candy (white)
- 3 Tablespoons chocolate chips (dark)
- 8 pretzels (white chocolate-covered )
- 16 candy eyes
- 24 slices pepperoni
- 4 Ounces cheddar cheese (block)
- 1 Cup blueberries
- 1 Cup blackberries
- 1 Cup pistachios (roasted, salted, in-shell)
- 1 Cup candy corn
- 20 to 24 crackers
- 8 Slices prosciutto
👨🍳 Instructions
- 1press: Start by making the soft cheese skulls. Lightly spray a skeleton mold with spray oil. Carefully press the soft spreadable cheese into the skull cavities. Place the mold into the freezer for about 15 to 30 minutes until it hardens enough to be taken out as one piece.
- 2drizzle: Make the witch's brooms next. Melt the white melting candies and scoop into a piping bag, repeat with the dark chocolate chips in a separate piping bag. Take one pretzel stick and lay it down on a piece of parchment paper. Drizzle the white melting chocolate vertically onto the bottom ½” of the pretzel to create the bottom of the broom. Then take the dark chocolate and drizzle on top of the white melting chocolate. Repeat for the remaining pretzels, place the brooms in the refrigerator to harden.
- 3attach: While the white chocolate is still melted make the ghost pretzels. Add two drops of melted white chocolate just above the top two holes of each white chocolate pretzel. Place one candy eyeball on each of the droplets. Place in the refrigerator to harden completely.
- 4shape: To make the pepperoni roses, you will need an empty bottle such as a 20 oz soda bottle or an empty glass olive oil bottle. the opening at the top of the bottle should be about the size of a quarter. Place one pepperoni onto the top of the bottle. Folding about half of the pepperoni down into the bottle and half down the outside of the bottle. Add two more pepperonis to cover the whole opening, they should overlap a little. Repeat this by adding a second layer of three pepperonis, staggering on top of the first three. When complete, turn the bottle upside down on to a clean workspace and gently twist the bottle up and off of the pepperoni rose. If needed, you can use toothpicks to secure the roses.
- 5cut: Use the pumpkin cookie cutter to cut pumpkins out of the cheese, then slice to create enough pumpkins for 2 per coffin.
- 6stack: To make the blueberry stick take a toothpick and stack as many blueberries on it as you can.
- 7assemble: To assemble the mini charcuterie boards take the empty coffins and place 5 or 6 crackers at the very top back of the coffin. Set your skeleton just in front of the crackers off to one side. Take one or two pieces of prosciutto and gently fold or crumple like a ribbon and press into the skeleton's lap having it come up into or just outside of the rib cage.
- 8add: Set the pepperoni roses at the very bottom end of the coffin depending on the size of your coffin, you may need a couple extra slices of pepperoni on the bottom to lift that rose up a tiny bit for presentation.
- 9add: Next, you'll want to add the blackberries next to the skeleton and the crackers. Then place the blueberry stick on the skeleton's left side just in front of his shoulder.
- 10Add little piles of pistachios and candy corn as seen in photos. Then take your two pieces of pumpkin shaped cheese and place just in front of the pistachios.
- 11arrange: Add three of the soft cheese skulls just in front of the cheddar cheese. Place your white ghost pretzels among the crackers, and the broomstick right on top.
- 12Serve right away.
About the Chef & Original Recipe
This recipe was published by xoxobella.com. Visit the original source for step-by-step photos, chef notes and additional details.
Source: xoxobella.com