
Christmas Sugar Cookie Bars
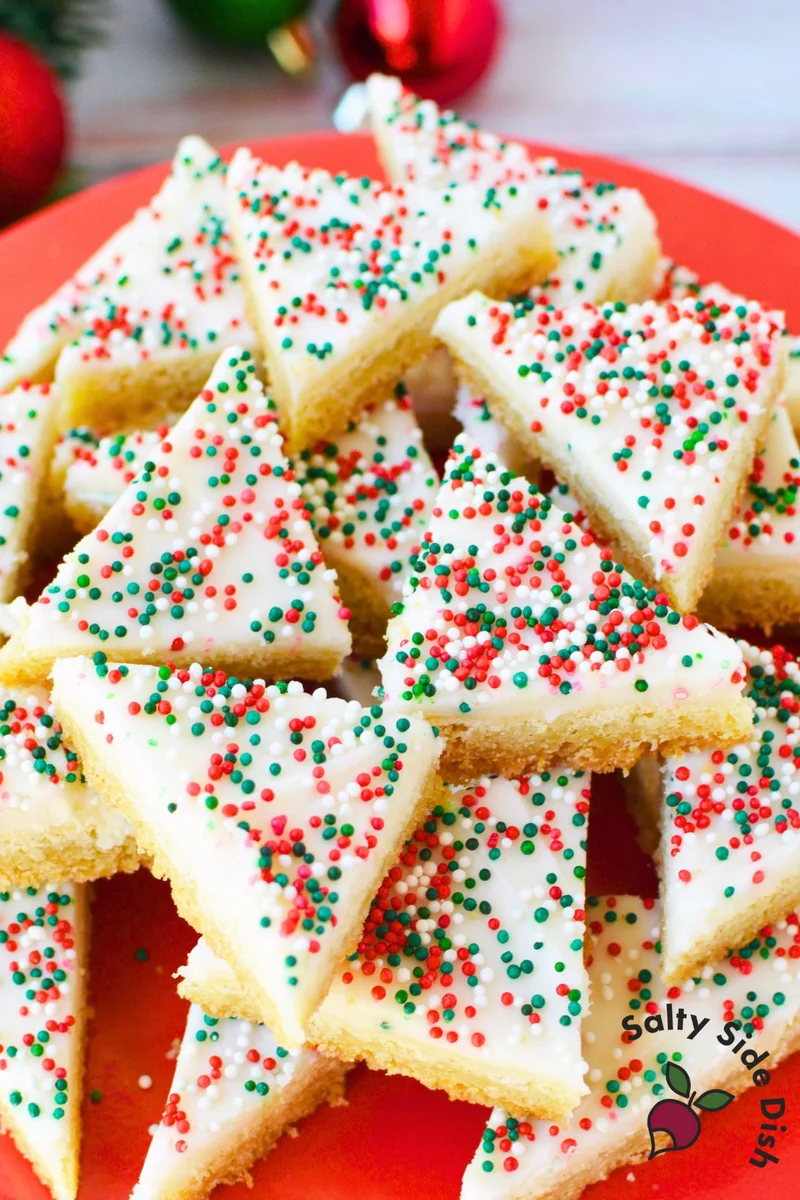
These soft American sugar cookie bars bake as one sheet-pan slab, then get topped with creamy frosting and festive sprinkles. They’re a handy choice for a holiday dessert tray or cookie exchange because you can cut the slab into squares or triangles.
Ingredients
- 313 g (2 1/2 cups)plain flour
- 3/4 teaspoonbicarbonate of soda
- 1/2 teaspoonbaking powder
- 1/4 teaspoonsalt
- 170 g (3/4 cup)butter, softened to room temperature, not melted
- 333 g (1 2/3 cups)granulated sugar
- 30 g (1/4 cup)icing sugar
- 1egg
- 2 teaspoonsvanilla extract
- 454 g (16 oz)ready-made frosting
- to tasteChristmas sprinkles or nonpareils
Instructions
- 1
Prepare the tray
Heat the oven to 175°C (350°F). Line a 25 × 38 × 2.5 cm (10 × 15 × 1-inch) baking tray with baking parchment and lightly coat the parchment with non-stick cooking spray.
- 2
Mix dry ingredients
Whisk the flour, bicarbonate of soda, baking powder and salt together in a medium bowl, then set aside.
- 3
Cream butter and sugar
In a large bowl, beat the softened butter, granulated sugar and icing sugar on medium-high speed for about 5 minutes, scraping down the sides halfway through, until pale and fluffy.
- 4
Add egg and vanilla
Beat in the egg and vanilla extract until fully combined. The mixture will be creamy and thick.
- 5
Combine the dough
Gradually add the flour mixture and beat gently just until combined. Avoid overmixing; the dough may look slightly crumbly.
- 6
Press and bake
Transfer the dough to the prepared tray and press it into an even layer with your hands or the back of a spoon. Bake for 15 minutes, until lightly puffed with the top beginning to crack. Avoid overbaking, as the bars will continue to set while cooling.
- 7
Cool completely
Take the tray out of the oven and leave the cookie slab to cool completely in the tray before adding the frosting.
- 8
Frost and decorate
Spread the ready-made frosting evenly over the cooled slab with an offset spatula, then add a generous scattering of Christmas sprinkles or nonpareils.
- 9
Cut into pieces
Lift the parchment and cookie slab out of the tray and place it on a cutting board. Cut into bars or triangles; for standard bars, cut into 6 × 3 rectangles, then cut each rectangle diagonally into halves or quarters for smaller triangles. Trim the edges if you prefer a neater finish.
What are sugar cookie bars?
Sugar cookie bars take the familiar buttery, vanilla-scented American sugar cookie dough and bake it in a single tray rather than shaping individual biscuits. This version is finished with ready-made frosting and Christmas sprinkles, making it easy to decorate for a holiday table.
The method relies on creaming the butter and sugars until fluffy, then pressing the dough into an even layer. Baking one slab also makes it simple to cut a batch into small portions for sharing.
Nutrition and macros by portion
The nutrition label shows one serving as written: 184 calories, 0g protein, 0g carbs, 0g fat.
| Portion | Adjustment | kcal | Protein | Carbs | Fat |
|---|---|---|---|---|---|
| Lighter | Use less frosting | 129 kcal | 0g | 0g | 0g |
| This serving | As written | 184 kcal | 0g | 0g | 0g |
| Hungry | Serve larger bars | 276 kcal | 0g | 0g | 0g |
The flour and sugars provide most of the carbohydrates, while the butter and frosting contribute much of the fat; the egg adds a little protein. Pair a bar with fruit or another less-sweet option if you want a more balanced dessert plate.
Why cream the butter and sugars?
Softened butter: it should give when pressed but remain solid, not melted. This lets it beat smoothly with the sugars.
Creaming time: beat for about 5 minutes and scrape the bowl halfway through so the mixture becomes pale and fluffy throughout.
Mix the dough gently
Dry mixture: whisking the flour, bicarbonate of soda, baking powder and salt first helps distribute the raising agents before they meet the butter mixture.
Once combined: add the flour mixture gradually and stop beating as soon as no dry pockets remain. A slightly crumbly-looking dough is expected and can be pressed together in the tray.
Press for an even bake
Even layer: press the dough across the lined tray and level the surface, paying attention to the corners. A consistent thickness helps the slab bake evenly.
Parchment: lining and lightly greasing the tray makes it easier to lift out the cooled slab and helps protect the edges from overbrowning.
Watch the baking cues
At 15 minutes: look for a lightly puffed surface with the beginnings of small cracks. The bars should not be baked until deeply browned.
Cooling: let the slab cool completely in the tray before frosting. If it is still warm, the frosting can soften and melt into the cookie layer.
Frost, sprinkle and slice
Frosting: spread it in an even layer over the cooled slab, then add the sprinkles while the surface is still receptive so they stay in place.
Cutting: lift the slab onto a board using the parchment. Cut it into rectangles first, then divide those diagonally for triangles if you want smaller festive pieces.
Serving ideas
These bars fit well on a holiday dessert tray alongside fruit, biscuits or other small sweets. Their sweet frosting makes smaller pieces useful when serving a spread with several desserts.
For a simple pairing, serve them with tea, coffee or a glass of milk. Cut the slab shortly before serving for the tidiest edges.
Recipe notes & tips
- Bring the butter to room temperature so it creams smoothly without needing to melt it.
- Scrape down the bowl halfway through creaming to incorporate butter and sugar from the sides.
- Stop mixing once the flour is combined to avoid developing a tough, dense dough.
- Press the dough into an even layer, especially in the corners of the tray.
- Wait until the slab is completely cool before spreading on the frosting.
- Use a long, sharp knife and wipe it between cuts for cleaner portions.
Variations
- Change the sprinkles: use another colour or shape to suit a different celebration.
- Add citrus: mix finely grated lemon or orange zest into the dough with the egg and vanilla.
- Use a different extract: replace the vanilla with almond extract for a different flavour.
- Make smaller triangles: cut each rectangle diagonally into quarters rather than halves.
- Tint the frosting: stir a little food colouring into the ready-made frosting before spreading.
Common mistakes to avoid
- Using melted butter: the dough texture can change; use butter softened at room temperature instead.
- Overmixing after adding flour: the bars can turn dense; beat only until the mixture comes together.
- Uneven pressing: thicker and thinner patches bake differently; level the dough across the whole tray.
- Overbaking: the slab can dry out; take it out at 15 minutes when lightly puffed and just beginning to crack.
- Frosting while warm: the topping can melt into the cookie; let the slab cool completely first.
- Cutting without lifting the parchment: the slab may be harder to portion neatly; move it to a board before slicing.
How to store
Store the cut bars in an airtight container at room temperature for up to 3 days, or refrigerate them for up to 5 days. Let chilled bars sit out briefly before serving; reheating is not needed.
Frequently asked questions
Can I make the bars ahead?
Yes. Bake the slab and let it cool completely, then frost and decorate it before serving or store it covered until needed.
How can I tell when the cookie layer is done?
After about 15 minutes, it should be lightly puffed and the top should just begin to crack. Avoid waiting for deep browning, as the slab continues to set as it cools.
Why does the dough look crumbly?
The method notes that the dough may look slightly crumbly after the flour is mixed in. Press it into the tray rather than adding extra liquid.
Can I use homemade frosting?
The recipe uses ready-made frosting, but you can spread homemade frosting over the slab once it has cooled completely.
How do I get neat cuts?
Lift the parchment and slab onto a cutting board, then cut with a long, sharp knife. Wiping the blade between cuts can help keep the edges tidy.
Can I cut the bars into triangles?
Yes. Cut the slab into rectangles first, then slice each rectangle diagonally into halves or quarters for smaller triangles.
Cook it from the original
This recipe comes from saltysidedish.com. Their page has the author’s own photos, notes and tips — the best place to cook it from.
Open the recipe on saltysidedish.com