
Sourdough Bread : No Knead and EASY
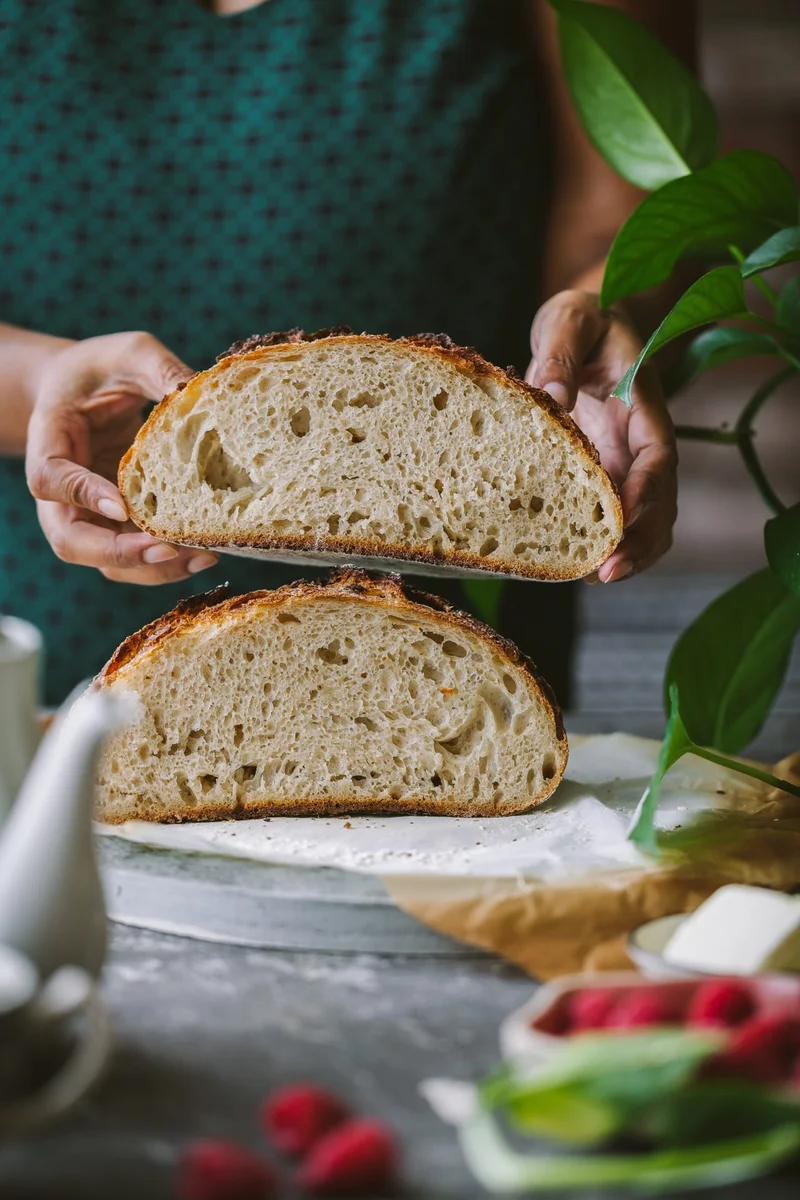
This no-knead sourdough loaf uses a ripe starter, a series of gentle folds and a long, cool proof to develop its flavour and structure. It takes planning and patience, but the hands-on work is simple and the loaf is baked in a covered casserole for a crisp crust.
Ingredients
- 350 gplain flour
- 90 gwholemeal flour
- 315 g, plus extra for wetting your handswarm water
- 90 gripe, mature sourdough starter
- 9 gsalt
- to dustrice flour
Instructions
- 1
Mix the flours
Put the warm water and both flours in a large mixing bowl. Mix by hand until combined and no dry patches of flour remain; there is no need to knead.
- 2
Rest the dough
Cover the bowl and leave the dough to rest for 2 hours.
- 3
Add the starter
Add the ripe starter. With a wet hand, quickly pinch it into the dough using your fingers and thumb. Cover and rest for 15 minutes.
- 4
Mix in salt
Sprinkle the salt over the dough and use a wet hand to work it in.
- 5
Slap and fold
Lightly wet the work surface and take the dough out of the bowl. Slap it down and fold it over, then turn it by 90 degrees and repeat. Continue for 2 minutes.
- 6
Rest the dough
Return the dough to the bowl, cover it and leave it to rest for 30 minutes.
- 7
Plan the folds
Complete 6 rounds of stretch and folds: leave 15 minutes between the first 4 rounds, then 30 minutes between each of the final 2 rounds.
- 8
Stretch and fold
Wet your hands, lift one section of dough upwards and fold it over. Turn the bowl by 180 degrees and repeat, then turn it by 90 degrees and repeat, followed by a final turn of 180 degrees and fold. Finish by lifting the whole dough towards you with both hands and folding in both sides to make a smooth, rounded top. The dough may not stretch much at first; it should become more pliable after the third round.
- 9
Bulk ferment
After all 6 rounds, cover the dough and leave it to ferment for 2–3 hours. The timing depends on the room temperature; look for air pockets and a rise to almost double its original size.
- 10
Prepare to shape
Dust the work surface lightly with flour. Gently turn the dough out onto it, taking care not to knock out the air.
- 11
Pre-shape the loaf
Dust the dough, especially around its edges. Use a bench scraper to draw it towards you in a circular motion several times, forming a soft, round ball.
- 12
Rest the shape
Leave the pre-shaped dough uncovered for 30 minutes.
- 13
Flatten the dough
Dust the dough lightly with flour and flip it over in one quick movement. Gently stretch the sides to make a rough rectangle.
- 14
Fold the dough
Fold the opposite edges over one another. Lift from the side and roll the dough up as you would a blanket.
- 15
Shape the loaf
Dust lightly with flour again, then use a bench scraper to shape the dough into a round.
- 16
Prepare the basket
Dust a banneton or a cloth-lined bowl with flour. Turn the shaped dough over and place it inside.
- 17
Chill the dough
Cover the basket or bowl with linen and place it in a grocery bag. Seal the bag with a clip and refrigerate for 15 hours.
- 18
Heat the oven
After 15 hours, put the lidded casserole you will bake in into the oven. Preheat to 260°C (500°F). The loaf will bake covered for 30 minutes and uncovered for 20 minutes. A pizza stone or baking sheet can also be used, provided you have something to cover the loaf.
- 19
Score the loaf
Once the oven is hot, take the dough from the fridge. Dust it with a little rice flour and quickly turn it onto baking parchment. Score the top with a sharp knife.
- 20
Bake covered
Carefully transfer the loaf, still on the parchment, into the preheated casserole. Cover and bake for 30 minutes.
- 21
Finish baking
Reduce the oven temperature to 246°C (475°F) and bake uncovered for 20 minutes.
- 22
Cool the bread
Let the loaf cool completely before slicing. Allow 5–6 hours before cutting into it.
What is sourdough bread?
Sourdough is bread leavened with a fermented flour-and-water starter rather than commercial baker’s yeast. Its tradition reaches back to early forms of breadmaking, when naturally occurring yeasts and bacteria helped dough rise.
This version pairs plain flour with wholemeal flour and uses a long, chilled proof. The starter, folds and covered bake build flavour and structure without requiring kneading.
Nutrition and macros by portion
The nutrition label shows one serving as written: 1740 calories, 53g protein, 365g carbs, 6g fat.
| Portion | Adjustment | kcal | Protein | Carbs | Fat |
|---|---|---|---|---|---|
| Lighter | Serve a thinner slice | 1218 kcal | 37g | 255g | 4g |
| This serving | As written | 1740 kcal | 53g | 365g | 6g |
| Hungry | Serve a larger slice | 2610 kcal | 80g | 548g | 9g |
The plain and wholemeal flours provide most of the loaf’s carbohydrates, while the starter contributes more flour and a little protein. The dough contains no added oil or butter; most of its fat comes in small amounts from the flours. Serve a slice with eggs, beans or cheese and vegetables for a more balanced plate.
The flour and starter
Plain flour: it provides most of the dough’s structure and makes up the larger share of the mix.
Wholemeal flour: a smaller portion adds a fuller grain flavour. The dough’s water level is generous, so handle it with damp hands during mixing and folding.
Ripe starter: use it when it is mature and ready to raise dough. Mixing it in after the initial rest gives the flour time to hydrate first.
Why the dough rests
Initial rest: the flour and water sit together for 2 hours before the starter is added. This gives the mixture time to hydrate without any kneading.
Folding rests: the repeated stretches and folds develop strength gradually. Keep to the stated intervals and use wet hands to make the sticky dough easier to handle.
Build strength with folds
Slap and fold: this brief 2-minute stage works the dough on a lightly damp surface. It is followed by six rounds of gentler stretch and folds in the bowl.
Shaping: keep a light touch when turning the dough out and pre-shaping it, so you do not press out the air pockets. Use the bench scraper to help create surface tension as you draw the dough into a round.
Read the fermentation cues
Bulk fermentation: allow 2–3 hours after the folds, but judge the dough by its appearance as well as the clock. It should have visible air pockets and rise to almost twice its starting size.
Cold proof: the shaped loaf rests in the fridge for 15 hours. Keeping it covered in a bag helps prevent the surface from drying out.
Get the bake right
Covered bake: preheat the casserole with its lid in place, then bake the loaf covered for 30 minutes at 260°C (500°F). The hot covered vessel provides the enclosed baking environment specified in the method.
Crust: remove the lid and lower the heat to 246°C (475°F) for the final 20 minutes. Let the bread cool for 5–6 hours before slicing so the crumb can finish setting.
How to serve the loaf
This loaf works well sliced alongside soup, eggs or a salad, or simply toasted and topped with butter or cheese. Rice flour is used to dust the shaped dough, not as a main flour in the loaf.
For a meal, pair a slice with a protein-rich topping and vegetables. The bread is made as one loaf, so cut only as much as you need and keep the rest whole.
Recipe notes & tips
- Keep a bowl of water nearby so you can dampen your hands before handling the sticky dough.
- Use the stated rest intervals for the folds and cover the dough between sessions.
- Dust the basket or cloth well so the shaped loaf is easier to turn out.
- Check for air pockets and a near-doubling in size rather than relying on bulk-fermentation time alone.
- Preheat the casserole with its lid in the oven before transferring the loaf.
- Wait 5–6 hours before slicing to allow the loaf to cool completely.
Variations
- More wholemeal: replace some of the plain flour with wholemeal flour, keeping in mind the dough may handle differently.
- Seeded crust: press seeds onto the outside of the shaped loaf before placing it in the basket.
- Herb flavour: fold finely chopped herbs into the dough during a stretch-and-fold round.
- Garlic loaf: add finely chopped garlic during the folds for savoury flavour.
- Small loaves: divide the dough before shaping and adjust the baking time to suit their size.
Common mistakes to avoid
- Adding starter too slowly: pinch it into the dough quickly with wet fingers so it disperses evenly.
- Using dry hands: dampen them before folding to reduce sticking and tearing.
- Rushing bulk fermentation: wait for air pockets and a near-doubling in size, even if the dough needs longer than expected.
- Handling roughly: move the dough gently during pre-shaping and shaping to preserve its air.
- Skipping the hot casserole: preheat the lidded casserole before transferring the loaf.
- Slicing too soon: leave the bread to cool for 5–6 hours before cutting.
How to store
Once completely cool, store the loaf in a bread bag or wrapped in a clean cloth at room temperature and use within 2–3 days for the best texture. Refresh slices in a toaster or warm oven; freeze sliced bread for longer storage and toast from frozen.
Frequently asked questions
Can I make this without a banneton?
Yes. Use a bowl lined with a cloth and dust the cloth well with flour before adding the shaped dough.
How do I know when bulk fermentation is finished?
Look for air pockets and a dough that has risen to almost double its original size. The recipe allows 2–3 hours, but room temperature affects the timing.
Why does the dough feel sticky?
This dough contains a generous amount of water and is meant to be handled with damp hands. Wet your hands before the folds rather than adding extra flour to the dough.
Can I bake it without a casserole?
The method allows a pizza stone or baking sheet, but you will still need something to cover the loaf during the covered part of baking.
Why should the loaf cool for so long?
The recipe calls for 5–6 hours of cooling before slicing. Cutting while it is still hot can make the crumb seem less set.
Can I shorten the overnight proof?
The recipe specifies 15 hours in the refrigerator. Changing that time may affect how the loaf is proofed, so follow the stated timing for this method.
Cook it from the original
This recipe comes from playfulcooking.com. Their page has the author’s own photos, notes and tips — the best place to cook it from.
Open the recipe on playfulcooking.com