
No Knead Artisan Bread
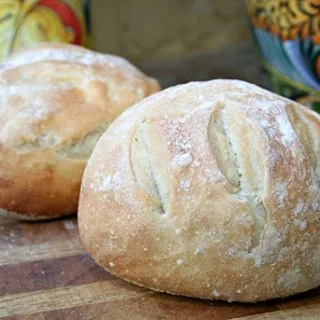
This recipe creates bread with a good crust and crumb and requires no kneading.
Ingredients
- 3 Cups Lukewarm Water
- 1 1/2 Tablespoons Granulated Yeast (1 1/2 Packages)
- 1 1/2 Tablespoons Kosher Salt
- 6 1/2 Cups Unsifted, Unbleached, All-purpose White Flour
Instructions
- 1
Warm the water slightly.
- 2
It should feel just a little warmer than...: It should feel just a little warmer than body temperature, about 100 degrees F.
- 3
Add the yeast and salt to the water...: Add the yeast and salt to the water in a 5 quart bowl, or preferably, in a re-sealable, lidded plastic food container.
- 4
Mix in the flour, no kneading necessary.
- 5
Add all of the flour at once, mixing...: Add all of the flour at once, mixing with a wooden spoon, a high capacity food processor, or heavy duty stand mixer until the mixture is uniform, or until everything is uniformly moist, without dry patches.
- 6
Cover the container with a lid (not airtight),...: Cover the container with a lid (not airtight), and allow the mixture to rise at room temperature until it collapses, about 2 hours.
- 7
You can use a portion of the dough...: You can use a portion of the dough to make bread at any time after this step.
- 8
Since refrigerated dough is less sticky to shape,...: Since refrigerated dough is less sticky to shape, it is best to refrigerate the dough overnight (or at least 3 hours) before you try making the bread for the first time.
- 9
Refrigerate the unused dough in your lidded container...: Refrigerate the unused dough in your lidded container for up to two weeks.
- 10
On baking day, first prepare a baking peel...: On baking day, first prepare a baking peel by sprinkling it with cornmeal to prevent sticking.
- 11
Sprinkle your refrigerated dough with flour and pull...: Sprinkle your refrigerated dough with flour and pull off a 1 pound chunk.
- 12
Add a little more flour, and pull the...: Add a little more flour, and pull the dough on all sides around to the bottom creating a ball.
- 13
This step should not take longer than 30...: This step should not take longer than 30 to 60 seconds.
- 14
Allow the dough to rise on the pizza...: Allow the dough to rise on the pizza peel for about 40 minutes.
- 15
It does not need to be covered at...: It does not need to be covered at this point. (It may not rise much before baking, so do not be concerned.)
- 16
Twenty minutes before baking, preheat the oven to...: Twenty minutes before baking, preheat the oven to 450 degrees F. with a baking stone on the center rack.
- 17
Place an empty container to hold water on...: Place an empty container to hold water on the rack below the pizza stone.
- 18
Dust the top of the bread with a...: Dust the top of the bread with a little more flour, and slash a 1/4 inch deep cross, or tic-tac toe pattern into the top using a serrated bread knife.
- 19
Slip the bread from the pizza peel onto...: Slip the bread from the pizza peel onto the hot pizza stone. Pour in about a cup of hot water into the container below the stone and close the oven door to trap the steam.
- 20
Bake the bread for about 30 minutes or...: Bake the bread for about 30 minutes or until the crust is nicely browned and firm to the touch.
- 21
Allow the bread to cool completely on a...: Allow the bread to cool completely on a wire rack before slicing.
- 22
Store the remaining dough in your lidded container...: Store the remaining dough in your lidded container and use it over the next 14 days.
- 23
Both the dough's flavor and texture are improved...: Both the dough's flavor and texture are improved as it rests in the refrigerator.
Cook it from the original
This recipe comes from italianfoodforever.com. Their page has the author’s own photos, notes and tips — the best place to cook it from.
Open the recipe on italianfoodforever.com