
Greek Vegetable Pita Pizzas
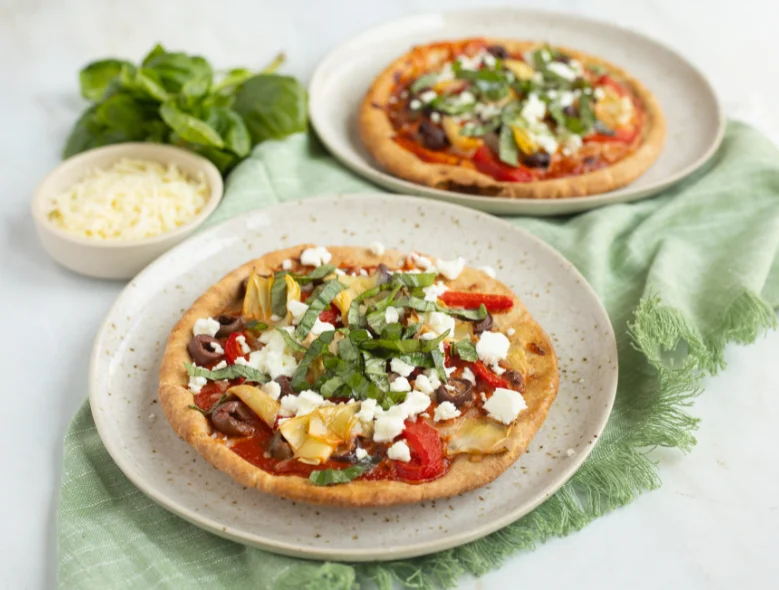
These Greek-inspired pita pizzas layer pizza sauce, vegetables, olives and two cheeses on whole wheat pita. They bake quickly, making them an easy option for a speedy lunch or a light supper.
Ingredients
- 4 small (10 cm diameter)whole wheat pitas
- 240 ml (1 cup)jarred low-sodium pizza sauce
- 60 ml (¼ cup)reduced-fat Italian-style shredded cheese
- 60 ml (¼ cup)sliced Kalamata olives
- 60 ml (¼ cup)thinly sliced roasted red peppers
- 60 ml (¼ cup)chopped marinated artichoke hearts
- 1shallot, thinly sliced
- 57 g (2 oz)reduced-fat feta cheese, crumbled
- 120 ml (½ cup)fresh basil, julienned
Instructions
- 1
Heat the oven
Preheat the oven to 200°C (400°F).
- 2
Top the pitas
Spread the pizza sauce over the pita breads. Add the olives, roasted red peppers, artichokes and shallot, then finish with the Italian-style cheese.
- 3
Bake the pizzas
Bake for 7–8 minutes, until the cheese has melted and the pitas are crisp.
- 4
Finish and serve
Remove from the oven and top with the feta and fresh basil.
What are Greek vegetable pita pizzas?
Pita pizzas use flatbread as a quick base for familiar pizza toppings. This version takes inspiration from Mediterranean flavours, pairing olives, artichokes, roasted peppers, feta and basil.
The recipe is a speedy, home-cook-friendly take rather than a traditional Greek dish. Whole wheat pitas make individual bases, while a brief bake crisps their edges and melts the cheese.
Nutrition and macros by portion
The nutrition label shows one serving as written: 140 calories, 6g protein, 19g carbs, 4g fat.
| Portion | Adjustment | kcal | Protein | Carbs | Fat |
|---|---|---|---|---|---|
| Lighter | More vegetables, less cheese | 98 kcal | 4g | 13g | 3g |
| This serving | As written | 140 kcal | 6g | 19g | 4g |
| Hungry | Add another pita | 210 kcal | 9g | 29g | 6g |
The pita and pizza sauce provide most of the carbohydrates, while the cheeses contribute fat and some of the protein. Olives and feta also add fat and salt. Pair a pita pizza with a generous salad or extra vegetables for a more balanced plate.
Choosing the toppings
Pizza sauce: Jarred low-sodium sauce keeps preparation simple and provides a savoury base. Spread it evenly, leaving a little of the pita uncovered around the edge.
Vegetables and olives: Slice the roasted peppers and shallot thinly, and chop the artichokes so the toppings are easy to distribute. Slicing the olives also helps their salty flavour reach each bite.
Layering for an even bake
Sauce first: Coat each pita lightly rather than piling on a thick layer, which can make the centre soft. Arrange the vegetables and olives across the sauce, then scatter the Italian-style cheese over the top.
Feta later: Add the crumbled feta after baking, as the method specifies. This keeps it distinct from the melted cheese, while fresh basil adds a fragrant finish.
Getting the texture right
Crisp edges: Bake at 200°C (400°F) for 7–8 minutes, checking near the end. The cheese should be melted and the pita crisp; ovens and pita thickness can affect how quickly they reach that point.
Keep an eye on the base: The topping is relatively quick to heat, so avoid leaving the pitas in the oven well beyond the stated time. Lift an edge carefully to check that the bottom has crisped.
Timing and preparation
Ready to assemble: Drain excess liquid from the marinated artichokes and slice the shallot before topping the pitas. This helps the assembly move quickly and reduces the chance of a watery topping.
Work in batches if needed: Arrange the pitas in a single layer on the baking tray. If they do not fit without overlapping, bake them in batches so the heat can reach each base.
What to serve with them
Fresh sides: A green salad or sliced cucumber and tomato makes a crisp contrast to the warm, savoury toppings. A simple lemon dressing can complement the olives and feta.
For a fuller meal: Serve the pita pizzas with soup or extra vegetables. Cut them into wedges for sharing, or leave them whole as individual portions.
Recipe notes & tips
- Pat the artichokes dry if they seem particularly wet.
- Spread the sauce close to the edges, but leave a narrow border for a crisp rim.
- Slice the shallot thinly so it softens during the short bake.
- Keep the pitas in a single layer on the tray.
- Add the feta and basil after baking, as directed.
- Check the bases at 7 minutes and bake for the remaining minute if needed.
Variations
- Add spinach: Scatter a small handful of well-dried leaves over the sauce.
- Use another olive: Substitute sliced green olives for the Kalamata olives.
- Add chilli: Sprinkle chilli flakes over the toppings before baking.
- Change the cheese: Use another reduced-fat shredded cheese in place of the Italian-style blend.
- Make it herbier: Add a little dried oregano with the vegetables.
Common mistakes to avoid
- Too much sauce: A thick layer can soften the pita; spread it thinly and evenly.
- Wet artichokes: Excess marinade can make the base soggy; drain and pat them dry.
- Overlapping pitas: They may bake unevenly; use a second tray or cook in batches.
- Thick shallot slices: They may stay firm after a short bake; slice the shallot thinly.
- Overbaking: The small bases can become too hard; check them at 7 minutes.
- Basil baked on top: It can lose its fresh aroma; add it after the pizzas come out of the oven.
How to store
Store cooled leftovers in an airtight container in the fridge for up to 3 days. Reheat in an oven or toaster oven until hot and crisp; add fresh basil after reheating if possible.
Frequently asked questions
Can I prepare the toppings ahead?
Yes. Slice and chop the toppings in advance and keep them covered in the fridge. Assemble the pitas shortly before baking so the bases do not soften.
Can I use fresh artichoke hearts?
The recipe calls for marinated artichoke hearts. If using cooked fresh artichokes instead, season them to taste and make sure they are not wet before adding them.
How do I know when the pita pizzas are done?
After 7–8 minutes at 200°C (400°F), the Italian-style cheese should be melted and the pita crisp. Check the underside as well, since oven temperatures and bread thickness vary.
Can I make these without an oven?
The provided method uses an oven. For a different cooking method, you would need to adapt the timing and watch the base closely to prevent it from scorching.
Can I freeze the finished pita pizzas?
They are best eaten fresh because the vegetables and pita can lose their texture after freezing. Refrigerate leftovers instead and reheat them until crisp.
Cook it from the original
This recipe comes from diabetesfoodhub.org. Their page has the author’s own photos, notes and tips — the best place to cook it from.
Open the recipe on diabetesfoodhub.org