
No Knead Focaccia (Crazy Easy - Beginner Friendly)
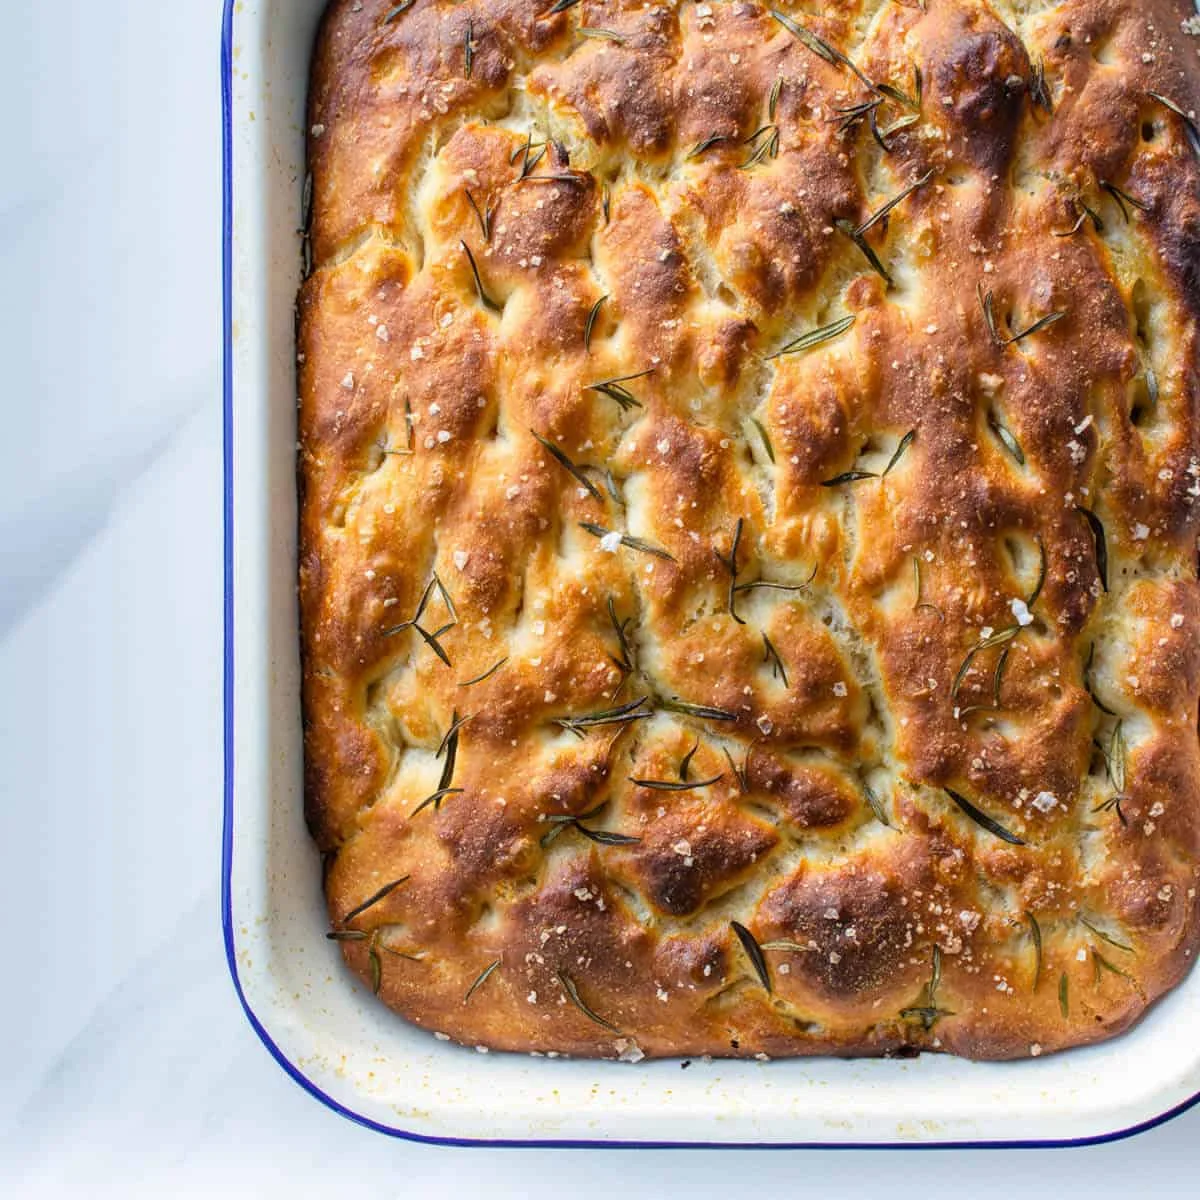
This Italian no-knead focaccia has a crisp, golden crust and a soft, airy centre, with rosemary and flaky salt on top. A long rise in the fridge does most of the work, making it an approachable bread to prepare ahead.
Ingredients
- 500 g (17.5 oz)plain flour (all-purpose; 00 or bread flour also works)
- 475 ml (2 cups; 355 ml room-temperature water and 120 ml boiling water)warm water
- 2 teaspoonsinstant dried yeast or active dried yeast
- 1 teaspoonsugar
- 2 teaspoonssalt
- 60 ml (4 tablespoons)extra virgin olive oil
- 15 ml (1 tablespoon)extra virgin olive oil
- 2 sprigsfresh rosemary leaves
- To tasteflaky sea salt
Instructions
- 1
Mix the flour
Put the flour and salt in a large bowl and stir to combine.
- 2
Activate the yeast
In a separate bowl, stir together the warm water, sugar and instant yeast. If using active dried yeast, wait until bubbles or foam appear before continuing.
- 3
Make the dough
Pour the yeast mixture into the flour and stir with a spatula or wooden spoon until no flour remains at the bottom of the bowl. The dough should be very thick and sticky.
- 4
Rise overnight
Drizzle olive oil over the dough, cover the bowl with cling film and refrigerate for about 10–12 hours. By the next day, the dough should have tripled in size.
- 5
Oil the dish
Add 2–3 tablespoons of olive oil to a non-stick oven dish measuring 34 × 27 cm (9 × 13 inches), coating the sides lightly as well. If you prefer, line the dish with baking parchment before adding the oil.
- 6
Shape the dough
Coat your hands with a little olive oil and transfer the dough to the prepared dish. Gently stretch it to fit, then level the top.
- 7
Proof the dough
Cover the dish with cling film and leave it in a warm place at room temperature for 2–4 hours, until the dough has doubled in size.
- 8
Make the dimples
Heat the oven to 220°C (425°F). Oil your fingers and press them all over the surface of the dough to make dimples.
- 9
Top and bake
Drizzle the dough with olive oil, then scatter over the rosemary leaves and flaky salt. Bake for 20–25 minutes, until golden brown; if your oven runs cool, it may take up to 30 minutes, so keep an eye on it.
- 10
Cool and slice
As soon as it comes out of the oven, transfer the focaccia from the dish to a wire rack. Leave it to cool for about 10 minutes before slicing and serving.
What is focaccia?
Focaccia is an Italian flatbread, often finished with olive oil, herbs and salt. This version uses a wet, no-knead dough and a long rise, so time rather than kneading develops its flavour and airy texture.
The dough is proofed in an oiled dish, then dimpled before baking. Those hollows hold oil and seasoning, while the hot oven helps the base and top turn golden.
Nutrition and macros by portion
The nutrition label shows one serving as written: 211 calories, 5g protein, 33g carbs, 6g fat.
| Portion | Adjustment | kcal | Protein | Carbs | Fat |
|---|---|---|---|---|---|
| Lighter | Use less dipping oil | 148 kcal | 4g | 23g | 4g |
| This serving | As written | 211 kcal | 5g | 33g | 6g |
| Hungry | Serve a larger slice | 317 kcal | 8g | 50g | 9g |
Most of the carbohydrates come from the flour, while olive oil supplies most of the fat. The flour also contributes some protein; serve a slice with a protein-rich dish and vegetables for a more balanced plate.
Choosing the flour and yeast
Flour: Plain flour is the listed choice, while 00 or bread flour can also be used. The dough is meant to be thick and sticky, so avoid adding extra flour just to make it easier to handle.
Yeast: Instant dried yeast can be mixed straight into the warm water. Active dried yeast needs a pause until bubbles or foam appear before you add it to the flour.
Why the long rise matters
Fridge rise: The overnight rest takes about 10–12 hours and the dough should triple in size. Cover the bowl well so the surface does not dry out.
Second proof: Once stretched into the dish, the dough needs another 2–4 hours in a warm place. Look for it to double before baking rather than relying on the clock alone.
Handling the sticky dough
Oiled hands: A little olive oil helps the dough move into the dish without sticking as much. Stretch it gently towards the corners; if it resists, let it relax briefly and try again.
Even surface: Level the top before the second proof so the bread bakes more evenly. Press the dimples in after proofing, using oiled fingers to keep the dough from clinging.
Topping and baking cues
Rosemary and salt: Scatter the leaves and flaky salt over the oiled surface just before baking. Distribute them across the dough so each portion gets some topping.
Colour: Bake at 220°C for 20–25 minutes, checking for a nicely golden-brown top. A less powerful oven may need up to 30 minutes.
Serving ideas
Serve the focaccia warm or at room temperature, sliced alongside a meal or as a snack. It also works well with a dipping oil, such as the basil oil suggested in the recipe.
For a simple plate, pair a piece with soup, salad or vegetables. The bread is rich with olive oil, so a fresh or brothy accompaniment provides contrast.
Recipe notes & tips
- Measure the water carefully so the dough keeps its intended sticky consistency.
- Use a bowl large enough to allow the dough to expand during its overnight rise.
- Oil your hands before transferring and stretching the dough in the dish.
- If the dough springs back while you stretch it, pause briefly before continuing.
- Start checking the focaccia at 20 minutes and bake until the top is golden brown.
- Move the bread to a wire rack straight away to avoid leaving its base in the hot dish.
Variations
- Use bread flour: Swap it for the plain flour if you prefer a chewier loaf.
- Try 00 flour: Use 00 flour in place of the plain flour for another option listed in the recipe.
- Change the herbs: Replace the rosemary with another herb that suits your meal.
- Add sliced olives: Scatter them over the top before baking for a savoury variation.
- Serve with basil oil: Pair a slice with basil oil for dipping, as suggested in the recipe.
Common mistakes to avoid
- Adding extra flour: The dough should be very thick and sticky, so mix thoroughly rather than trying to make it dry.
- Skipping the yeast check: If using active dried yeast, wait for bubbles or foam before mixing it with the flour.
- Underproofing the dough: Give the shaped dough 2–4 hours in a warm place and wait until it has doubled.
- Forgetting to oil the dish: Coat the base and sides lightly so the focaccia can be released after baking.
- Pressing with dry fingers: Oil your fingers first so they are less likely to stick to the dough.
- Leaving the bread in the dish: Transfer it to a wire rack as soon as it comes out of the oven.
How to store
Once completely cool, keep the focaccia in an airtight container at room temperature and eat within 2 days. Reheat briefly in a warm oven to refresh the crust; avoid storing it while warm, as trapped steam can soften it.
Frequently asked questions
Can I use active dried yeast?
Yes. Stir it into the warm water with the sugar and wait until bubbles or foam appear before adding the mixture to the flour.
How long should the dough rise in the fridge?
The recipe gives about 10–12 hours overnight. It should be roughly tripled in size by the next day.
Can I prepare the dough without a fridge?
The recipe relies on an overnight rise in the fridge, so this method is designed around that step. Follow the stated cold rise for the intended schedule.
How do I know the focaccia is baked?
The top should be nicely golden brown after 20–25 minutes at 220°C. It can take up to 30 minutes in an oven that is not very powerful.
Why is the dough so sticky?
That is expected for this high-moisture, no-knead dough. Use oiled hands to transfer and stretch it rather than adding extra flour.
Can I use baking parchment?
Yes. The method says you can line the oven dish with parchment before adding the oil.
Cook it from the original
This recipe comes from cookingwithayeh.com. Their page has the author’s own photos, notes and tips — the best place to cook it from.
Open the recipe on cookingwithayeh.com