
Easy recipe for making classic pan de muerto to celebrate Día de Muertos in Mexico
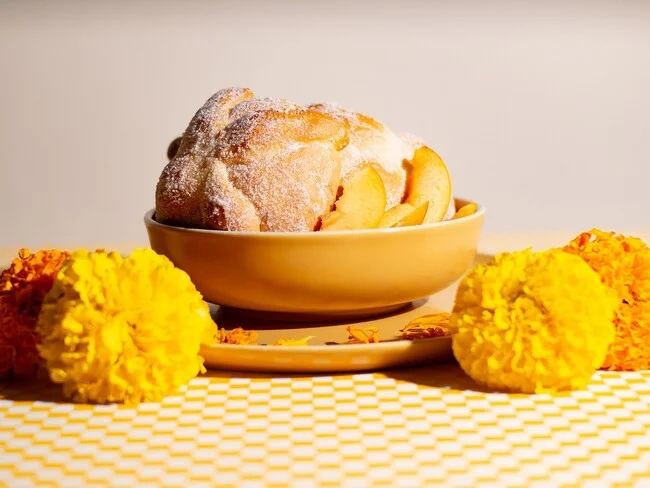
Pan de muerto is a lightly sweet, orange-and-orange-blossom-scented Mexican bread traditionally made for Día de Muertos. Its soft crumb and dough-bone decoration make it a festive bake to share or place on an ofrenda.
Ingredients
- 700 gstrong white bread flour
- to tastebutter, at room temperature, plus extra for brushing
- 3eggs
- 50 mlmilk
- 40 gfresh yeast
- to tasteorange zest
- 1 teaspoonorange blossom water
- 150 gsugar, plus extra for sprinkling
- a pinchsalt
- a splashwarm water
Instructions
- 1
Activate the yeast
Stir the fresh yeast into a splash of warm water until dissolved. Mix in one tablespoon of flour and one tablespoon of sugar to make a paste, then leave it somewhere warm until it doubles in volume.
- 2
Mix the dough
In a large bowl, make a well in 500 g of the flour and add the orange zest, sugar and a pinch of salt. Mix in the eggs, milk and one teaspoon of orange blossom water, then add the activated yeast.
- 3
Knead and prove
Work the ingredients together by hand until they form a cohesive dough. Add the room-temperature butter and knead for 25 minutes, until the dough is smooth, slightly springy and no longer sticks to your hands; add a little more flour if needed. Cover with a damp cloth and leave in a warm place at room temperature for at least 3 hours, until doubled in size.
- 4
Shape the loaves
Turn out the dough and press it to release excess air. Knead for another 2 minutes to soften it, then divide it into balls, reserving some dough for the decorations. Roll each ball lightly against the work surface to smooth it; make each one about half the size you want the finished loaf to be, as it will rise further.
- 5
Make the bones
Take a small piece of the reserved dough and roll it between your fingers into a cylinder. Press your fingers along it to create the bone-like ridges.
- 6
Assemble and prove
Place a small dough ball in the centre of each loaf and arrange the bone-shaped strips around it. Cover the assembled loaves with a kitchen cloth and leave them somewhere warm for 1 hour, or until doubled in size.
- 7
Bake the loaves
Beat an egg yolk with a few drops of water and brush it over the risen loaves. Bake at 180°C for 25–35 minutes, until lightly golden and cooked through.
- 8
Brush and sugar
Melt a little butter and brush it over the baked loaves, then sprinkle them with sugar.
What is pan de muerto?
Pan de muerto is a sweet Mexican bread associated with Día de Muertos, when families remember loved ones and prepare offerings. Its rounded shape is commonly decorated with strips of dough that resemble bones and a small ball at the centre.
This version uses orange zest and orange blossom water for fragrance, while a butter glaze and sugar coating give the finished loaf a sweet, lightly crisp surface.
Nutrition and macros by portion
The nutrition label shows one serving as written: 500 calories, 13g protein, 88g carbs, 13g fat.
| Portion | Adjustment | kcal | Protein | Carbs | Fat |
|---|---|---|---|---|---|
| Lighter | Smaller slice | 350 kcal | 9g | 62g | 9g |
| This serving | As written | 500 kcal | 13g | 88g | 13g |
| Hungry | Larger slice | 750 kcal | 20g | 132g | 20g |
Most of the carbohydrates come from the flour and sugar, while butter and eggs contribute much of the fat; the eggs and flour also provide some protein. Enjoy a smaller slice alongside fruit or another savoury dish if you want a more balanced plate.
Choose and measure the flour
Strong flour: the recipe starts the dough with 500 g of flour and uses more during kneading if needed. Although the ingredient list gives 700 g in total, add the remaining flour gradually so the dough does not become unnecessarily firm.
Butter: the recipe does not specify a quantity, so add it at room temperature and work it in until incorporated. Soft butter is easier to blend through the dough than cold butter.
Build the flavour
Orange zest: grate only the coloured outer layer of the peel, avoiding the bitter white pith. Add it with the flour and sugar so its aroma spreads through the dough.
Orange blossom water: measure the teaspoon carefully; its floral aroma is distinctive and can become overpowering if freely poured. The final sugar coating complements the citrus scent.
Knead for a smooth dough
Butter stage: first bring the other ingredients together, then add the softened butter. This order helps the dough form before the fat is worked through it.
Texture cue: knead for the stated 25 minutes, aiming for dough that feels smooth, slightly springy and no longer sticky to the hands. If it needs flour, add just a little at a time.
Allow time to rise
First rise: cover the dough with a damp cloth and leave it somewhere warm for at least 3 hours, until it has doubled. The time can vary with the warmth of the room, so use the dough’s size as the cue.
Second rise: after shaping and decorating, cover the loaves and leave them for about 1 hour, or until doubled again. These proving stages mean the hands-on time is only part of the overall schedule.
Shape the bones and centre
Bone strips: roll small pieces of reserved dough into cylinders, then press along them with your fingers to make ridges. Arrange them around each loaf rather than flattening them into the dough.
Centre: add a small dough ball where the strips meet. Make the main dough balls smaller than the finished loaves you want, since they will expand during proving and baking.
Check the bake and serve
Colour: brush the risen loaves with egg yolk diluted with a few drops of water before baking. Bake at 180°C for 25–35 minutes, stopping when they are lightly golden and cooked through.
Finish: brush the warm baked loaves with melted butter and sprinkle with sugar. Serve with coffee, hot chocolate or tea, or include them as part of a Día de Muertos gathering.
Recipe notes & tips
- Keep a little of the listed flour back and add it gradually if the dough remains sticky during kneading.
- Use warm rather than hot water to dissolve the fresh yeast.
- Set the dough in a comfortably warm spot, away from draughts, for both proving stages.
- Reserve the decorative dough before dividing the main dough into balls.
- Leave space between shaped loaves on the baking tray so they can expand.
- Watch the loaves towards the end of the 25–35-minute bake, as ovens can vary.
Variations
- More citrus: add a little extra orange zest for a stronger orange aroma.
- Less floral: reduce the orange blossom water slightly for a subtler scent.
- Cinnamon sugar: mix a pinch of ground cinnamon into the sugar coating.
- Individual loaves: divide the dough into smaller portions and adjust the baking time, checking for a lightly golden finish.
- Plain finish: leave off the sugar coating if you prefer a less sweet surface.
Common mistakes to avoid
- Adding all the flour at once: hold some back and work in only what the dough needs so it does not become too stiff.
- Using hot water: very hot water can harm the yeast; use warm water instead.
- Rushing the first rise: wait until the dough has doubled, even if it takes longer than expected.
- Making oversized dough balls: shape them at about half the desired finished size to allow for expansion.
- Skipping the second rise: cover the assembled loaves and let them double before baking for a lighter result.
- Overbaking: check from 25 minutes and take the loaves out when lightly golden and cooked through.
How to store
Once completely cool, keep the bread in an airtight container at room temperature for up to 2 days. Warm individual pieces briefly in a low oven to refresh them; the sugar coating may soften in storage.
Frequently asked questions
How long does this recipe take?
The method includes at least 3 hours for the first rise and about 1 hour for the second, in addition to kneading, shaping and baking. Allow more than 90 minutes overall if the dough needs the full proving time.
Can I use dried yeast instead of fresh yeast?
The recipe specifies 40 g of fresh yeast and does not give a dried-yeast conversion. If substituting, use the conversion on your yeast packet and follow its activation instructions.
How do I know when the dough has risen enough?
For each rise, look for the dough or shaped loaves to approximately double in size. Room temperature affects how long this takes, so use the size cue rather than relying only on the clock.
Why is my dough sticky?
It may need more kneading or a small amount of additional flour. Add flour gradually as the method directs, since too much can make the bread dense.
Can I prepare the dough ahead?
The recipe does not specify an overnight proving method. For the most reliable result, follow the warm-room proving times and bake once the shaped loaves have doubled.
How can I tell when the bread is baked?
The loaves should be lightly golden and cooked through after 25–35 minutes at 180°C. Check near the lower end of the time range and continue baking if they still look underdone.
Cook it from the original
This recipe comes from directoalpaladar.com.mx. Their page has the author’s own photos, notes and tips — the best place to cook it from.
Open the recipe on directoalpaladar.com.mx