
Sushi Roll Cake
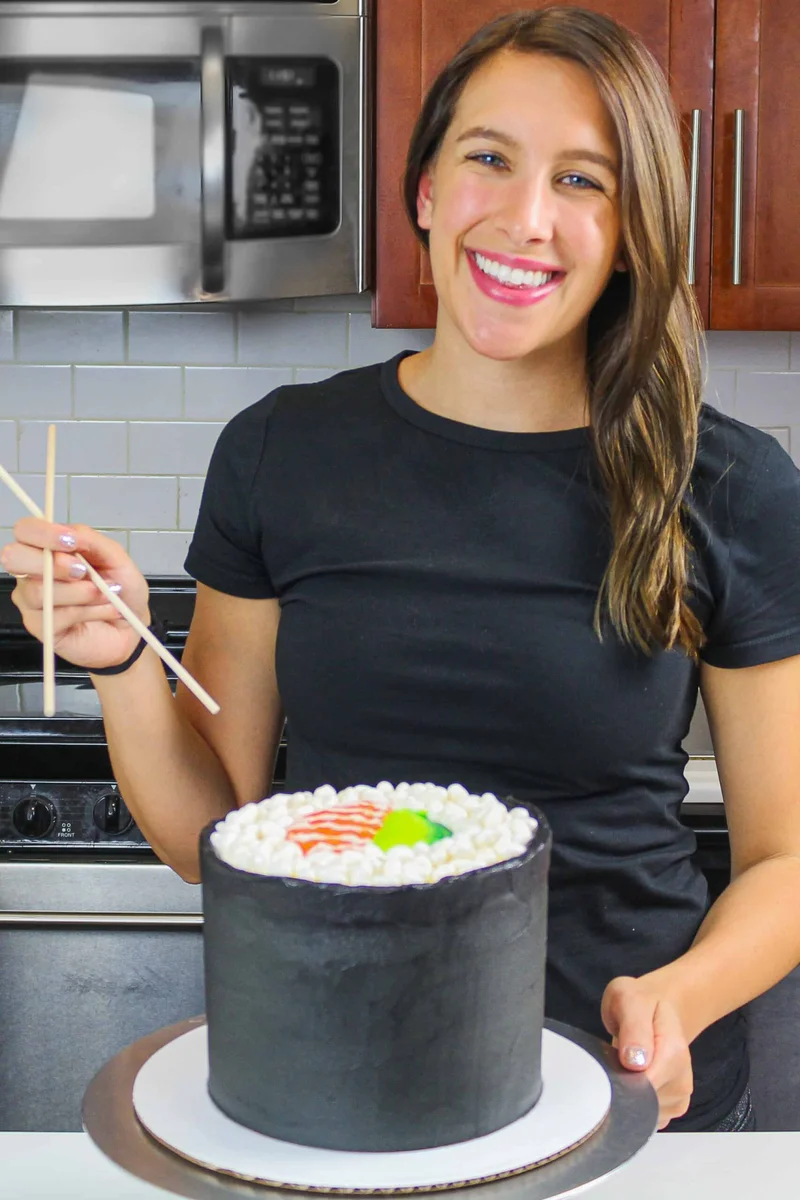
This American-style cake pairs moist vanilla layers with vanilla and dark chocolate buttercream, then decorates the top to resemble a sushi roll. It is a playful centrepiece for a celebration or a special treat for sushi fans.
Ingredients
- 390 g (3 cups)plain flour
- 600 g (3 cups)granulated sugar
- 10 g (2½ tsp)baking powder
- 6 g (1 tsp)fine salt
- 226 g (1 cup; 2 sticks), room temperatureunsalted butter
- 235 g (1 cup), room temperaturecarton egg whites (or about 7 egg whites)
- 345 g (1½ cups), room temperaturebuttermilk
- 28 g (2 tbsp)vegetable or rapeseed oil
- 8 g (2 tsp)vanilla extract or vanilla bean paste
- 434 g (2 cups; 1 lb box), room temperatureunsalted butter
- 12 g (1 tbsp)vanilla extract or vanilla bean paste
- 3 g (½ tsp)fine salt
- 907 g (7 cups; 2 lb bag)icing sugar
- 45 g (3 tbsp), room temperaturedouble cream or whipping cream
- To tasteblack gel food colouring
- 33 g (⅓ cup)dark or black cocoa powder
- 90 g (½ cup), melted and cooleddark chocolate chips
- 15 g (1 tbsp), room temperaturedouble cream or whipping cream
- To tasteorange and green gel food colouring
- To tastewhite coconut-flavour jelly beans
- 125 cm (10-inch) greaseproof cake board
- 1offset spatula
- 1spinning cake stand
Instructions
- 1
Prepare the pans
Heat the oven to 175°C (350°F). Line three or four 20 cm (8-inch) cake pans with parchment rounds and grease them with non-stick baking spray.
- 2
Combine dry ingredients
In a stand mixer fitted with a paddle, or with a hand mixer, mix the 390 g flour, 600 g sugar, 10 g baking powder and 6 g salt until evenly combined.
- 3
Add the butter
With the mixer on low, gradually add 226 g butter to the dry mixture. Keep mixing until no large pieces remain and the mixture looks crumbly.
- 4
Mix the liquids
Add 235 g egg whites and mix on low just until incorporated. Add the 345 g buttermilk in two additions, mixing on low after each.
- 5
Finish the batter
Mix in 8 g vanilla and 28 g oil on low until incorporated. Scrape down the bowl, then mix on low for about 30 seconds.
- 6
Divide the batter
Share the batter evenly between the prepared pans. A digital scale can help make the layers the same height.
- 7
Bake the layers
Bake for 32–34 minutes, until a toothpick inserted in a cake comes out with a few moist crumbs. Cool in the pans for 10 minutes, then run a small offset spatula around each edge to loosen the cake.
- 8
Cool the cakes
Put the pans in the freezer for 30 minutes to speed up cooling. Once the layers are completely cool, carefully turn out the cakes.
- 9
Level the layers
Just before assembling, use a serrated knife to level the tops. If making the cakes ahead, wrap and freeze them; let frozen layers thaw for about 20 minutes before assembly so they are still slightly cold to the touch.
- 10
Beat the butter
While the cakes bake and cool, make the vanilla buttercream. Beat 434 g butter with a paddle attachment or hand mixer on medium for 30 seconds, until smooth.
- 11
Add flavourings
Mix in 12 g vanilla and 3 g salt on low.
- 12
Add the sugar
Gradually add the 907 g icing sugar, about 1 cup at a time, alternating with 45 g cream. Mix on low; a kitchen towel over the mixer can help contain the sugar.
- 13
Adjust consistency
Mix on low until everything is incorporated and the buttercream reaches the desired consistency. If it is too thick, add more cream 1 tbsp at a time; if it is too thin, add icing sugar ¼ cup at a time.
- 14
Make black frosting
Transfer one-third of the frosting to a separate bowl. Add 3 squirts of black gel colouring, 33 g black cocoa, 90 g melted and cooled dark chocolate and 15 g cream. Stir with a rubber spatula until evenly coloured.
- 15
Set aside frosting
Leave the remaining buttercream uncoloured. Cover both bowls with plastic wrap and set aside.
- 16
Stack the cakes
Put a dab of white frosting on the greaseproof cake board to anchor the first layer, then stack the cake layers on the board.
- 17
Fill the layers
Use a large offset spatula to spread an even layer of uncoloured vanilla buttercream between each cake layer.
- 18
Apply the crumb coat
Spread a thin coat of frosting around the cake, covering the layers completely.
- 19
Chill the cake
Smooth the frosting with a bench scraper. Chill in the fridge for 20 minutes or the freezer for 5 minutes, until the frosting feels firm.
- 20
Add black frosting
Spread a second, thicker layer of black frosting around the sides of the cake, then smooth it with a bench scraper.
- 21
Frost the top
Spread a thin layer of white frosting over the top of the cake.
- 22
Colour the filling
Colour ½ cup of frosting salmon with pink and orange gel colouring, and colour another ½ cup green with electric green gel colouring.
- 23
Decorate the roll
Use a small offset spatula to frost a 10 cm (4-inch) circle on top of the cake, dividing it into salmon and green halves to represent salmon and avocado. Pipe thin lines of white frosting over the orange section to suggest the ribbons of fat in salmon.
- 24
Add the rice
Fill the top of the cake around the green and orange frosting with white jelly beans to resemble rice.
What is a sushi roll cake?
This is a decorated celebration cake rather than sushi: vanilla cake layers and buttercream are arranged to evoke a sushi roll. Its American-style cake base gives the design a familiar, tender crumb, while the frosting and sweets create the look of rice and filling.
The contrast between white frosting, a dark outer coating and colourful toppings makes the idea work visually. Chill the cake between coats so the decoration has a firm surface to build on.
Nutrition and macros by portion
The nutrition label shows one serving as written: 571 calories, 5g protein, 78g carbs, 28g fat.
| Portion | Adjustment | kcal | Protein | Carbs | Fat |
|---|---|---|---|---|---|
| Lighter | Smaller cake slice | 400 kcal | 4g | 55g | 20g |
| This serving | As written | 571 kcal | 5g | 78g | 28g |
| Hungry | Larger cake slice | 857 kcal | 8g | 117g | 42g |
Most of the carbohydrates come from the flour, granulated sugar and icing sugar, while butter and cream contribute much of the fat. Egg whites and buttermilk supply some protein, but this is primarily a sweet cake. Pair a slice with fresh fruit, or serve a smaller slice after a meal.
A tender vanilla cake
Butter and dry ingredients: mixing them until crumbly helps distribute the butter through the flour and sugar before the liquids go in. Stop when no large chunks remain rather than trying to make a smooth paste.
Egg whites and buttermilk: the whites keep the batter pale, while buttermilk adds moisture and a gentle tang. Bring both to room temperature as specified so they incorporate more readily.
Getting even layers
Divide the batter evenly between three or four prepared pans; using scales can help make the layers a consistent height. The recipe allows either number of pans, so baking time and layer thickness may vary slightly.
Doneness: a toothpick should come out with a few moist crumbs, not wet batter. Leave the cakes in their pans for 10 minutes before loosening the edges.
Why the frosting is split
Vanilla buttercream: icing sugar goes in gradually, alternating with cream, to help it combine smoothly. Adjust the consistency in small increments as directed.
Black buttercream: cocoa and melted dark chocolate give this portion its deep colour and chocolate flavour. Let the melted chocolate cool before mixing it in, as the recipe specifies.
Building a smooth finish
Crumb coat: a thin first layer covers the cake before chilling. The fridge takes about 20 minutes and the freezer about 5 minutes; in either case, wait until the frosting feels firm before adding the thicker black layer.
Smoothing: a bench scraper helps create an even outer surface. Keep the white top layer thin so the colourful circle and jelly-bean decoration remain the focus.
Creating the sushi look
Salmon and avocado: divide a 10 cm circle on top into salmon-coloured and green halves. Thin white lines over the orange section suggest the pattern of salmon.
Rice: white coconut-flavour jelly beans fill the space around the coloured circle. Arrange them over the frosted top to complete the sushi-roll effect.
Serving the cake
This is a rich, sweet celebration cake, so small slices make a practical starting point for serving 24 people. Use a long, sharp knife and wipe it between cuts for neater slices through the frosting.
Serve it on its own or alongside fresh fruit and unsweetened tea or coffee. The recipe does not specify a separate side, so choose something simple if you want to balance the sweetness.
Recipe notes & tips
- Bring the butter, egg whites, buttermilk and cream to room temperature where the recipe specifies.
- Weigh the batter into the pans if you want the cake layers to be an even height.
- Wait until the melted chocolate has cooled before adding it to the black buttercream.
- Chill the crumb-coated cake until the frosting feels firm before applying the thicker black layer.
- Keep the cake layers slightly cold during assembly to make stacking easier.
- Wipe the knife between slices for cleaner cuts through the frosting.
Variations
- Chocolate outer layer: use the black cocoa and dark chocolate buttercream as directed for a more pronounced chocolate finish.
- Colour the filling: adjust the pink, orange and green gel colours to suit the sushi-inspired design.
- Different jelly beans: use another colour of jelly beans if white coconut-flavour ones are unavailable, while keeping the rice-like topping idea.
- Vanilla bean: choose vanilla bean paste instead of vanilla extract for the cake or buttercream where either is listed.
- Make ahead: bake and freeze the cake layers, then thaw them for about 20 minutes before assembling.
Common mistakes to avoid
- Uneven layers: divide the batter evenly between the pans, using a scale if helpful.
- Overmixing the batter: mix on low and stop once the ingredients are incorporated.
- Warm cake layers: let them cool fully before turning them out and frosting.
- Soft crumb coat: chill the cake until the frosting is firm to the touch before adding the next coat.
- Lumpy black frosting: use melted, cooled chocolate and mix the cocoa and colouring thoroughly.
- Loose buttercream: add icing sugar ¼ cup at a time until it reaches the desired consistency.
How to store
Store the finished cake covered in the fridge; the recipe does not give a specific storage duration. Let slices sit briefly at room temperature before serving so the buttercream softens slightly.
Frequently asked questions
Can I bake the cake layers ahead?
Yes. The recipe says to wrap and freeze the layers, then let them thaw for about 20 minutes before assembling. They should still feel slightly cold to the touch.
Can I use three pans instead of four?
Yes. The method allows three or four 20 cm pans. Divide the batter evenly; layer thickness and baking time may differ, so check for the specified toothpick cue.
How do I know when the cake layers are baked?
Bake for 32–34 minutes, checking that a toothpick comes out with a few moist crumbs. Wet batter means the cakes need more time.
What if my buttercream is too thick?
Add more cream 1 tbsp at a time, mixing on low until it reaches the consistency you want.
What if my buttercream is too thin?
Add icing sugar ¼ cup at a time and mix on low until it thickens.
How long should I chill the crumb coat?
Chill it in the fridge for 20 minutes or in the freezer for 5 minutes, until the frosting feels firm to the touch.
Cook it from the original
This recipe comes from chelsweets.com. Their page has the author’s own photos, notes and tips — the best place to cook it from.
Open the recipe on chelsweets.com