
Sushi Rice and Sushi Rolling Instructions
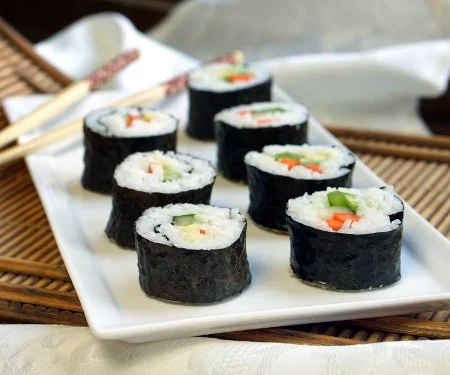
This recipe makes seasoned sushi rice and explains how to shape it into maki rolls with a bamboo mat. It is a useful starting point for homemade sushi, with plenty of room to choose your own fillings.
Ingredients
- 370 g (2 cups)white rice, uncooked
- 475 ml (2 cups)cold water
- 60 ml (¼ cup)rice vinegar
- 25 g (2 tablespoons)sugar
- 7.5 g (1½ teaspoons)salt
Instructions
- 1
Rinse the rice
Put the rice in a fine sieve and rinse it until the water runs clear.
- 2
Bring to boil
Combine the rice and 475 ml cold water in a large saucepan. Cover and bring to the boil.
- 3
Cook the rice
Turn the heat down to low and cook, covered, for 15 minutes.
- 4
Rest the rice
Turn off the heat and leave the rice covered for 10 minutes.
- 5
Mix the seasoning
In a small bowl, stir together the rice vinegar, sugar and salt until the sugar dissolves.
- 6
Season the rice
Pour the vinegar mixture over the rice and mix well to coat it.
- 7
Cool the rice
Let the rice cool to room temperature before using it for sushi.
- 8
Set out the nori
Place a sheet of nori shiny side down on a bamboo rolling mat.
- 9
Spread the rice
Cover two-thirds of the nori, starting from a short end, with ⅓–½ cup of sushi rice. Aim for a layer about 3 mm (⅛ inch) thick. If the rice is difficult to spread because it is sticky, dampen your fingers with water.
- 10
Add the filling
Arrange your filling ingredients in a line about one-third of the way up the nori.
- 11
Roll and seal
Use the mat to lift the bottom section, where the rice begins, over the filling. Continue rolling, drawing the mat straight away from you to shape the roll. When it is rolled, lift the mat around the roll and press firmly so the rice holds together and the uncovered strip of nori seals the roll.
- 12
Slice the roll
Cut the roll with a large, sharp knife. If rice or filling sticks to the blade, moisten it slightly with water.
- 13
Serve the sushi
Serve with pickled ginger, soy sauce and/or wasabi, as desired.
What is sushi rice?
Sushi rice is short-grain rice cooked and seasoned with a mixture of rice vinegar, sugar and salt. Sushi developed in Japan, and this recipe pairs the seasoned rice with nori and a filling to make maki rolls.
Rinsing the rice helps remove excess surface starch, while resting it after cooking lets the grains finish steaming. The vinegar seasoning gives the rice its characteristic tangy, lightly sweet flavour.
Nutrition and macros by portion
The nutrition label shows one serving as written: 360 calories, 6g protein, 80g carbs, 1g fat.
| Portion | Adjustment | kcal | Protein | Carbs | Fat |
|---|---|---|---|---|---|
| Lighter | Use less rice per roll | 252 kcal | 4g | 56g | 1g |
| This serving | As written | 360 kcal | 6g | 80g | 1g |
| Hungry | Serve an extra roll | 540 kcal | 9g | 120g | 2g |
Most of the carbohydrates come from the rice, with a smaller amount from the sugar; the rice also provides most of the protein. The recipe contains very little fat, while the salt is the main source of sodium. Pair a serving of rolls with vegetables or a salad to round out the plate.
Rinsing and cooking the rice
Rinsing: Use a fine sieve and keep going until the water runs clear. This helps the cooked grains hold their shape rather than turning overly gummy.
Cooking: Keep the pan covered on low heat for the full 15 minutes, then leave it covered off the heat for another 10 minutes. Lifting the lid during this time lets steam escape.
Seasoning the grains
Vinegar mixture: Stir until the sugar dissolves so the seasoning is evenly distributed. Pour it over the rice and mix gently but thoroughly to coat the grains.
Cooling: Bring the rice to room temperature before rolling. Warm rice can soften the nori and make shaping less manageable.
Rolling a neat maki
Rice layer: Spread it over two-thirds of the nori, leaving the far edge uncovered. A thin, even layer makes the roll easier to close.
Filling line: Place the filling about one-third of the way up the sheet. Roll from the bottom over the filling, then use the mat to shape and press the roll so it holds together.
Getting the texture right
Sticky rice is normal, but it can cling to your fingers as you spread it. Dampen your fingers lightly with water to make the rice easier to handle.
For clean slices, use a large, sharp knife and moisten the blade slightly if rice or filling begins to stick. A gentle sawing motion can help keep the roll from being squashed.
Serving and timing
The recipe yields 8 rolls, with a suggested serving of 2–3 rolls per person. Serve them with pickled ginger, soy sauce or wasabi, or a selection of all three.
The rice needs 15 minutes of cooking and a further 10 minutes of covered resting, followed by time to cool before rolling. Prepare any fillings while the rice cools, if convenient.
Recipe notes & tips
- Measure the rice and water carefully for a consistent result.
- Keep the saucepan covered during cooking and resting.
- Dissolve the sugar fully in the vinegar mixture before adding it to the rice.
- Wet your fingertips lightly when sticky rice is hard to spread.
- Leave the far third of the nori uncovered so it can seal the roll.
- Moisten the knife blade a little if rice starts sticking while you slice.
Variations
- Choose your filling: Arrange your preferred filling ingredients in a line before rolling.
- Add cucumber: Cut it into slender strips so it fits neatly inside the roll.
- Use avocado: Slice it into strips for a soft, creamy filling.
- Include cooked fish: Use cooked fish as a filling if you prefer it to raw fish.
- Serve with extras: Offer pickled ginger, soy sauce and wasabi alongside the rolls.
Common mistakes to avoid
- Skipping the rinse: Rinse until the water runs clear to remove excess surface starch.
- Lifting the lid: Keep the saucepan covered during cooking and the 10-minute rest.
- Spreading warm rice: Let it cool to room temperature before placing it on the nori.
- Covering all the nori: Leave the last third bare so it can seal the roll.
- Overfilling the sheet: Keep the filling in a line so the roll can close around it.
- Using a dry, sticky knife: Moisten the blade slightly when rice or filling clings to it.
How to store
For best texture, roll and eat the sushi soon after assembling. Refrigerate leftover rice or rolls promptly in a covered container and use within 1–2 days; chilled rice may become firm, so let it lose some of its chill before serving.
Frequently asked questions
How much rice goes on each sheet of nori?
The method suggests ⅓–½ cup per roll, spread in a thin layer about 3 mm (⅛ inch) thick over two-thirds of the nori.
What can I do if the rice sticks to my fingers?
Dampen your fingers with a little water before spreading the rice. Avoid soaking them, as excess water can make the nori harder to handle.
Why does the rice need to rest after cooking?
The covered 10-minute rest lets the rice finish steaming after the heat is turned off. Keep the lid on during this time.
Do I need a bamboo mat to roll sushi?
The method uses a bamboo mat to lift and shape the roll. It also helps you press the finished roll firmly so it holds together.
How do I stop the roll coming apart?
Leave the far third of the nori without rice, roll the sheet so that edge closes around the outside, then press the finished roll with the mat to help seal it.
How many rolls does this make?
The recipe states a yield of 8 rolls, with 2–3 rolls suggested per person.
Cook it from the original
This recipe comes from curiouscuisiniere.com. Their page has the author’s own photos, notes and tips — the best place to cook it from.
Open the recipe on curiouscuisiniere.com