
HOMEMADE NAAN/GREEK STYLE PITA BREAD
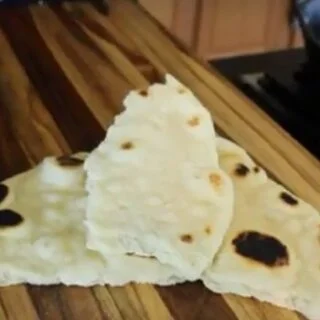
These soft, pan-cooked flatbreads are made with a yeasted yoghurt dough and rolled into rounds before cooking. Make them to serve warm with dips, or keep a batch on hand to accompany meals.
Ingredients
- 240 ml (1 cup)lukewarm water
- 2 teaspoonsactive dry yeast
- 1 teaspoonsugar
- 500 g (4 cups)bread flour
- 2 teaspoonssalt
- 240 g (1 cup)plain yoghurt
- 45 ml (3 tablespoons)olive oil
Instructions
- 1
Proof the yeast
Put the water, yeast and sugar in the bowl of a stand mixer. Leave for 8 minutes; a puffy layer should form. If it does not, discard the mixture and start again with fresh yeast.
- 2
Mix the dough
Add the flour, salt, yoghurt and olive oil to the yeast mixture. Knead on low speed for 8–10 minutes.
- 3
Cover the dough
Transfer the dough to a well-oiled bowl and cover it with plastic wrap or a clean tea towel.
- 4
Let it rise
Set the dough aside until it has doubled in volume.
- 5
Prepare the dough
Once risen, the dough is ready to shape into pitas.
- 6
Chill if needed
The dough can be stored in the refrigerator for up to 3 days. Before using it, let it come to room temperature, then continue with the shaping steps.
- 7
Shape the portions
Cut the dough into 10–12 equal pieces and roll each into a ball. Cover with a tea towel and leave to rest for 10–15 minutes so the dough is easier to roll.
- 8
Oil the surface
Drizzle a little olive oil over your work surface and rub it over the surface and rolling pin. The recipe recommends this instead of flour for softer pitas.
- 9
Roll the rounds
Roll each ball into a circle 15–20 cm (6–8 inches) in diameter.
- 10
Cook the pitas
Heat a cast-iron pan over medium-high heat. Cook each round for 1–2 minutes per side.
- 11
Keep them warm
Stack each cooked bread on a plate and cover with a tea towel to keep it warm and moist.
- 12
Store the bread
Keep the bread in a resealable plastic bag in the refrigerator or freezer.
- 13
Serve
Enjoy.
What is Greek-style pita bread?
Pita is a round flatbread found in cuisines across the eastern Mediterranean and Middle East. This home-style version uses a yeasted dough enriched with yoghurt and olive oil, then cooks on a hot pan rather than in an oven.
The yoghurt makes the dough supple, while resting the portions helps them roll out without springing back. The result is a soft, flexible bread for serving warm.
Nutrition and macros by portion
The nutrition label shows one serving as written: 233 calories, 7g protein, 42g carbs, 6g fat.
| Portion | Adjustment | kcal | Protein | Carbs | Fat |
|---|---|---|---|---|---|
| Lighter | Serve with lighter fillings | 163 kcal | 5g | 29g | 4g |
| This serving | As written | 233 kcal | 7g | 42g | 6g |
| Hungry | Add another pita | 350 kcal | 11g | 63g | 8g |
Most of the carbohydrates come from the bread flour, while olive oil contributes much of the fat. Flour and yoghurt provide most of the protein. Pair a pita with vegetables and a protein-rich dip or filling for a more balanced plate.
Why use yoghurt and bread flour?
Yoghurt: Plain yoghurt adds moisture and gives the dough a tender feel. Use an unsweetened variety so it does not change the bread’s flavour.
Bread flour: Its higher protein content helps the dough develop structure as it kneads. Measure consistently, as too much flour can make the rounds stiff.
Getting the yeast started
Yeast mixture: Lukewarm water, sugar and active dry yeast stand together for 8 minutes. Look for a puffy layer as the recipe’s sign that the yeast is active.
Kneading: Mix on low speed for 8–10 minutes, until the ingredients form a cohesive dough. The recipe does not specify a separate hand-kneading method.
Rising and resting the dough
First rise: Leave the covered dough until it has doubled in volume. The recipe gives a visual cue rather than a fixed rising time, so allow the dough to guide you.
Portion rest: After shaping the dough into balls, cover and rest them for 10–15 minutes. This short pause makes the rounds easier to roll.
Rolling and cooking
Oiled surface: Rub olive oil over the worktop and rolling pin instead of dusting them with flour. This helps keep the dough soft, as intended by the recipe.
Hot pan: Cook the rounds in a preheated cast-iron pan over medium-high heat for 1–2 minutes on each side. Keep an eye on them while they cook; the recipe gives time, but no specific browning cue.
How to serve the pitas
Serve the breads warm alongside dips, grilled vegetables or a main meal. They also work well for wrapping fillings, provided they are rolled thin enough to fold comfortably.
Stack cooked pitas under a clean tea towel as you go. This helps retain warmth and moisture while you finish cooking the remaining rounds.
Recipe notes & tips
- Check that the yeast mixture turns puffy after its 8-minute proof.
- Let the dough rise until doubled rather than relying on a fixed clock time.
- Rest the dough balls for the full 10–15 minutes before rolling.
- Oil the rolling surface and pin lightly to help keep the pitas soft.
- Cook over medium-high heat and work in batches if the pan cannot fit a round comfortably.
- Cover cooked pitas with a tea towel while the rest cook.
Variations
- Herb dough: Mix finely chopped herbs into the dough with the flour.
- Garlic finish: Brush the cooked breads with garlic-infused olive oil.
- Wholemeal blend: Replace some of the bread flour with wholemeal flour, adding it gradually as the dough mixes.
- Seeded topping: Sprinkle seeds onto the rounds and gently press them in before cooking.
- Flatbread wedges: Cut cooked rounds into wedges and serve alongside dips.
Common mistakes to avoid
- Inactive yeast: If no puffy layer forms after 8 minutes, discard the mixture and begin again with fresh yeast.
- Too much flour: Adding extra flour while rolling can make the breads less soft; use the recipe’s oiled work surface instead.
- Skipping the rest: Rolling immediately after portioning can make the dough harder to shape; give the balls 10–15 minutes.
- Uneven rounds: Roll each piece to a consistent 15–20 cm diameter so the breads cook more evenly.
- Crowded pan: Overlapping rounds will not cook properly; cook them one at a time or in a pan with enough room.
- Uncovered cooked bread: Leaving the breads exposed can let them dry; cover the stack with a tea towel.
How to store
Store the cooled pitas in a resealable plastic bag in the refrigerator or freezer. The recipe gives no storage duration for the cooked breads; thaw frozen bread before reheating, and warm briefly in a pan.
Frequently asked questions
How long does the dough need to rise?
The recipe does not specify a time. Leave it covered until it has doubled in volume.
Can I make the dough ahead?
Yes. It can be kept in the refrigerator for up to 3 days. Bring it to room temperature before shaping and cooking.
Why oil the work surface instead of using flour?
The recipe uses oil because it helps keep the pitas softer than rolling them on a floured surface.
How many breads does this make?
The recipe serves 10, but the method says to divide the dough into 10–12 pieces. The final number depends on how many portions you choose.
Can I freeze the cooked pitas?
The recipe says they keep in the freezer in a resealable plastic bag, but does not specify how long. Thaw before warming to serve.
Cook it from the original
This recipe comes from dimitrasdishes.com. Their page has the author’s own photos, notes and tips — the best place to cook it from.
Open the recipe on dimitrasdishes.com