
Easy Banoffee Pie
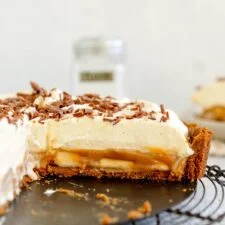
You really can't beat a homemade banoffee pie. My banoffee pie recipe has a brown butter graham cracker base, a layer of banana, thick Dulce de Leche, and then loads of whipped cream to finish. Banoffee pie is the perfect make ahead dessert and will always be a crowd pleaser! My recipe uses a game changing tip of putting the bananas under the caramel layer so that they stay super fresh.
Ingredients
- One Graham Cracker Crust, made with quantities for a 10" tart pan, fully baked and cooled
- One Batch homemade Dulce de Leche, cooled and ready to use
- About 300g banana, sliced into coins about 1cm thick (if you like more or less bananas, change the amount. This gave me one layer and came from about 3 medium bananas
- One batch of homemade whipped cream (Unsweetened) OR one batch of homemade chantilly cream (lightly sweetened)
- Block of chocolate for shaving into curls (optional)
Instructions
- 1
Prepare the Graham Cracker Crust using the quantities for a 25cm (10") tart pan. The quantities are in the recipe notes for a 25cm pan. Cool completely. If you are making this to serve straight away, I like to throw the baked graham cracker base into the freezer for 15 minutes or so just to make sure that it is nice and cold and set up. If you are assembling ahead of time you do not need to do this - it will firm up in the fridge.
- 2
Arrange the chopped bananas over the base of the cooled graham cracker crust. If you like lots of banana, do two layers, if you don't like much, chop them thinner.
- 3
Whisk the cooled Dulce de Leche to remove any lumps. Blob on top of the bananas, then spread out using an offset spatula or the back of a spoon.
- 4
If serving straight away, top with whipped cream or chantilly cream and top with chocolate curls made by peeling over a block of chocolate with a vegetable peeler.
- 5
If you are making ahead, you can either store it with just the banana and caramel layer and add the whipped cream just before you serve, or if you want to have it all done, you can top with the whipped cream and store for up to overnight before serving. If you can, I like to add fresh whipped cream just before serving, but it will also be just fine if you need to do it ahead.
- 6
To serve, remove the edge of the tart pan by placing the pan on an upside down bowl - the edge piece of the pan should drop off.
- 7
Cut into slices using a sharp knife dipped into hot water and dried before cutting. Wipe the knife between each cut.
- 8
Store leftovers in an airtight container for up to a week.
Cook it from the original
This recipe comes from cloudykitchen.com. Their page has the author’s own photos, notes and tips — the best place to cook it from.
Open the recipe on cloudykitchen.com