
Peach and Milk Gelatin
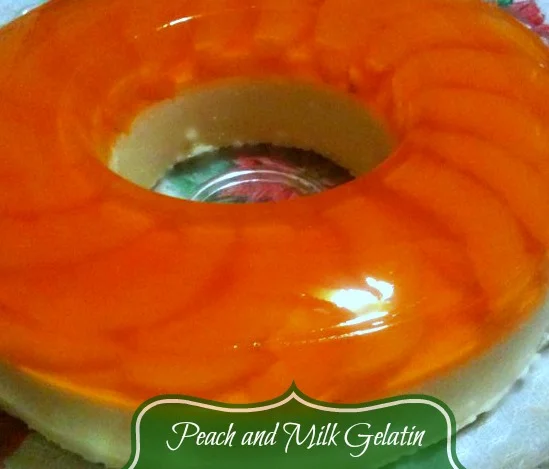
Peach and milk gelatin is a Mexican-style moulded dessert layered with peaches, peach jelly and a creamy cinnamon-scented milk mixture. Its contrasting colours make it a pretty centrepiece for parties, while the make-ahead setting time keeps serving simple.
Ingredients
- 1 litre, dividedwater
- 10 g (2½ tsp)gelatin
- 1 boxpeach jelly
- 1 large can, fruit and syrup dividedpeaches in syrup
- 355 ml (1½ cups) plus 237 ml (1 cup), dividedwater
- 1 largecinnamon stick
- 30 g (7½ tsp)gelatin
- 1 can (354 ml; 12 oz)evaporated milk
- 1 can (397 g; 14 oz)condensed milk
Instructions
- 1
Make peach jelly
Bring 1 litre of water to the boil in a saucepan. While it heats, dissolve 10 g of gelatin in 60 ml (¼ cup) cold water and leave it to stand.
- 2
Mix the jelly
When the litre of water boils, stir in the gelatin mixture, the box of peach jelly and 1 cup of syrup from the canned peaches. Mix until combined, then turn off the heat.
- 3
Set the base
Pour about 6 mm (¼ inch) of the mixture into a jelly mould and refrigerate until set. Meanwhile, slice the peaches.
- 4
Layer the peaches
Once the base is firm, arrange a layer of peach slices over it. Slowly pour another 6 mm (¼ inch) of warm jelly mixture over the fruit, taking care not to shift it.
- 5
Finish peach layers
Keep the jelly mixture warm rather than cold so it bonds to the set layer; warm it gently if needed. Refrigerate until the second layer is set, add another layer of peaches, then pour over the remaining warm mixture. Refrigerate for about 1 hour.
- 6
Prepare milk jelly
Heat 355 ml (1½ cups) of water with the cinnamon stick. Dissolve 30 g of gelatin in 237 ml (1 cup) of cold water.
- 7
Mix the milk
When the cinnamon water boils, reduce the heat and add the gelatin mixture, stirring well. Stir in the evaporated milk and condensed milk.
- 8
Add milk layer
Let the mixture cool until warm, then remove the cinnamon stick. Pour it over the firm peach jelly and refrigerate until fully set.
- 9
Unmould the jelly
Pour warm water into a pan larger than the mould, taking care not to splash any into the jelly. Carefully run a sharp utensil, such as a butter knife, down the inside edge of the mould to loosen it. Set the mould in the warm water for about 5 seconds.
- 10
Turn onto plate
Place a plate over the mould and turn it over in one quick movement. The jelly should release onto the plate.
What is peach and milk gelatin?
This is a moulded dessert built from layers of fruit jelly and sweetened milk gelatin, a style of colourful gelatin dessert enjoyed in Mexico and elsewhere in Latin America. The peach-and-milk combination gives it both a bright fruit layer and a creamy one.
Peaches in syrup contribute fruit and flavour, while the cinnamon stick gently perfumes the milk mixture. Building the peach jelly in stages helps suspend the slices throughout the mould.
Nutrition and macros by portion
The nutrition label shows one serving as written: 170 calories, 5g protein, 31g carbs, 4g fat.
| Portion | Adjustment | kcal | Protein | Carbs | Fat |
|---|---|---|---|---|---|
| Lighter | Smaller, thinner slice | 119 kcal | 4g | 22g | 3g |
| This serving | As written | 170 kcal | 5g | 31g | 4g |
| Hungry | Larger slice | 255 kcal | 8g | 47g | 6g |
The condensed milk contributes much of the energy and carbohydrate, while the evaporated milk and gelatin supply some protein; the milk also contributes fat. Peaches and the sweetened jelly add further carbohydrates. Serve a slice with fresh fruit, or pair it with a lighter savoury meal to balance the table.
Build the peach layers
Set base: A thin first layer gives the fruit a level surface to sit on. Wait until it is firm before arranging the peaches.
Warm jelly: Pour the next layer slowly and while it is still warm, not cold. This helps it adhere to the set jelly beneath and keeps the fruit from being disturbed.
Get the gelatin right
Bloom first: The gelatin for each part is mixed with cold water before being added to hot liquid. This helps it disperse smoothly rather than clumping.
Dissolve fully: Stir the gelatin mixture into the boiling or hot liquid as directed, making sure it is well mixed. For the milk layer, reduce the heat before adding it.
Watch the setting stages
Between layers: The first peach layer needs to become firm before you add fruit; the next should set before you add the remaining peaches and jelly. The recipe gives about 1 hour for the final peach layer, but the milk layer needs to chill until fully set.
Before pouring: Cool the milk mixture until warm, rather than pouring it hot over the peach layer. This helps keep the layers distinct.
Choose a mould and plate
Mould: Use a mould large enough to hold both mixtures and leave room to arrange the fruit. A ring mould shows off the peach slices when the jelly is turned out.
Plate: Choose a serving plate wider than the mould so there is room to catch the dessert and any syrupy moisture.
Serve it well
Chill the dessert until set, then unmould it shortly before serving so its layered shape is easy to see. A sharp knife dipped in warm water can help make neat slices.
It works well as a sweet finish after a meal or as part of a party dessert table. Serve it on its own or alongside fresh fruit.
Recipe notes & tips
- Drain and reserve the peach syrup carefully so you can measure the amount needed for the jelly.
- Cut the peaches into slices of similar thickness so they are easier to distribute in the mould.
- Pour the warm jelly mixture slowly over the fruit to keep the slices in place.
- Allow each peach layer to set before adding the next one.
- Keep the mould level in the refrigerator while the layers set.
- When loosening the mould, keep the warm-water bath below its rim to prevent water getting into the dessert.
Variations
- Use fresh peaches: Replace the canned fruit with ripe peach slices, while keeping the syrup measurement in mind for the jelly mixture.
- Try another fruit jelly: Use a different flavour of boxed jelly for a new colour and fruit pairing.
- Add fruit between layers: Arrange extra peach slices in the mould before pouring each layer.
- Use a ring mould: Choose a ring-shaped mould to give the finished dessert a decorative centre.
- Make individual portions: Set the layers in small cups instead of one large mould, checking each one is fully set before serving.
Common mistakes to avoid
- Pouring onto an unset base: The fruit can sink or shift; wait until the first layer is firm.
- Using cold jelly mixture: It may not bond well to the set layer; keep it warm and reheat gently if necessary.
- Pouring too quickly: The force can move the peaches; add the mixture slowly and carefully.
- Adding the milk mixture while hot: It can disturb the peach layers; let it cool until warm before pouring.
- Splashing water into the mould: This can damage the surface; keep the water bath below the mould's rim.
- Skipping the release step: The jelly may stick; loosen the edge and dip the mould in warm water for about 5 seconds.
How to store
Cover and refrigerate the moulded dessert, and aim to eat it within 3 days. Keep it chilled between servings; if already unmoulded, cover it gently so the surface does not dry out. This gelatin dessert is best served cold rather than reheated.
Frequently asked questions
How long does the gelatin need to set?
The recipe specifies about 1 hour after the final peach-jelly layer. Chill the milk layer until fully set as well; the total time depends on the mould and refrigerator.
Can I make it the day before?
Yes. It needs time to chill and set, so making it ahead is convenient. Keep it covered in the refrigerator and unmould it close to serving.
Why should the next jelly layer be warm?
A warm layer is more likely to bond to the layer beneath it. If the mixture has cooled too much, warm it gently before pouring.
How do I stop the peaches from moving?
Let the first thin layer set, then pour the next warm layer slowly over the peaches. Avoid pouring directly onto one spot with force.
How do I get the dessert out of the mould?
Loosen the inside edge with a sharp utensil, then sit the mould in warm water for about 5 seconds without letting water splash inside. Cover with a plate and turn it over quickly.
Can I use a different mould?
Yes, provided it can hold the full mixture. A ring mould gives a classic presentation, while individual cups can be served without unmoulding.
Cook it from the original
This recipe comes from mamalatinatips.com. Their page has the author’s own photos, notes and tips — the best place to cook it from.
Open the recipe on mamalatinatips.com