
Yaniqueques / Johnny Cake Tortillas
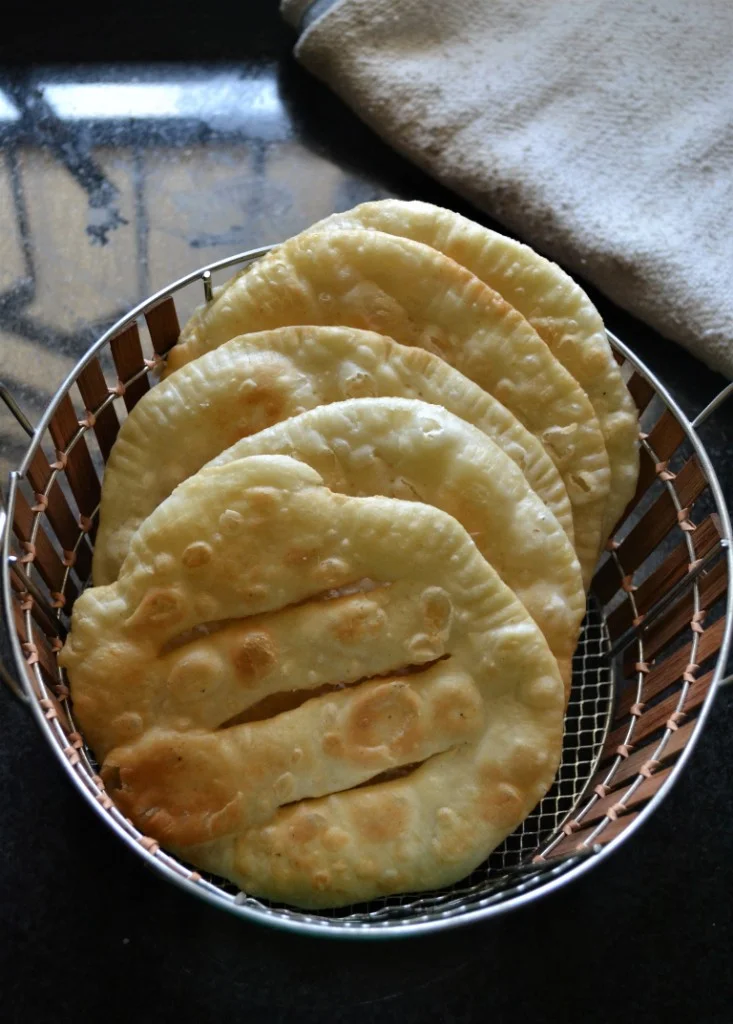
Yaniqueques are thin, crisp fried breads made from a simple flour dough. This Dominican-style version is quick to mix and shape, and makes a warm, crunchy snack or side.
Ingredients
- 125 g (1 cup)plain flour
- 1 g (¼ tsp)baking powder
- 3 g (½ tsp)salt
- 28 g (2 tbsp)butter
- as neededwater
- as neededoil for deep-frying
Instructions
- 1
Mix the ingredients
In a bowl, combine the flour, salt, baking powder and butter.
- 2
Form the dough
Add enough water to bring the mixture together into a firm dough.
- 3
Rest the dough
Cover the dough and leave it to rest for 15 minutes.
- 4
Divide the dough
Knead the dough for 1 minute, then split it into five equal portions.
- 5
Shape the discs
Roll each portion into a thin disc. Use a fork to make indentations around the edge.
- 6
Pierce the centres
Prick the middle all over with a fork, or make three slits in it with a knife.
- 7
Fry until crisp
Deep-fry the breads until browned and crisp.
- 8
Serve them hot
Serve the yaniqueques while hot.
What are yaniqueques?
Yaniqueques, also known as Johnny cakes, are a familiar fried bread in the Dominican Republic and across the Caribbean. They are usually made from a straightforward dough, rolled thin and cooked in hot oil.
This version includes butter for richness and baking powder for a little lift. The thin shape and pierced centre help the bread fry evenly and turn crisp.
Nutrition and macros by portion
The nutrition label shows one serving as written: 190 calories, 3g protein, 19g carbs, 10g fat.
| Portion | Adjustment | kcal | Protein | Carbs | Fat |
|---|---|---|---|---|---|
| Lighter | Use less frying oil | 133 kcal | 2g | 13g | 7g |
| This serving | As written | 190 kcal | 3g | 19g | 10g |
| Hungry | Make larger yaniqueques | 285 kcal | 5g | 29g | 15g |
Most of the carbohydrates come from the flour, while the butter and oil used for frying contribute most of the fat; the flour provides a modest amount of protein. Pair one yaniqueque with beans or eggs and vegetables for a more balanced plate.
A simple dough
Flour: plain flour gives the dough its structure and is easy to roll into thin rounds.
Butter: rubbing or mixing it into the dry ingredients adds richness. Work it through the flour before adding water so it is distributed evenly.
Water: add it gradually until the dough holds together but still feels firm. The exact amount depends on the flour and how it has been stored.
Resting and shaping
Rest: cover the dough for 15 minutes so it is easier to handle and roll.
Thin discs: divide the dough into five equal portions, then roll each one thinly for a crisp result.
Indentations: mark the edge with a fork, then prick the centre or cut three slits. These openings let steam escape as the bread fries.
Frying for crispness
Oil temperature: the recipe does not specify a temperature, so watch the dough closely and fry in hot oil. If the oil is too cool, the breads can absorb more oil; if it is too hot, they may brown before crisping through.
Doneness: look for an evenly browned surface and a crisp feel. Fry the breads in batches if needed so they have room to cook.
Serving ideas
Serve the breads hot, when their edges are at their crispest. They work as a snack or alongside a meal.
For a more substantial plate, pair them with beans, eggs or a fresh salad. Serve any dips or toppings separately to help the breads stay crisp.
Getting the texture right
Firm dough: add water in small amounts rather than pouring it in all at once; the dough should not turn sticky.
Even thickness: roll each portion to a similar thinness so the breads cook at a similar rate.
Drain well: once browned and crisp, lift the breads out of the oil and let excess oil drip away before serving.
Recipe notes & tips
- Add water a little at a time to keep the dough firm.
- Cover the dough during its 15-minute rest so it does not dry out.
- Roll the portions to a similar thickness for more even frying.
- Make the fork marks or slits before frying so the centre can cook through.
- Avoid crowding the pan, which can cool the oil.
- Serve the breads soon after frying for the best crunch.
Variations
- Herb dough: mix finely chopped herbs into the flour for a savoury note.
- Garlic flavour: add a little garlic powder to the dry ingredients.
- Spiced dough: add a pinch of paprika or black pepper for extra warmth.
- Sweet finish: dust the hot breads lightly with sugar for a sweeter snack.
- Dipping sauce: serve with a favourite sauce on the side rather than topping the breads in advance.
Common mistakes to avoid
- Sticky dough: add water gradually and stop once the dough holds together firmly.
- Uneven discs: roll each portion to a similar thickness so they fry at the same pace.
- Unpierced centres: prick the middle or cut the three slits before frying to allow steam to escape.
- Crowded pan: fry in batches so the oil stays hot and the breads have room to move.
- Pale, oily bread: make sure the oil is hot before frying and allow excess oil to drain after cooking.
How to store
These are best eaten hot and crisp. If needed, refrigerate leftovers in a covered container for up to 2 days, then reheat in a hot oven or dry frying pan until crisp; avoid the microwave, which softens them.
Frequently asked questions
Can I make the dough ahead?
Yes. Cover it and refrigerate it, then let it sit briefly at room temperature so it is easier to roll.
How thin should I roll the dough?
Roll each portion into a thin disc, keeping the thickness fairly even. Thinner discs tend to fry up crisper.
Do I need to make slits and fork marks?
The recipe gives two ways to vent the centre: prick it all over with a fork or make three slits with a knife. Fork marks around the edge are also part of the shaping.
How do I know when a yaniqueque is done?
It should be browned and crisp. Keep an eye on it while frying, as thin dough can colour quickly.
Can I use a different fat instead of butter?
The listed recipe uses butter. Another solid fat may work, but it can change the flavour and texture.
Can I reheat leftover yaniqueques?
Yes. Warm them in a hot oven or dry frying pan until crisp again. They are best freshly fried.
Cook it from the original
This recipe comes from gayathriscookspot.com. Their page has the author’s own photos, notes and tips — the best place to cook it from.
Open the recipe on gayathriscookspot.com