
Vegetable Kothu Parotta
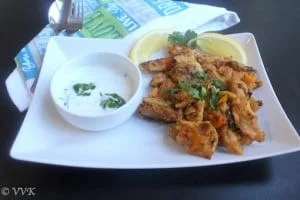
Vegetable kothu parotta is a Tamil Nadu-style dish of chopped parotta tossed with salna, chickpeas and vegetables. It is a handy, spicy way to turn leftover parotta into a filling meal.
Ingredients
- 2Malabar parottas (leftovers work well)
- 1/4 cupsalna (or kurma)
- 1/4 cupcooked chickpeas
- 1/4 tspgaram masala
- 1/2 cupcoloured bell peppers, chopped
- 1/4 cuponion, finely chopped
- 1tomato
- 1/2 tspsalt
- 1/2 tspred chilli powder
- 2 tspoil
- 1 tspfennel seeds
- 2 tbspcilantro, for garnish
Instructions
- 1
Chop the parotta
Crumble or chop the parotta into small pieces.
- 2
Prepare the vegetables
Chop all the vegetables and set them aside.
- 3
Heat the oil
Heat a kadai and add the oil.
- 4
Roast the fennel
When the oil is hot, add the fennel seeds and roast them for 30 seconds.
- 5
Cook the onion
Add the onion and sauté until translucent.
- 6
Soften the vegetables
Add the tomato, bell peppers, salt, garam masala and red chilli powder. Cook until the tomato is soft and the peppers are tender.
- 7
Add the main ingredients
Add the chickpeas, leftover salna and crumbled parotta.
- 8
Mix and cook
Mix everything well and cook until the moisture has been absorbed.
- 9
Simmer for crust
If you like, simmer the mixture until a crust forms.
- 10
Garnish and serve
Garnish with cilantro and serve the kothu parotta with onion raita.
What is vegetable kothu parotta?
Kothu parotta is a Tamil Nadu dish made by chopping parotta and cooking it together with a spiced mixture. The name refers to the chopped or minced texture of the bread.
This version combines leftover parotta with salna, chickpeas and vegetables. Salna brings moisture and seasoning, while the parotta pieces soak up the flavours as they cook.
Nutrition and macros by portion
The nutrition label shows one serving as written: 285 calories, 8g protein, 42g carbs, 9g fat.
| Portion | Adjustment | kcal | Protein | Carbs | Fat |
|---|---|---|---|---|---|
| Lighter | Use less oil | 200 kcal | 6g | 29g | 6g |
| This serving | As written | 285 kcal | 8g | 42g | 9g |
| Hungry | Add another parotta | 428 kcal | 12g | 63g | 14g |
The parotta provides most of the carbohydrates, while oil contributes much of the fat. Chickpeas add some protein as well as further carbohydrates; serve with onion raita for a cool contrast and add extra vegetables alongside if you want a more balanced plate.
Why leftover parotta works
Leftover parotta is easy to crumble or chop and holds its shape when tossed with the other ingredients. It also readily takes on the salna without needing a separate sauce.
Fresh parotta can be used too, but let it cool enough to handle before chopping it into small pieces.
Build the flavour in stages
Fennel seeds: roasting them briefly in the hot oil gives the dish its aromatic base. Add the onion after the seeds have had their 30 seconds.
Vegetables: cook the tomato and peppers with the spices until tender before adding the parotta. This gives them time to soften and lets the spices mix through.
Get the texture right
Moisture: cook the mixture until the salna has been absorbed into the parotta. The finished dish should be well combined rather than wet.
Crust: for a lightly crisp base, leave the mixture to simmer until a crust forms. Keep an eye on it so it does not catch before you are ready to serve.
Choose your curry base
Salna: the recipe uses a small amount of leftover salna to season and moisten the mixture. Stir it in with the chickpeas and chopped parotta.
Kurma: kurma is an alternative if that is what you have available. Its flavour will shape the seasoning of the finished dish.
Serve it while hot
Kothu parotta is best served soon after cooking, while the bread is hot and the vegetables are tender. The recipe suggests onion raita alongside it.
Add the cilantro garnish just before serving for a fresh finishing note.
Recipe notes & tips
- Chop the parotta into small, similar-sized pieces so it mixes evenly with the vegetables.
- Have the vegetables chopped before you heat the kadai, as the cooking stages move along quickly.
- Let the fennel seeds roast for the specified 30 seconds before adding the onion.
- Cook the tomato and peppers until tender before stirring in the parotta.
- If the mixture still looks moist, keep cooking until the moisture is absorbed.
- Serve with onion raita as suggested in the method.
Variations
- Use kurma: swap it for the salna as suggested in the ingredients.
- Change the peppers: use any combination of coloured bell peppers.
- Add more vegetables: increase the chopped vegetables while keeping the same cooking sequence.
- Make it milder: reduce the red chilli powder to suit your preference.
- Finish with a crust: simmer the mixed ingredients until a crust forms.
Common mistakes to avoid
- Adding parotta too early: cook the tomato and peppers until tender first, then add the bread.
- Leaving excess moisture: continue cooking until the salna has been absorbed.
- Skipping the fennel: roast the seeds in the hot oil before adding the onion to build the aromatic base.
- Cutting uneven pieces: chop the parotta into small pieces so they combine more consistently.
- Cooking unattended for a crust: watch the pan as the mixture simmers so it does not catch.
How to store
Refrigerate leftovers in a covered container and use within 3 days. Reheat in a pan until piping hot, stirring as needed; add a small splash of water if the mixture seems dry.
Frequently asked questions
Can I use fresh parotta?
Yes. Chop it into small pieces and follow the same method.
Can I use kurma instead of salna?
Yes, the ingredients list kurma as an alternative to salna.
What does kothu parotta mean?
It describes parotta that is chopped or minced and cooked with other ingredients.
How do I know when the dish is ready?
The vegetables should be tender and the moisture absorbed into the parotta. For a crust, simmer it a little longer as described in the method.
What should I serve with vegetable kothu parotta?
The recipe suggests onion raita.
Cook it from the original
This recipe comes from vidhyashomecooking.com. Their page has the author’s own photos, notes and tips — the best place to cook it from.
Open the recipe on vidhyashomecooking.com