
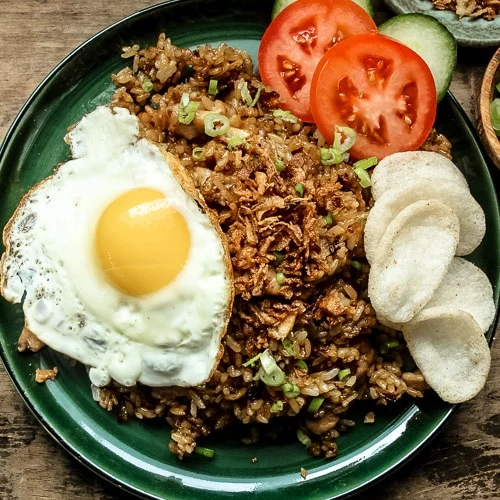
Nasi Goreng (Indonesian Fried Rice)
Nutrition per Serving
1009
Calories
33g
Protein
167g
Carbs
21g
Fat
Nasi Goreng is a popular Indonesian fried rice that packs a ton of flavor in each bite, and is probably one of the tastiest fried rice out there. It features a unique dark brown color that comes from the sweet soy sauce (kecap manis) caramelizing and a salty shrimp paste that gives it a lot of umami flavor.
📝 Ingredients
- 3 cups rice ((day old, cold))
- 1 tablespoon butter
- oil
- 3 cloves garlic
- 2-3 small shallots ((or 1 small onion, approx. 1/3 cup))
- 2 1/2 teaspoons shrimp paste ((or 3 tablespoons of fish sauce. See notes about shrimp paste))
- 2 1/2 tablespoons kecap manis
- 1-2 bird's eye chili ((or 1 tablespoon of sambal olek hot sauce))
- 1 stalk green onion ((use the whites for marinades, and the greens for a garnish))
- 2 boneless chicken thighs ((or 1 chicken breast, or 1 1/2 cups of ground meat))
- 1 tablespoon fish sauce
- 3 eggs ((1 per serving))
- fried shallots/onions
- green onions
- tomato
- cucumber
👨🍳 Instructions
- 1--- Preparation ---
- 2Start by breaking up the leftover rice (3 cups rice into small pieces by hand. The smaller, the better as it helps the rice to fry evenly.
- 3Finely mince 2-3 small shallots and 3 cloves garlic and set them aside. If you are making it spicy, chop 1-2 bird's eye chili as well.
- 4Slice the tomato and cucumber and set them aside. These will be used for garnishing your plate.
- 5Finely mince 1 stalk green onion and set them aside. Separate the greens as a garnish for the end and the whites as a marinade for the chicken.
- 6--- Marinate the Chicken ---
- 7Cut 2 boneless chicken thighs up into small cubes and place them in a bowl. I like to keep the skin on for more flavor and texture.
- 8Add the whites of the green onions and 1 tablespoon fish sauce and set it aside to marinate.
- 9--- Make the Fried Egg ---
- 10Fry a sunny side up egg and set it aside for later. Fry 1 egg per serving, so if you're making two servings, make 2 eggs.
- 11--- Make the Fried Rice ---
- 12In a large skillet or wok, set the heat to medium-high. Once the pan is hot, add in oil (don't be shy with the oil) and 1 tablespoon butter. Then add in the marinated diced chicken and cook it until it is fully cooked which will take approximately 2-3 minutes.
- 13Add in the minced shallots. Cook until they are soft for 2 minutes, then add in the minced garlic and toast it for 1 minute.
- 14Push the chicken aside and add in 2½ teaspoons shrimp paste and toast it for about 1 minute or until it turns a darker color. (If you are using fish sauce, do not add it yet)
- 15Add the 3 cups rice and mix everything together. Cook the rice for about 2-3 minutes. Use this time to also break up any lumps of rice into individual grains.
- 16Add in 2½ tablespoons kecap manis and turn up the heat to high to toast the rice and caramelize the sugars in the sauce for about 2 minutes. (If you are using fish sauce, add in 3 tablespoons now.)
- 17Do a Taste Test. Everyone has a different preference when it comes to their sweet and salty balance. Do a taste test and adjust to how you like it. I personally like a 1:1 balance of salty and sweet, but if you like it sweeter, add more kecap manis. I also like my nasi goreng quite flavorful, if you find this too strong in flavor, add 1/4 cup to 1/2 cup more rice to bring it down a notch.
- 18Add in the green part of the green onions, turn off the heat and mix well.
- 19--- Plate and Garnish ---
- 20Place the nasi goreng fried rice on a plate or bowl and place the cucumber and tomatoes on the side. If you are using shrimp/prawn crackers, add a few on the side as well.
- 21Sprinkle some fried shallots/onions. (I like to use a lot, and find when mixed into the rice gives it a lot of extra flavor and texture).
- 22Add the fried egg on top and enjoy!
About the Chef & Original Recipe
This recipe was published by pupswithchopsticks.com. Visit the original source for step-by-step photos, chef notes and additional details.
Source: pupswithchopsticks.com