
Vegan Salmon Sashimi
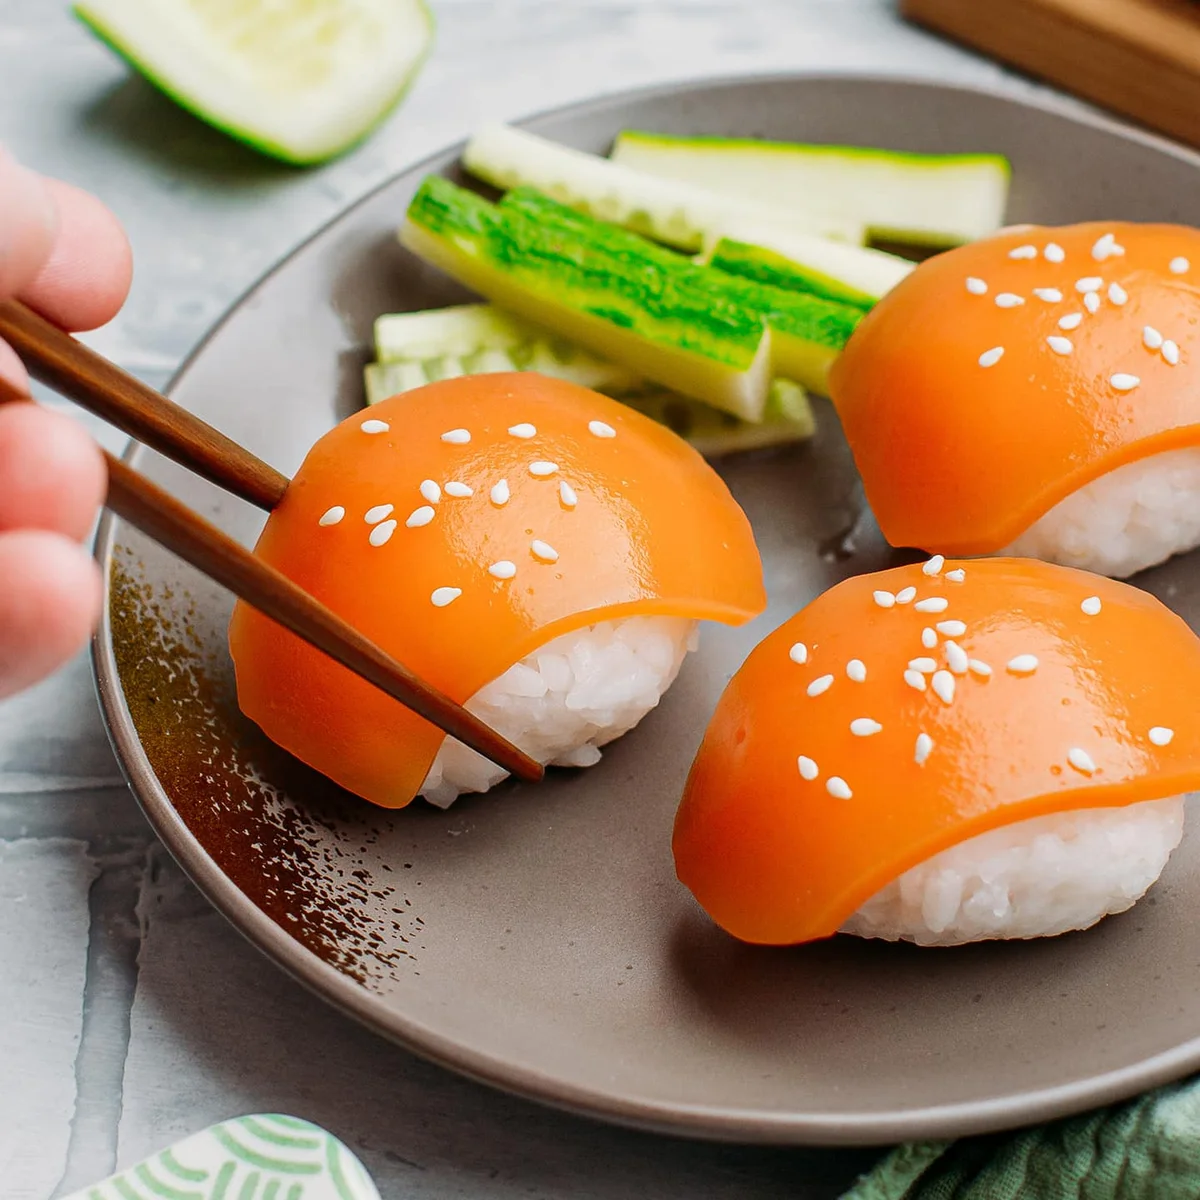
This Japanese-inspired vegan sashimi is a chilled, sliceable gel flavoured with nori and coloured to resemble salmon. Make it ahead for nigiri, sushi, poke bowls or sandwiches.
Ingredients
- 320 mlwater
- 1/2 sheetnori seaweed
- 60 mlunsweetened almond milk
- 5 gsugar
- 3 gsalt
- 12 gtapioca starch
- 5 gkonnyaku jelly powder
- 1 ml (about 1/4 tsp)orange food colouring
- 10 mloil
Instructions
- 1
Line the pan
Line a 13 × 5 cm pan with baking parchment. Use another pan or container if that is what you have available.
- 2
Infuse the water
Warm half the water, 160 ml, over a medium heat until just warm, then pour it into a bowl. Add the nori and leave it to steep for 10–15 minutes. Strain out and discard the seaweed, keeping the infused water.
- 3
Measure the liquid
Pour the nori-infused water and the remaining water into a saucepan. The total should be 300 ml; if it is short, add more water.
- 4
Whisk the mixture
Add the almond milk, sugar, salt, tapioca starch and konnyaku powder. Whisk until the starches and powder dissolve, then whisk in the orange food colouring and oil.
- 5
Cook until thick
Set the saucepan over a medium heat and whisk constantly until the mixture boils and thickens. This should take 3–6 minutes.
- 6
Chill until set
Pour the mixture into the prepared pan and cool it at room temperature for at least 1 hour. Transfer it to the refrigerator for another hour before removing it from the pan.
- 7
Slice and serve
Use a very sharp knife to cut the vegan salmon into slices 6 mm thick. Serve in nigiri or sushi, or add it to sandwiches, toast and other dishes.
- 8
Keep refrigerated
Store the vegan salmon in the refrigerator for up to 4 days.
What is vegan salmon sashimi?
Sashimi is a Japanese dish of thinly sliced ingredients, commonly fish. This plant-based version uses nori-infused liquid and a set gel mixture to make slices that can be served in similar ways.
Nori supplies a savoury, sea-like flavour, while the orange colouring gives the finished slices their salmon-like appearance. Tapioca starch and konnyaku powder help the mixture set into a sliceable shape.
Nutrition and macros by portion
The nutrition label shows one serving as written: 7 calories, 0g protein, 1g carbs, 0g fat.
| Portion | Adjustment | kcal | Protein | Carbs | Fat |
|---|---|---|---|---|---|
| Lighter | Use less oil | 5 kcal | 0g | 1g | 0g |
| This serving | As written | 7 kcal | 0g | 1g | 0g |
| Hungry | Serve with rice | 11 kcal | 0g | 1g | 1g |
Tapioca starch provides most of the carbohydrates, while the oil and almond milk contribute some fat; the ingredients provide very little protein. For a more balanced plate, serve a portion with rice or another grain, vegetables and a separate protein source if desired.
The nori infusion
Steep the nori in warm water for 10–15 minutes so its flavour passes into the liquid. Strain it out before adding the remaining ingredients for a smoother mixture.
Measure the liquid after straining: the method calls for 300 ml in total. Add water if needed to reach that amount.
Getting a smooth mixture
Dissolve the tapioca starch and konnyaku powder thoroughly in the liquid before heating. A careful whisk at this stage helps prevent dry pockets from forming as the mixture thickens.
Add the colouring and oil after the powders have dissolved, then whisk again to distribute them evenly.
Watch the thickening
Keep whisking over a medium heat as the mixture warms. It should boil and thicken in about 3–6 minutes, but the texture is a more useful cue than the clock.
Once thickened, transfer it to the lined pan promptly so it can cool in an even layer.
Set and slice
Allow at least 1 hour of cooling at room temperature, followed by another hour in the refrigerator. Chilling firms the mixture enough to remove it from the pan and cut it.
Use a very sharp knife and aim for slices around 6 mm thick. Clean cuts help the pieces keep their shape for serving.
Serving ideas
Pair the slices with rice for nigiri or sushi, or arrange them in a poke bowl. Their nori flavour also works in a sandwich or on toast.
For a balanced plate, serve them with rice or another grain and add vegetables for extra variety and texture.
Recipe notes & tips
- Line the pan neatly so the set mixture is easier to lift out.
- Whisk the powders into the liquid before heating to reduce the chance of lumps.
- Keep the whisk moving while the mixture heats and thickens.
- Check the liquid volume after straining the nori, and top it up to 300 ml as the method directs.
- Chill the mixture fully before slicing for cleaner cuts.
- Use the slices in sushi or nigiri, or serve them in a sandwich or on toast.
Variations
- Add ginger: Serve the slices with finely grated ginger for a fresh, sharp contrast.
- Make poke bowls: Pair the slices with rice and your choice of vegetables.
- Serve as nigiri: Place a slice over a small mound of seasoned rice.
- Use in sandwiches: Layer the slices into bread with crunchy vegetables.
- Try a toast topping: Arrange the slices on toast with a savoury spread.
Common mistakes to avoid
- Skipping the strain: Remove the nori after steeping so the infused liquid is smooth.
- Guessing the liquid volume: Measure after straining and add water if needed to reach 300 ml.
- Heating too soon: Whisk until the powders dissolve before putting the pan on the heat.
- Stopping the whisking: Keep whisking constantly as the mixture heats to help it thicken evenly.
- Cutting while warm: Chill for the full stated time before removing and slicing.
- Using a blunt knife: Choose a very sharp knife for neater slices.
How to store
Keep the vegan salmon covered in the refrigerator and use it within 4 days. The recipe does not specify reheating; serve it chilled or cold.
Frequently asked questions
How long does vegan salmon sashimi take to set?
Allow at least 1 hour at room temperature, then refrigerate for another hour before removing it from the pan.
How thick should I cut the slices?
The recipe suggests slices about 6 mm thick. A very sharp knife will help keep them neat.
Can I use a different-sized pan?
Yes. The recipe says another pan or container can be used, though the finished layer may be a different thickness.
What can I serve it with?
Use it for nigiri, sushi or poke bowls, or add it to sandwiches and toast.
How long will it keep?
It keeps in the refrigerator for up to 4 days.
What if the strained liquid is not 300 ml?
Add water until the total reaches 300 ml, as directed in the method.
Cook it from the original
This recipe comes from fullofplants.com. Their page has the author’s own photos, notes and tips — the best place to cook it from.
Open the recipe on fullofplants.com