
Garlic & Parsley Dough Balls
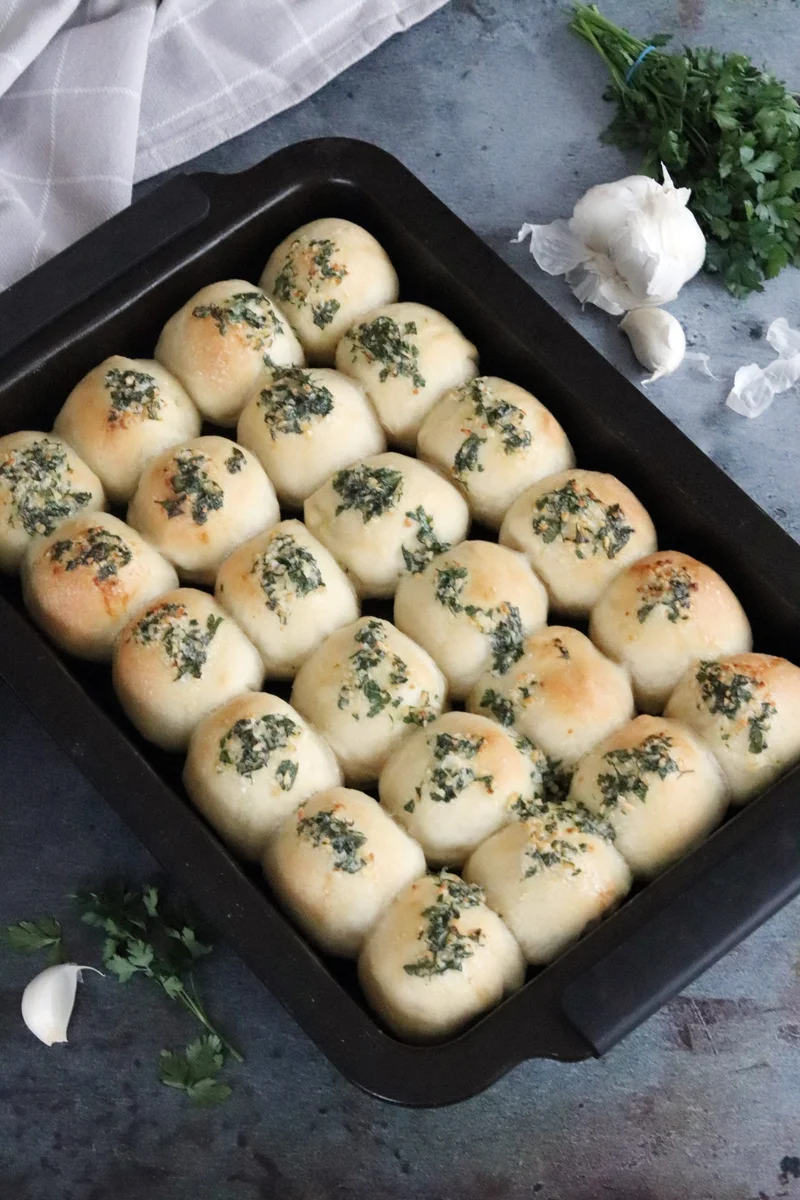
Soft, fluffy dough balls are baked until golden, then finished with a savoury butter flavoured with garlic and fresh parsley. They make a crowd-pleasing Italian-inspired side for sharing alongside a meal or dipping into sauce.
Ingredients
- 500 gstrong plain flour
- 7 g (one packet)instant yeast
- 1 1/2 tspsea salt
- 1/2 tspcaster sugar
- 4 tbspolive oil
- 300 mllukewarm water
- as neededspray oil
- 100 gunsalted butter, softened
- 1 tspsea salt
- 2 tbspfresh parsley, chopped
- 2 clovesgarlic, minced
Instructions
- 1
Combine ingredients
Put the flour, yeast, 1 1/2 tsp sea salt and caster sugar in the bowl of a mixer. Make a well in the centre, then pour in the olive oil and lukewarm water.
- 2
Mix the dough
Fit the dough hook and mix on the lowest speed for 2 minutes.
- 3
Develop the dough
Scrape down the sides of the bowl and the dough hook, then mix for 8 minutes. If needed, stop halfway through to remove dough from the hook.
- 4
Knead until smooth
Turn the dough out onto a lightly floured surface and knead it a couple of times, until soft and smooth.
- 5
First prove
Spray a bowl with oil and put in the dough. Cover with oiled cling film and leave to prove for 1–2 hours, until doubled in size.
- 6
Knock back dough
Press the dough down in the bowl to knock out the air. Turn it onto a lightly floured surface and knead it a couple of times.
- 7
Shape the balls
Cut off sections of dough and roll them into 30 g balls. Arrange them in an oiled roasting tin, leaving 1 cm between each ball.
- 8
Second prove
Cover the dough with oiled cling film and leave it to prove for 30 minutes.
- 9
Bake and mix butter
Heat the oven to 190°C fan or 210°C conventional. Bake the dough balls for 8 minutes. While they bake, mix the softened butter with the chopped parsley, minced garlic and 1 tsp sea salt.
- 10
Add parsley butter
After 8 minutes in the oven, take out the dough balls and place a small dab of parsley butter on top of each one.
- 11
Finish baking
Return the tin to the oven and bake for a further 8–10 minutes, until the dough balls are golden brown.
What are garlic and parsley dough balls?
Dough balls are small portions of yeasted bread dough, baked together and served warm. This Italian-inspired version is finished with butter, garlic and parsley for a savoury, aromatic topping.
Strong flour helps give the dough structure, while the two proving stages let it rise before baking. Adding the butter partway through the bake gives it time to melt into the tops without being in the oven for the full cooking time.
Nutrition and macros by portion
The nutrition label shows one serving as written: 114 calories, 0g protein, 0g carbs, 5g fat.
| Portion | Adjustment | kcal | Protein | Carbs | Fat |
|---|---|---|---|---|---|
| Lighter | Less butter topping | 80 kcal | 0g | 0g | 4g |
| This serving | As written | 114 kcal | 0g | 0g | 5g |
| Hungry | Serve a larger portion | 171 kcal | 0g | 0g | 8g |
The flour supplies most of the carbohydrates, while the olive oil and butter contribute most of the fat; the flour also provides some protein. Serve a few dough balls with a generous salad or vegetables and a protein-rich main to make a more balanced plate.
Building a soft dough
Flour and yeast: strong plain flour provides the base for the dough, and instant yeast can be mixed straight in with the dry ingredients. Keep the yeast and salt evenly distributed through the flour before adding the liquids.
Water and oil: lukewarm water brings the dough together, and olive oil adds richness. The mixer does most of the work, but a brief hand-knead helps bring the dough into a smooth ball.
Why there are two proves
First rise: leave the covered dough until it has doubled in size; the recipe allows 1–2 hours. The time can vary with room temperature, so use the dough’s growth as the cue rather than relying only on the clock.
Second rise: after knocking back and shaping, give the balls 30 minutes under oiled cling film. This gives them a final chance to puff up before they go into the oven.
Shaping evenly
Portioning: cut the dough into 30 g pieces and roll each one into a ball. Keeping the portions similar in size helps them bake at roughly the same rate.
Spacing: arrange the balls in an oiled roasting tin with 1 cm between them, as directed. The close spacing keeps them together as they prove and bake.
Getting the garlic butter right
Softened butter: use butter that is soft enough to mix easily with the parsley, garlic and salt. Chopped fresh parsley and minced garlic spread through it so each small dab carries all three flavours.
Mid-bake topping: add the butter after the first 8 minutes in the oven, then bake for another 8–10 minutes. Look for golden-brown tops as the finishing cue.
Serving them warm
These dough balls are best served soon after baking, while the centres are soft and the parsley butter is melted. Put them on the table as a sharing side with pasta, soup or a salad.
For a dipping option, serve them alongside tomato sauce or another sauce already being served with the meal. Keep the dough balls in the roasting tin until you are ready to bring them to the table.
Recipe notes & tips
- Use lukewarm rather than hot water so the dough is comfortable to handle.
- Oil the cling film lightly to help prevent it sticking to the dough as it rises.
- Scrape the dough hook halfway through the longer mixing stage if dough clings to it.
- Use a lightly floured surface for shaping so the dough is easier to handle without adding much extra flour.
- Prepare the parsley butter while the dough balls bake for their first 8 minutes.
- Check for a golden-brown finish during the final 8–10 minutes of baking.
Variations
- Herb swap: replace the parsley with another finely chopped soft herb.
- Extra garlic: add another minced clove to the butter for a more pronounced garlic flavour.
- Cheesy finish: sprinkle finely grated cheese over the buttered dough balls before the final bake.
- Chilli butter: mix a pinch of chilli flakes into the parsley butter for a little heat.
- Dipping side: serve with a bowl of tomato sauce for dipping.
Common mistakes to avoid
- Water too hot: very hot water can affect the yeast; use lukewarm water as specified.
- Rushed first prove: moving on before the dough has doubled can leave the balls less airy; give it the full 1–2 hours if needed.
- Uneven portions: balls of different sizes may bake at different rates; weigh or judge each piece against the 30 g size.
- Drying dough: uncovered dough can form a skin; cover it with oiled cling film during both proves.
- Skipping the butter timing: adding the topping at the start changes the method; wait until the first 8 minutes of baking are complete.
- Removing too early: pale tops need more time; bake for the further 8–10 minutes until golden brown.
How to store
Let leftovers cool, then store them in an airtight container in the fridge for up to 3 days. Reheat in a moderate oven until warmed through; the butter may firm up when chilled and will melt again as the dough balls heat.
Frequently asked questions
How do I know when the dough has finished its first prove?
It should have doubled in size. The recipe allows 1–2 hours, but use the dough’s volume as the main cue.
Can I make the dough without a stand mixer?
The method uses a mixer and dough hook. You can mix and knead by hand instead, working the dough until it is soft and smooth.
Why are the dough balls shaped at 30 g?
That is the portion size given in the method, and it helps keep the balls similar so they cook evenly.
Can I prepare the parsley butter ahead?
Yes. Mix the softened butter, parsley, garlic and salt ahead and keep it covered in the fridge; let it soften enough to dab onto the dough balls.
How can I tell when the dough balls are done?
They should be golden brown after the final 8–10 minutes of baking. If they still look pale, continue baking and check again.
Can I freeze the leftovers?
They can be frozen in a sealed freezer-safe container, though the topping may not be quite as fresh after thawing. Reheat them in the oven until warmed through.
Cook it from the original
This recipe comes from curlyscooking.co.uk. Their page has the author’s own photos, notes and tips — the best place to cook it from.
Open the recipe on curlyscooking.co.uk