
Challah Buns
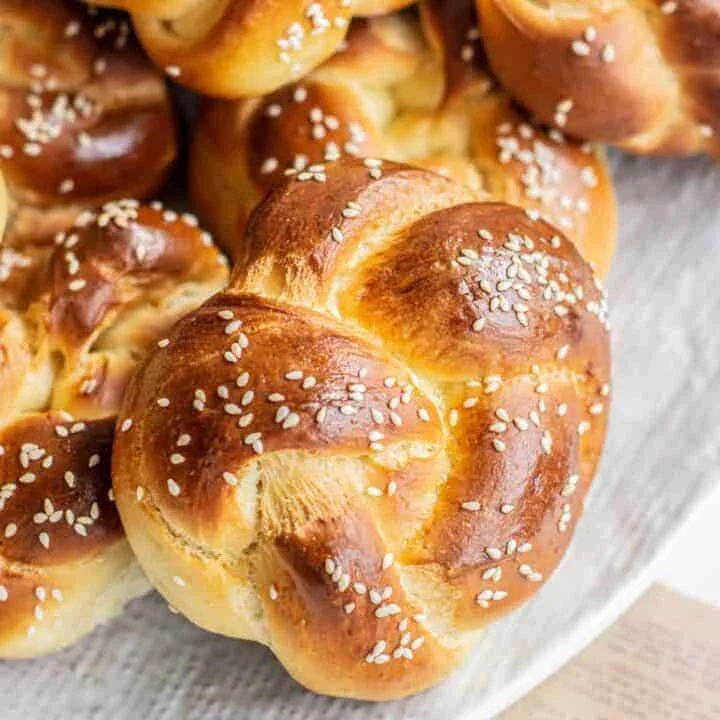
These individual challah buns are soft, lightly sweet rolls shaped into knots and finished with sesame seeds. Make them for a festive table, sandwiches or a batch of golden rolls to share.
Ingredients
- 160 g (2/3 cup)lukewarm water
- 37 g (3 tablespoons)granulated sugar
- 1 1/2 teaspoonsinstant yeast or active dry yeast
- 437 g (3 1/2 cups)plain flour
- 36 g (2 1/2 tablespoons)vegetable oil
- 2 largeeggs
- 1 largeegg yolk
- 1 teaspoonsalt
- 1 egg + 1 tablespoonwater
- To tastesesame seeds
Instructions
- 1
Mix yeast
In the bowl of a stand mixer fitted with a dough hook, or in a large mixing bowl, combine all the lukewarm water, sugar and yeast. If using active dry yeast, leave the mixture for around 5–10 minutes until foamy; this step can be skipped with instant yeast.
- 2
Knead dough
Add the remaining dough ingredients and mix on low speed until a shaggy dough forms. Increase to medium speed and knead for around 12 minutes, until smooth and strong.
- 3
Knead by hand
If working by hand, turn the dough out onto a work surface and knead for around 12 minutes until strong and smooth. If you need a break, let it rest for 5 minutes before continuing. Use a slap-and-fold motion: slap the dough onto the bench, pull it back up and fold it over itself.
- 4
Let dough rise
Shape the kneaded dough into a ball and place it in a large oiled bowl. Cover with a damp towel or plastic wrap and leave in a warm place until doubled in size. For an overnight cold rise, cover tightly and place the bowl in the fridge overnight instead.
- 5
Divide dough
Turn the dough out onto a floured work surface and weigh it on kitchen scales. Divide the weight by 9, then cut the dough into 9 equal pieces with a bench scraper and shape each into a small ball.
- 6
Prepare tray
Line a large baking tray with parchment paper.
- 7
Twist dough
Cut one dough ball in half and roll each piece into a 25 cm (10-inch) rope. Dust the ropes lightly with flour to help keep the knot loose as it rises. Twist the two ropes together to make one long twisted rope.
- 8
Start the knot
Shape the rope into an upside-down U and cross one end over the other, leaving a hole at the top and two ends at the bottom. Bring one bottom end up and through the hole.
- 9
Finish the knot
Take the second end and pass it through the hole from underneath to complete the knot.
- 10
Arrange knots
Place the knot on the lined baking tray and repeat with the remaining dough pieces.
- 11
Proof the rolls
Cover the tray with a damp towel or plastic wrap and leave the knots at room temperature until puffy.
- 12
Heat the oven
Preheat the oven to 190°C (375°F).
- 13
Glaze and seed
When the knots have finished rising, whisk together one egg and 1 tablespoon of water. Brush the tops with the egg wash and sprinkle with sesame seeds.
- 14
Bake until golden
Bake for around 20 minutes, until deeply golden brown. If they are browning too quickly, loosely cover them with foil after the first 10 minutes.
- 15
Cool the rolls
Take the knots out of the oven and cool them to room temperature on a wire rack.
What are challah buns?
Challah is a traditional Jewish enriched bread, often braided and served for Shabbat and holidays. These individual rolls borrow its egg-rich, gently sweet dough and shape it into an easy-to-serve knot.
The oil and eggs help make the crumb tender, while the twisted shape gives each bun a golden, sesame-topped crust.
Nutrition and macros by portion
The nutrition label shows one serving as written: 283 calories, 9g protein, 42g carbs, 8g fat.
| Portion | Adjustment | kcal | Protein | Carbs | Fat |
|---|---|---|---|---|---|
| Lighter | Smaller bun portion | 198 kcal | 6g | 29g | 6g |
| This serving | As written | 283 kcal | 9g | 42g | 8g |
| Hungry | Add another bun | 425 kcal | 14g | 63g | 12g |
The flour supplies most of the carbohydrates, while the eggs contribute protein and the oil and eggs provide much of the fat. Serve a bun with vegetables and a protein-rich filling or side to make a more balanced plate.
Choosing the yeast
Active dry yeast: Give it 5–10 minutes in the lukewarm water and sugar so it can become foamy before adding the other ingredients.
Instant yeast: It can be mixed straight in with the water and sugar; the initial wait is optional for this type.
Build a smooth dough
Kneading: The dough needs around 12 minutes of kneading to become smooth and strong. A stand mixer makes this straightforward, while the slap-and-fold method helps bring the dough together by hand.
Rest breaks: If hand-kneading becomes tiring, a 5-minute pause is part of the method. Resume kneading afterwards until the dough feels cohesive and elastic.
Shape loose, even knots
Equal pieces: Weigh the full dough and divide that number by 9 for more uniform rolls. Similar-sized buns are more likely to finish baking at the same time.
Loose twists: Dusting the ropes with a little flour helps keep their knot definition visible as they puff. Avoid pulling the twists so tight that they cannot expand.
Watch the two rises
First rise: Let the dough rise in a warm place until it has doubled in size, rather than relying only on the clock. The overnight fridge option slows this stage down.
Second rise: After shaping, wait until the knots look puffy before glazing and baking. This gives the rolls time to expand in their final shape.
Check colour and finish
Egg wash: Brush the tops carefully so the glaze coats the dough without pooling on the tray. Add the sesame seeds while the surface is still wet so they stick.
Baking: The rolls are ready when deeply golden, around 20 minutes in the 190°C oven. If the tops darken too quickly, loosely tent the tray with foil after the first 10 minutes.
Serving ideas
Serve the buns warm or at room temperature alongside soup, salads or a shared meal. Their soft, slightly sweet crumb also works well split for sandwiches.
For a simple spread, pair them with butter or a savoury filling, keeping in mind that either will change the nutrition of the meal.
Recipe notes & tips
- Use lukewarm rather than hot water so the yeast can work as intended.
- Keep the dough covered during both rises to prevent its surface drying out.
- Use kitchen scales to divide the dough into 9 even pieces.
- Dust the twisted ropes lightly, rather than heavily, before shaping.
- Leave enough space between the knots on the baking tray for them to puff.
- Cool the buns on a wire rack to let steam escape from underneath.
Variations
- Poppy seed topping: Swap the sesame seeds for poppy seeds before baking.
- Seed mix: Scatter a mix of sesame and poppy seeds over the egg wash.
- Plain finish: Leave off the seeds for a simple glossy top.
- Overnight rise: Cover the dough tightly and let it rise slowly in the fridge overnight.
- Sandwich buns: Split cooled rolls and fill them with your favourite savoury sandwich ingredients.
Common mistakes to avoid
- Skipping the active dry yeast check: Let it sit in the water and sugar for 5–10 minutes until foamy.
- Under-kneading: Continue until the dough is smooth and strong, around 12 minutes.
- Uneven portions: Weigh the dough and divide its weight by 9 before cutting.
- Tight knots: Keep the ropes loosely twisted so the shape can expand as it rises.
- Baking before the rolls puff: Wait for the shaped knots to look puffy before applying the egg wash.
- Over-browning: Loosely cover the rolls with foil after the first 10 minutes if they are colouring too fast.
How to store
Once completely cool, store the rolls in an airtight container at room temperature for up to 2 days. Reheat briefly in a low oven, or freeze them in a sealed bag for up to 2 months and thaw before serving.
Frequently asked questions
Can I use active dry yeast instead of instant yeast?
Yes. Let the active dry yeast sit with the lukewarm water and sugar for around 5–10 minutes, until foamy, before continuing.
Can I prepare the dough the night before?
Yes. After kneading, cover the dough tightly and place it in the fridge overnight for a slow rise. Continue with dividing and shaping the next day.
How do I know when the dough has risen enough?
For the first rise, wait until the dough has doubled in size. After shaping, the knots should look puffy before you glaze and bake them.
Can I make the dough without a stand mixer?
Yes. Knead it by hand for around 12 minutes, using a slap-and-fold motion. Take a 5-minute rest if you need one, then continue until the dough is smooth and strong.
Why use flour on the ropes when shaping?
A light dusting helps keep the twists loose, so the knot shape remains defined as the dough rises.
Can I freeze the baked rolls?
Yes. Let them cool completely, then freeze in a sealed bag for up to 2 months. Thaw before serving and warm briefly if you like.
Cook it from the original
This recipe comes from bakingwithbutter.com. Their page has the author’s own photos, notes and tips — the best place to cook it from.
Open the recipe on bakingwithbutter.com