
Coconut Cream Cake
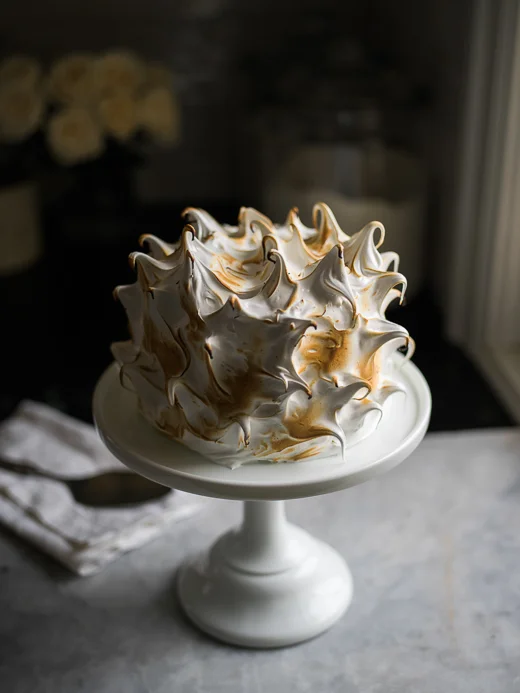
A tall, three-layer coconut cake filled with coconut pastry cream and finished with billowy Swiss meringue. It takes a few stages to assemble, but the toasted-looking meringue curls make it a playful centrepiece for a celebration.
Ingredients
- 200 gloosely packed sweetened shredded coconut
- 112 gunsalted butter, at room temperature
- 450 ggranulated sugar
- 80 mlmild-flavoured oil, such as vegetable oil
- 1 tablespoonvanilla extract
- 1½ teaspoonscoconut extract
- 4eggs, at room temperature
- 5egg yolks, at room temperature
- 280 gplain flour
- 2¼ teaspoonsbaking powder
- ¾ teaspoonkosher salt
- 240 mlunsweetened coconut milk, at room temperature
- 100 gloosely packed sweetened coconut flakes
- 400 mlunsweetened coconut milk
- 100 g, dividedgranulated sugar
- 1 pinchkosher salt
- Seeds scraped from ½ bean, or 1 teaspoonvanilla bean or vanilla extract
- ¼ teaspooncoconut or almond extract
- 2 tablespoonscornflour
- 3egg yolks, at room temperature
- 2 tablespoonsunsalted butter
- 80 mldouble cream, whipped to stiff peaks
- 360 ml (about 7 eggs)egg whites, at room temperature
- 600 ggranulated sugar
- 1 pinchkosher salt
- 2 teaspoonsvanilla extract
Instructions
- 1
Prepare the tins
Heat the oven to 175°C. Generously grease three 20 cm cake tins and line each with greased baking parchment.
- 2
Break up coconut
Pulse the shredded coconut in a food processor for about 30 seconds to shorten the long strands.
- 3
Cream the butter
Using a stand mixer with the paddle attachment, beat the butter on medium-high for about 1 minute, until smooth and creamy.
- 4
Beat the sugar
Set the mixer to medium. Add the sugar, oil, vanilla and coconut extract, then beat for about 5 minutes, until pale and roughly doubled in volume.
- 5
Add the eggs
Reduce the speed to medium-low and add the eggs and yolks one at a time, mixing each in before adding the next. Scrape down the bowl after every addition.
- 6
Mix dry ingredients
In a separate bowl, whisk together the flour, baking powder and salt.
- 7
Finish the batter
Mix a third of the flour mixture into the butter mixture just until combined, then add half the coconut milk. Repeat with another third of flour and the remaining coconut milk, then add the final third of flour. Scrape down the bowl and paddle after each addition, then fold in the shredded coconut.
- 8
Fill the tins
Divide the batter among the prepared tins and level it with a small offset spatula. Tap each tin gently on the worktop several times to release excess air bubbles.
- 9
Bake the layers
Bake for about 35 minutes, until a tester inserted into a cake comes out clean. Leave the cakes to cool completely before removing them from the tins; peel away the parchment and put one layer on a serving plate.
- 10
Prepare the flakes
Pulse the coconut flakes in a food processor 10 times to break up the strands slightly, then set aside.
- 11
Heat coconut milk
In a medium saucepan over medium heat, combine the coconut milk, 50 g of the sugar, the salt, vanilla and coconut extract. Cook, stirring, until the mixture simmers.
- 12
Make the yolk paste
In a medium bowl, whisk the cornflour with the remaining 50 g sugar. Add the egg yolks and whisk until smooth.
- 13
Temper the yolks
Gradually whisk enough hot milk into the yolk mixture to warm it. Pour the tempered mixture back into the pan with the remaining milk.
- 14
Cook the pastry cream
Return the pan to medium-high heat and bring the mixture to the boil, whisking continuously for 3 minutes so the cream does not separate as it cools. Whisk in the butter and coconut flakes.
- 15
Chill the cream
Pour the pastry cream into a shallow container and press cling film directly onto its surface to prevent a skin forming. Set the container in a bath made with ice cubes and cold water, taking care that the water does not come over its sides, or chill it in the freezer for about 15 minutes before using. Alternatively, transfer it to an airtight container and refrigerate for up to 3 days.
- 16
Fold in cream
Stir the chilled pastry cream until loosened. Mix in a third of the whipped cream to lighten it, then fold in the rest.
- 17
Stack the layers
Spread half the pastry cream over the cake layer on the plate, stopping just short of the edge. Add the next layer and press gently so it sits firmly on the filling, then spread over the remaining pastry cream and add the final layer. Tidy any filling that escapes with a metal decorating spatula and straighten the layers. Cover with cling film and refrigerate for about 1 hour to set the filling.
- 18
Heat the water
In a medium saucepan over medium-low heat, bring 2.5 cm of water to a simmer.
- 19
Dissolve the sugar
Combine the egg whites, sugar and salt in the stand-mixer bowl. Set it over the simmering water and stir with a rubber spatula for about 5 minutes, until hot and the sugar has dissolved.
- 20
Whip the meringue
Remove the bowl from the heat and fit it to the stand mixer with the whisk attachment. Beat on high for about 5 minutes, until very thick, glossy and holding stiff peaks. Add the vanilla and mix well; use straight away.
- 21
Cover the cake
Reserve 60 g of the meringue. Spread a thick, even layer of the rest over the cake with a metal spatula.
- 22
Shape the curls
Press a blob of reserved meringue against the meringue coating, then pull it away to form a wispy curl. A thicker blob makes a larger curl; repeat over the cake until it is covered.
- 23
Toast the tips
Hold a kitchen blowtorch about 7.5 cm from the cake, keeping just the flame tip over the meringue and moving the torch constantly to avoid scorching. Blow out the curl tips as they catch; their browned edges add contrast and flavour.
- 24
Serve or chill
Serve the cake straight away or cover and refrigerate for up to 48 hours.
What is coconut cream cake?
This is a celebratory layer cake built from coconut-flavoured sponge, a cooked coconut pastry cream and a dramatic Swiss meringue topping. Coconut cakes have many forms, but this version layers several textures and concentrates the flavour with coconut milk, flakes and extract.
The method has distinct stages, so each component can be made and chilled before the final assembly. That makes it easier to keep the filling between the layers and shape the meringue just before serving.
Nutrition and macros by portion
The nutrition label shows one serving as written: 2160 calories, 32g protein, 328g carbs, 85g fat.
| Portion | Adjustment | kcal | Protein | Carbs | Fat |
|---|---|---|---|---|---|
| Lighter | Smaller cake slice | 1512 kcal | 22g | 230g | 59g |
| This serving | As written | 2160 kcal | 32g | 328g | 85g |
| Hungry | Larger cake slice | 3240 kcal | 48g | 492g | 128g |
The sponge and meringue get much of their energy from sugar and flour, while butter, oil, coconut and cream contribute most of the fat. Eggs and yolks add protein, though a slice is still a rich dessert; balance it with fresh fruit and a smaller serving if preferred.
Building a soft coconut sponge
Creaming: beating the butter with sugar, oil and extracts until pale and airy helps give the sponge lift. Add the eggs gradually and scrape the bowl as directed so the mixture stays even.
Alternating: add the dry mixture and coconut milk in stages, mixing only until combined. This prevents overworking the flour, while pulsing the shredded coconut makes its long strands less prominent in the crumb.
Getting the pastry cream right
Tempering: drizzle hot coconut milk into the yolk mixture while whisking, then return it to the pan. This gradual warming helps the yolks blend smoothly rather than setting in hot liquid.
Boiling: keep whisking for the full 3 minutes once the mixture boils. The cream should thicken; cooking it for the stated time helps it hold together when chilled and layered.
Chilling and layering
Cooling: press cling film directly onto the pastry cream to prevent a skin, then chill it before folding in the whipped cream. The cream needs to be cool enough to hold its shape between the cake layers.
Stacking: stop the filling just short of the cake edge and press each layer gently into place. Refrigerating the stack for about 1 hour gives the filling time to set before the topping goes on.
Making glossy Swiss meringue
Dissolving: stir the egg whites and sugar over gently simmering water until hot and the sugar has dissolved. Keep the bowl above the water rather than letting it touch the pan.
Whipping: beat the mixture until it is glossy and holds stiff peaks before adding the vanilla. A firm meringue is much easier to spread and shape into curls.
Shaping and browning the topping
Curls: spread most of the meringue over the cake, then use small blobs of the reserved portion to pull up wispy peaks. Try one or two first to get a feel for how much meringue makes the size of curl you want.
Torching: keep the blowtorch moving and at about 7.5 cm from the cake. The aim is to brown the tips without lingering over one spot; blow out any tips that catch fire as you go.
Serving the cake
This cake is rich, so modest slices are a good starting point. Serve it on its own or pair it with fresh berries to bring a tart, fresh contrast to the sweet coconut and meringue.
For neater slices, use a sharp knife and wipe it between cuts. Keep the finished cake chilled until serving, then bring it out when you are ready to cut it.
Recipe notes & tips
- Bring the eggs, yolks and coconut milk to room temperature before making the sponge.
- Scrape down the mixer bowl after adding each egg or yolk so the batter mixes evenly.
- Cool the cake layers completely before adding pastry cream.
- Press cling film directly onto the pastry cream before chilling it.
- Make sure the meringue forms stiff peaks before using it to decorate.
- Keep the blowtorch moving to brown the meringue without scorching it.
Variations
- Almond note: use almond extract in the pastry cream for a gentle change in flavour.
- Vanilla option: use vanilla extract instead of vanilla bean in the pastry cream.
- Fresh fruit: serve slices with berries for a bright, tart contrast.
- Toasted coconut: scatter extra toasted coconut over the meringue just before serving.
- Simpler finish: spread the meringue smoothly over the cake instead of shaping curls.
Common mistakes to avoid
- Overmixing the batter: mix each flour addition only until combined to help keep the sponge tender.
- Adding hot milk too quickly: whisk it into the yolks gradually so they warm without scrambling.
- Skipping the full boil: whisk the pastry cream for 3 minutes after it boils so it holds together when cool.
- Filling warm cake layers: cool them completely first, or the pastry cream may soften and slide.
- Soft meringue peaks: continue beating until stiff peaks form so the curls keep their shape.
- Holding the torch still: keep it moving and blow out any tips that catch fire to avoid burning the topping.
How to store
Cover and refrigerate the assembled cake for up to 48 hours. Keep any unused pastry cream in an airtight container in the fridge for up to 3 days. Serve chilled; the meringue topping is best made and applied shortly before serving.
Frequently asked questions
Can I make the pastry cream ahead?
Yes. Cover it with cling film pressed onto the surface and refrigerate it in an airtight container for up to 3 days. Stir it smooth before folding in the whipped cream.
How do I know the cake layers are baked?
After about 35 minutes, insert a tester into a layer; it should come out clean. The recipe gives the tester as the main doneness check.
Why does the pastry cream need to boil for 3 minutes?
The method specifies continuous whisking for 3 minutes after the mixture reaches a boil to help prevent the cream separating as it cools.
Can I assemble the cake in advance?
You can stack the layers with the filling and chill for about 1 hour to set it. The finished cake can be covered and refrigerated for up to 48 hours.
Do I need a blowtorch?
The torch is used to brown the meringue curls and is part of this recipe's finish. Without one, you can still serve the cake with the meringue unbrowned, though it will look different.
How should I cut the cake neatly?
Use a sharp knife and wipe it between slices to clear away the filling and meringue.
Cook it from the original
This recipe comes from zoebakes.com. Their page has the author’s own photos, notes and tips — the best place to cook it from.
Open the recipe on zoebakes.com