
Sweet Potato Chip Recipe
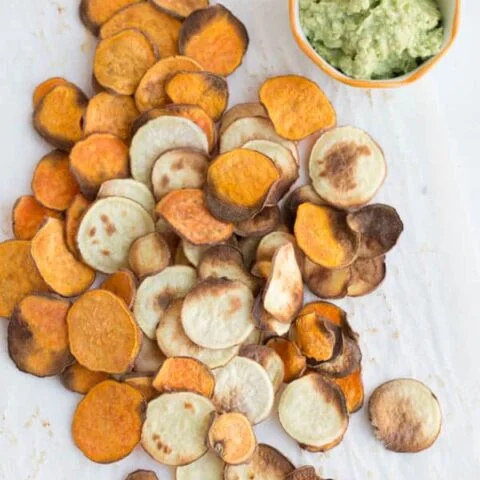
Thinly sliced sweet potatoes bake into crisp-edged chips with tender centres and a touch of sea salt. They are easy to make at home and especially good with guacamole for dipping.
Ingredients
- 2 mediumsweet potatoes
- as neededavocado or coconut oil non-stick spray
- to tastesea salt
Instructions
- 1
Heat the oven
Preheat the oven to 220°C (425°F). Line two rimmed baking sheets with baking parchment or coat them with non-stick spray.
- 2
Slice thinly
Cut the sweet potatoes into slices about 1.6 mm (1/16 inch) thick. A mandoline helps make the slices even, so they cook more evenly.
- 3
Arrange the slices
Lay the slices in a single, even layer on the prepared baking sheets.
- 4
Bake until golden
Bake for 15–25 minutes, rotating the baking sheets halfway through. Keep a close eye on the chips, as they can burn quickly; look for golden edges and a few browned spots in the centres.
- 5
Cool and serve
Leave the chips to cool for a while, then transfer them to a serving dish.
What are sweet potato chips?
Sweet potato chips are thin slices of sweet potato baked until their edges turn golden and crisp. This simple homemade version uses just sweet potatoes, a little oil spray and sea salt.
The method relies on even, very thin slices and space on the trays. Those details help the pieces bake at a similar pace and develop browned edges.
Nutrition and macros by portion
The nutrition label shows one serving as written: 223 calories, 4g protein, 52g carbs, 0g fat.
| Portion | Adjustment | kcal | Protein | Carbs | Fat |
|---|---|---|---|---|---|
| Lighter | Use less oil spray | 156 kcal | 3g | 36g | 0g |
| This serving | As written | 223 kcal | 4g | 52g | 0g |
| Hungry | Make a double batch | 335 kcal | 6g | 78g | 1g |
Most of the carbohydrates and fibre come from the sweet potatoes, which also provide a little protein. The oil spray and any added salt contribute some fat and sodium, though the amount depends on how much you use. Pair the chips with a source of protein, such as beans or yoghurt dip, and vegetables for a more balanced plate.
Why slice them so thinly?
Slice thickness: Aim for about 1.6 mm (1/16 inch), as directed. A mandoline makes it easier to keep the slices consistent, but take care while using one.
Even cooking: Thicker pieces may still be soft when thinner ones are ready. If you are slicing by hand, try to keep the pieces as similar in thickness as possible.
Set up the trays
Lining: Baking parchment keeps the slices from sticking to the trays. Non-stick spray is the stated alternative.
Spacing: Arrange the slices in an even layer rather than piling them up. Use both rimmed sheets so the chips have room to bake.
Watch the colour
Timing: The recipe gives a 15–25 minute range, with the sheets rotated halfway through. Begin checking closely as they approach the shorter end of that range.
Doneness: Look for golden edges and a few browned spots in the centres. The instruction is to watch carefully because the chips can burn quickly.
Cooling and serving
Cooling: Let the chips cool for a while before transferring them to a serving dish. Keep an eye on them during baking, since the colour can change quickly.
Pairing: The recipe description suggests serving them with guacamole. A fresh salad or a simple vegetable dip would also make an easy accompaniment.
Salt and oil
Oil spray: Use avocado or coconut oil non-stick spray for the trays if you are not lining them with parchment. The recipe does not specify an amount, so apply only enough to coat the surface lightly.
Seasoning: Add sea salt to taste. Starting with a small amount makes it easier to keep the seasoning balanced.
Recipe notes & tips
- Use a mandoline if you have one to make slices of an even thickness.
- Arrange the slices in a single layer across the two baking sheets.
- Rotate the baking sheets halfway through baking.
- Check the chips frequently towards the end of the baking time.
- Let the chips cool for a while before serving.
Variations
- Add black pepper: Season the slices with a little alongside the sea salt.
- Use smoked paprika: Add a light dusting for a smoky flavour.
- Try chilli: Add a pinch of chilli flakes for some heat.
- Serve with guacamole: Offer it as a dip alongside the chips.
- Add herbs: Sprinkle chopped fresh herbs over the chips after baking.
Common mistakes to avoid
- Uneven slices: Use a mandoline or take care to cut slices to a consistent thickness.
- Overlapping slices: Arrange them in a single layer across the prepared sheets.
- Forgetting to rotate: Turn the sheets around halfway through the bake.
- Baking unattended: Check closely because the chips can burn quickly.
- Serving straight away: Let the chips cool for a while before moving them to a dish.
How to store
Store cooled chips in an airtight container at room temperature and eat within 1–2 days; they may lose their crispness over time. To refresh them, warm them briefly in the oven and watch closely so they do not burn.
Frequently asked questions
Do I need a mandoline?
No, but it can help you make evenly thin slices. If cutting by hand, aim for about 1.6 mm (1/16 inch) throughout.
Can I use baking parchment instead of spray?
Yes. The method allows either baking parchment or non-stick spray on the baking sheets.
How do I know when the chips are ready?
Look for golden edges and a few browned spots in the centres. Watch closely, as they can burn quickly.
Why did my chips bake unevenly?
Slices of different thicknesses cook at different rates. Cutting them evenly and rotating the sheets halfway through can help.
Can I make these ahead?
They are best soon after baking, but you can store cooled chips in an airtight container for 1–2 days. They may soften, so briefly warming them in the oven can help refresh them.
Cook it from the original
This recipe comes from perrysplate.com. Their page has the author’s own photos, notes and tips — the best place to cook it from.
Open the recipe on perrysplate.com