
Instant Pot Indian Chicken Curry
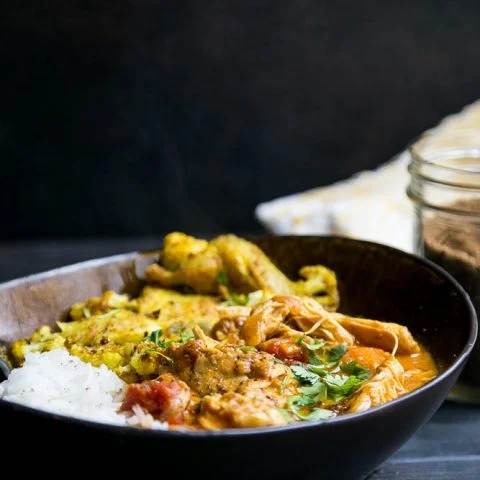
This Instant Pot chicken curry pairs tender chicken and carrots with a richly spiced tomato gravy. The pressure cooker brings the ingredients together in under an hour, while yoghurt stirred in at the end gives the sauce a creamy finish.
Ingredients
- 30 ml (2 tablespoons)coconut oil
- 1 largeonion, finely diced
- 2.5 cm (1 inch)piece of fresh ginger, finely grated
- 15 ml (1 tablespoon)minced or grated garlic
- 1 smalljalapeño or serrano pepper, deseeded and diced
- 680–907 g (1½–2 pounds)chicken thighs
- 15 ml (1 tablespoon)ground coriander
- 7.5 ml (1½ teaspoons)ground cumin
- 3.75 ml (¾ teaspoon)ground turmeric
- 2.5 ml (½ teaspoon)ground cayenne
- 794 g (1 28-ounce can)diced tomatoes, with their juice
- 600–720 g (2½–3 cups)carrots, sliced about 1.25 cm (½ inch) thick
- 120 ml (½ cup)chicken or vegetable stock
- 10 ml (2 teaspoons)salt
- 15 ml (1 tablespoon)tapioca or arrowroot starch
- 245 g (1 cup)plain, full-fat yoghurt
- 7.5 ml (1½ teaspoons)garam masala
- About 15 g (⅓ cup)fresh coriander, chopped
- Juice of ½lime
- To servesteamed rice or cauliflower rice
Instructions
- 1
Heat the oil
Set the Instant Pot to Sauté. Once it is hot, add the coconut oil.
- 2
Brown the onion
Add the onion and cook, stirring often, for 15–20 minutes, until golden brown. Use this time to prepare the remaining ingredients.
- 3
Add aromatics
Stir in the ginger, garlic and diced pepper. Cook for 1 minute, then add the coriander, cumin, turmeric and cayenne.
- 4
Brown the chicken
Push the onion mixture towards the sides of the pot and add the chicken. Leave it undisturbed for 4–5 minutes to brown, then turn it over.
- 5
Add vegetables
Add the tomatoes and their juice, carrots, stock and salt. Stir everything together with a large wooden spoon.
- 6
Pressure cook
Close the lid and set the steam valve to Sealing. Cook at high pressure for 18 minutes. When the cycle ends, release the pressure manually.
- 7
Thicken the curry
Mix the starch into the yoghurt, then add the mixture and garam masala to the curry. Set the Instant Pot to Sauté and heat until bubbling and further thickened, about 2–3 minutes.
- 8
Finish with lime
Turn off the cooker, stir in the chopped coriander and add the lime juice.
- 9
Serve with rice
Spoon the curry over steamed rice and, if desired, finish with a pinch of coriander.
What is Indian chicken curry?
Indian curry covers many regional dishes rather than one fixed recipe. This version takes a familiar approach, combining chicken, warming spices and a tomato-based gravy.
The Instant Pot pressure-cooks the chicken with carrots and tomatoes, then yoghurt is added near the end for a creamy finish. The long sauté for the onions builds flavour before pressure cooking begins.
Nutrition and macros by portion
The nutrition label shows one serving as written: 340 calories, 25g protein, 20g carbs, 18g fat.
| Portion | Adjustment | kcal | Protein | Carbs | Fat |
|---|---|---|---|---|---|
| Lighter | Serve with cauliflower rice | 238 kcal | 18g | 14g | 13g |
| This serving | As written | 340 kcal | 25g | 20g | 18g |
| Hungry | Add a larger rice portion | 510 kcal | 38g | 30g | 27g |
Chicken thighs provide most of the protein and much of the fat, while the carrots, tomatoes and rice or cauliflower rice contribute most of the carbohydrates. Coconut oil and full-fat yoghurt add further fat, and the salt and stock contribute sodium. Serve with cauliflower rice or a generous portion of vegetables to balance the plate.
Build flavour with the onions and spices
Golden onions: Give them the full 15–20 minutes, stirring often, so they soften and colour rather than catch on the base of the pot.
Spices and aromatics: Ginger, garlic and fresh chilli cook briefly before the ground spices go in. This short time in the pot helps bring out their aroma without leaving them to burn.
Choose your chicken and vegetables
Chicken thighs: These are well suited to pressure cooking and become tender in the curry. The recipe does not specify whether they are bone-in or boneless, so follow the stated cooking time and check the chicken is cooked through before serving.
Carrots: Slice them to about 1.25 cm (½ inch) thick so they hold their shape while softening. The tomatoes and stock provide the liquid for the pressure-cooking stage.
Brown the chicken before pressure cooking
Leave the chicken undisturbed for 4–5 minutes on its first side to give it time to brown. If the pot is crowded, the pieces may not colour evenly; work in batches if needed.
After turning the chicken, add the tomatoes, carrots, stock and salt and stir. Scrape the base as you mix so browned bits are loosened before you close the cooker.
Finish the sauce gently
Yoghurt mixture: Stir the starch into the yoghurt before adding it to the curry to help it blend into the sauce. Add it after pressure cooking, as the recipe directs.
Final simmer: Use the Sauté setting for about 2–3 minutes, stopping when the curry bubbles and thickens further. Stir in the garam masala, coriander and lime at the end for a fragrant, bright finish.
What to serve with the curry
Rice: Steamed rice is the suggested accompaniment and makes a simple base for the tomato gravy. Spoon the curry over it just before serving.
Cauliflower rice: This is the recipe's alternative if you want a lighter-tasting base. A simple side of vegetables can also round out the meal.
Recipe notes & tips
- Dice the onion small so it softens evenly during the long sauté.
- Stir the onion often while it cooks to reduce the chance of it sticking or scorching.
- Have the spices measured and ready before adding the ginger, garlic and pepper.
- Use the stated 1.25 cm (½ inch) carrot slices to help them cook evenly.
- Stir the starch into the yoghurt until smooth before adding it to the curry.
- Taste the finished curry before serving and adjust the lime or salt to suit.
Variations
- Make it dairy-free: Replace the yoghurt with coconut milk, as suggested in the recipe description.
- Adjust the heat: Use a milder pepper or omit the cayenne for a less fiery curry.
- Choose the stock: Use vegetable stock instead of chicken stock.
- Pick a starch: Use tapioca starch or arrowroot, as specified in the ingredients.
- Change the base: Serve with cauliflower rice instead of steamed rice.
Common mistakes to avoid
- Rushing the onions: They need 15–20 minutes to turn golden; keep cooking and stirring rather than moving on too soon.
- Crowding the chicken: Pieces may brown unevenly; brown them in batches if the pot is full.
- Burning the spices: Add them after the ginger, garlic and pepper and stir briefly before adding the other ingredients.
- Skipping the base scrape: Stir thoroughly after adding the liquid ingredients so browned bits are loosened from the pot.
- Adding yoghurt without starch: Mix the starch into the yoghurt first so it is ready to incorporate into the curry.
- Overcooking the sauce at the end: Heat it for about 2–3 minutes, just until bubbling and further thickened.
How to store
Refrigerate leftover curry in a covered container and use within 3–4 days. Reheat gently in a saucepan or microwave until piping hot, stirring to heat it evenly; add a little water if the sauce has thickened in storage.
Frequently asked questions
Can I use coconut milk instead of yoghurt?
Yes. The recipe description suggests replacing the yoghurt with coconut milk for a dairy-free version.
Can I use chicken breast?
The recipe calls for chicken thighs. Breast meat can be used, but it may become drier with the stated pressure-cooking time.
How spicy is this curry?
It includes a small jalapeño or serrano pepper and ½ teaspoon of cayenne. Use a milder pepper or reduce the cayenne if you prefer less heat.
Can I make it without an Instant Pot?
This method is written for an Instant Pot and does not give stovetop cooking times. For another cooker, use a suitable chicken curry method and check that the chicken is cooked through.
How do I know when the sauce is thick enough?
After adding the yoghurt mixture and garam masala, heat for about 2–3 minutes, until the curry is bubbling and has thickened further.
What should I serve with it?
Serve it over steamed rice or cauliflower rice, as suggested in the recipe.
Cook it from the original
This recipe comes from perrysplate.com. Their page has the author’s own photos, notes and tips — the best place to cook it from.
Open the recipe on perrysplate.com