
Easy Sourdough Bread (No kneading, No Autolyse, No Pre-Shape)
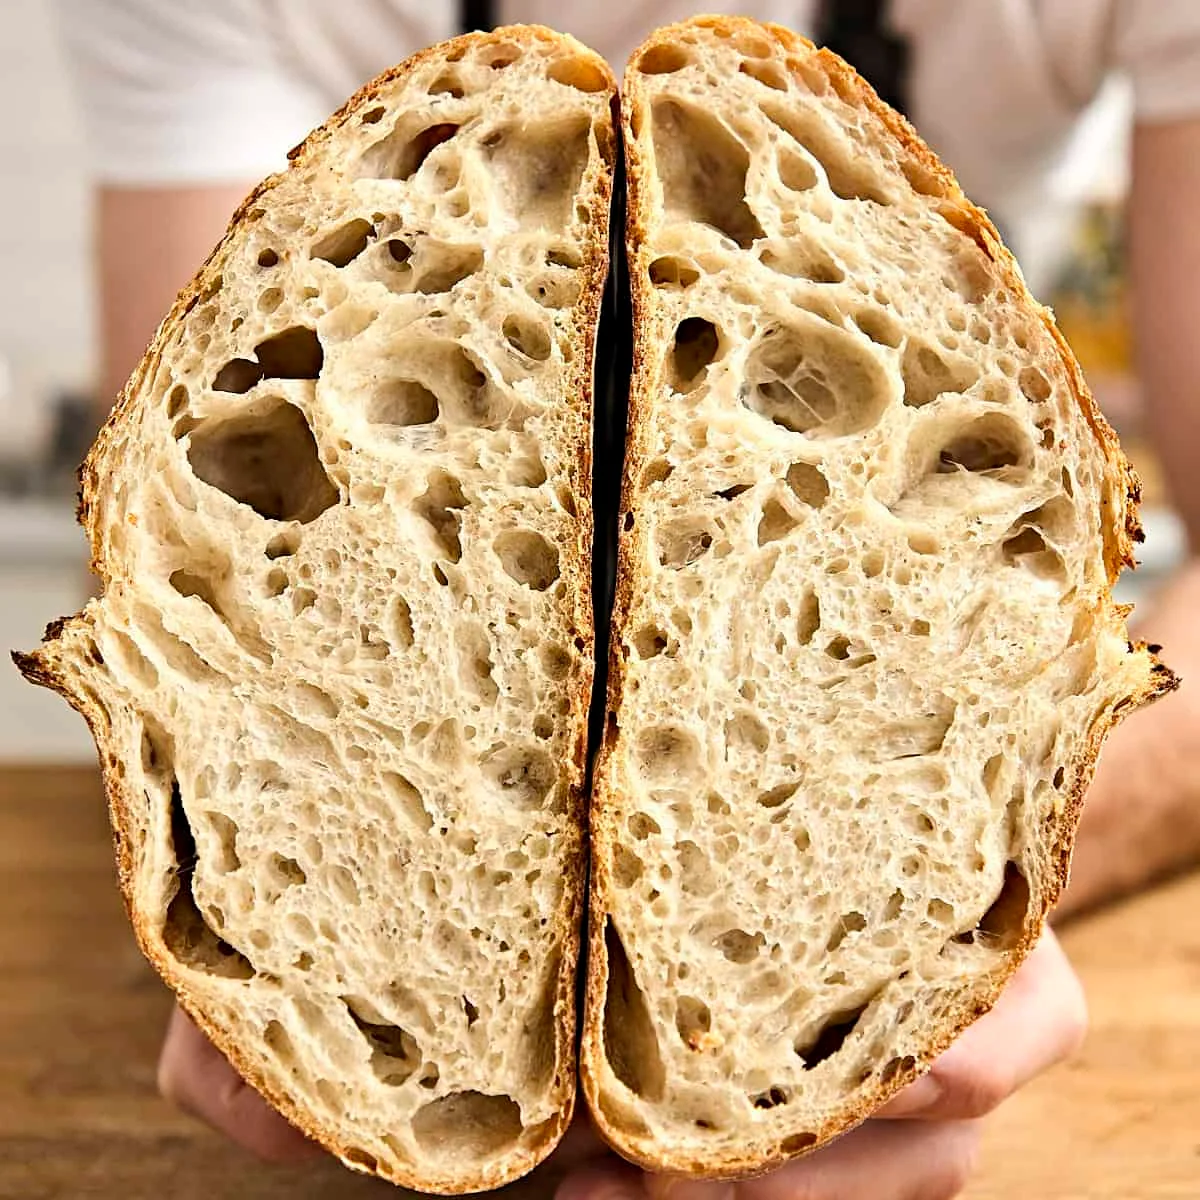
This sourdough loaf uses simple folds and a long cold rest instead of kneading, autolyse or pre-shaping. Bake it in a covered Dutch oven for a crisp, blistered crust and an airy crumb.
Ingredients
- 20 gactive sourdough starter
- 40 gwhite flour
- 10 grye flour
- 50 gwater
- 375 gwater
- 100 gactive levain
- 12 gsalt
- 450 gwhite bread flour
- 25 grye flour
- 25 gwholemeal flour
- for dustingrice flour
- for dustingflour
Instructions
- 1
Build the levain
Six to eight hours before mixing the dough, stir 20 g starter, 40 g white flour, 10 g rye flour and 50 g water together in a jar. Cover loosely and leave at room temperature until the mixture has tripled, looks very bubbly and has a domed top. This makes 120 g levain; use 100 g in the dough and keep the remaining 20 g to feed your starter.
- 2
Mix the dough
Whisk 375 g water, 100 g active levain and 12 g salt in a large bowl until milky. Add 450 g white bread flour, 25 g rye flour and 25 g wholemeal flour. Mix by hand or with a dough scraper until a rough, shaggy dough forms with no dry patches.
- 3
Fold and rest
Wet your hands, lift the dough from the middle so the ends hang down, then fold it in on itself to make a rough ball. Cover the bowl with a damp towel and leave at room temperature for 30 minutes.
- 4
Slap and fold
After 30 minutes, wet your hands, lift the dough and slap its bottom end against the work surface, then fold the top over towards you. Turn it a quarter turn and repeat two or three times, until it feels tight and resists stretching. Return it to the bowl, cover and rest for 30 minutes. Repeat this folding and resting process three more times, for four sessions in total.
- 5
Bulk ferment
After the final fold, cover the bowl and leave the dough at 24–27°C (75–80°F). Do not wait for it to double: it is ready when it has risen by about 75%, looks domed and jiggles like set gelatin when you shake the bowl.
- 6
Shape and chill
Turn the dough onto a lightly floured surface. Fold the top down to the middle and the sides into the centre, then roll it tightly from top to bottom into a log. Gently drag it towards you to build surface tension. Put it seam-side up in a proofing basket dusted generously with rice flour, pinch the seam closed and seal the basket in a plastic bag. Refrigerate for 12–24 hours.
- 7
Heat the oven
Keep the dough in the fridge. Put the lidded Dutch oven in the oven and preheat to 250°C (480°F) for a full hour.
- 8
Test and score
When the oven is fully hot, take the dough from the fridge and gently poke it with a floured finger. It is ready if the dent springs back slowly and stops halfway. Turn the dough onto baking parchment and make one confident, deep score, about 1.3 cm (½ inch), down the centre at a slight angle.
- 9
Bake the loaf
Use the parchment to lower the dough carefully into the hot Dutch oven. Cover and bake at 230°C (445°F) for 20 minutes. Remove the lid, reduce the oven to 200°C (390°F) and bake uncovered for a further 20–25 minutes, until deeply browned.
- 10
Cool completely
Transfer the loaf to a wire rack and leave it to cool for at least 2 full hours before slicing, so the crumb has time to set.
What is sourdough bread?
Sourdough is bread raised with a naturally fermented starter rather than relying on commercial baker’s yeast. This American-style home loaf uses a rye-based starter and a long, chilled proof for flavour and a distinctive crust.
Simple folds develop the dough’s structure without kneading, while the recipe skips both autolyse and pre-shaping. The method depends on watching the dough’s rise and feel rather than following the clock alone.
Nutrition and macros by portion
The nutrition label shows one serving as written: 211 calories, 7g protein, 40g carbs, 1g fat.
| Portion | Adjustment | kcal | Protein | Carbs | Fat |
|---|---|---|---|---|---|
| Lighter | Smaller slice, more vegetables | 148 kcal | 5g | 28g | 1g |
| This serving | As written | 211 kcal | 7g | 40g | 1g |
| Hungry | Serve a thicker slice | 317 kcal | 11g | 60g | 2g |
The recipe’s listed nutrition is for one serving, but the method makes a whole loaf and does not specify how many slices it yields. Most of the carbohydrates come from the flours, the flour and levain also contribute protein, and the fat is low. Pair a slice with eggs, beans or another protein-rich topping and some vegetables for a more complete plate.
Build an active levain
Starter first: the levain is a small, refreshed mixture made from starter, white flour, rye flour and water. Let it rise until tripled, bubbly and domed before using it; the recipe makes 120 g, of which 100 g goes into the dough.
Timing: the stated 6–8 hours is a guide, since room temperature and starter activity affect how quickly it matures. Keep the remaining 20 g to feed your ongoing starter.
What the flour blend does
White bread flour: this is the main flour in the dough and provides its structure. Rye and wholemeal flour add different flavours and make up a smaller part of the blend.
Water and salt: whisking these with the levain before adding flour helps distribute them through the dough. Mix until no dry flour remains, but expect the dough to look rough and shaggy at this stage.
Folds without kneading
First fold: lifting the dough from its middle and folding the hanging ends inward gives it an initial shape. Wet hands help keep the sticky dough from clinging as much.
Slap and folds: work the dough against the counter, turning it between repetitions, until it feels tighter and resists stretching. The four sessions are separated by 30-minute rests, giving the dough time to relax between handling.
Read the bulk ferment
Look for the rise: after the final fold, the dough should grow by roughly 75%, not double. A domed surface and a gentle jiggle when the bowl is shaken are the recipe’s other cues.
Temperature matters: the specified range is 24–27°C (75–80°F). If the room is cooler or warmer, use the dough’s appearance and movement to judge progress rather than treating a fixed time as the finish line.
Shape for a good crust
Build tension: folding the dough inward and rolling it into a log creates a neat shape; gently dragging it towards you tightens the outer surface. Keep the seam closed before placing the loaf seam-side up in the rice-floured basket.
Cold rest: seal the basket in a plastic bag and refrigerate for 12–24 hours. The dough stays chilled while the Dutch oven heats, making the scoring and transfer easier to manage.
Score and bake
Poke test: a slowly returning dent that stops halfway is the cue given for readiness. Score the loaf with one deep, slightly angled cut so it has a defined opening as it bakes.
Covered bake: bake at 230°C (445°F) for 20 minutes with the lid on, then uncover and lower the oven to 200°C (390°F). The additional 20–25 minutes should take the crust to a deep brown.
Cool before slicing
Set the loaf on a wire rack and wait at least 2 full hours before cutting. Slicing while it is still hot can leave the crumb gummy, even if the crust looks done.
Serve thick slices with butter, cheese or soup, or toast them for breakfast. The plain loaf also works well as a base for sandwiches.
Recipe notes & tips
- Use a digital scale to weigh the flour, water, starter and salt accurately.
- Check that the levain has tripled and looks bubbly before mixing the dough.
- Wet your hands for the folds to make handling the sticky dough easier.
- Use the dough’s rise and jiggle to judge bulk fermentation, not just elapsed time.
- Preheat the Dutch oven for the full hour while the dough remains chilled.
- Allow at least 2 full hours for the loaf to cool before slicing.
Variations
- More rye: Replace some of the white bread flour with rye flour, keeping in mind that the dough’s texture may change.
- Seeded crust: Sprinkle seeds on the loaf after scoring for a crunchy finish.
- Herb loaf: Fold dried herbs into the dough when mixing for a savoury flavour.
- Sandwich slices: Shape the dough into a shorter, broader loaf for slices suited to sandwiches.
- Toast it: Slice and toast day-old bread for a crisp base for toppings.
Common mistakes to avoid
- Using sleepy levain: Wait until it has tripled, looks very bubbly and has a domed top before mixing.
- Adding dry flour patches: Mix until all the flour is moistened, even if the dough remains shaggy.
- Overworking the folds: Stop after the dough feels tight and resists stretching; it does not need endless handling.
- Waiting for the dough to double: Finish bulk fermentation at about a 75% rise, with a dome and a jiggle.
- Underheating the Dutch oven: Give it the full hour at 250°C (480°F) before baking.
- Cutting too soon: Cool the loaf on a rack for at least 2 full hours to help prevent a gummy crumb.
How to store
Once fully cool, store the loaf in a bread bag or wrapped at room temperature for about 2–3 days. Refresh slices in a toaster, or warm them briefly in the oven; freeze sliced bread for longer storage and toast from frozen.
Frequently asked questions
Can I use the starter instead of building the levain?
The method calls for 100 g of active levain built from 20 g starter, 40 g white flour, 10 g rye flour and 50 g water. Use the levain when it has tripled and is bubbly and domed.
How long does the dough need to ferment?
The levain takes 6–8 hours as a guide, followed by four fold sessions with 30-minute rests and bulk fermentation judged by the dough’s rise. After shaping, the dough chills for 12–24 hours.
Does the dough need to double during bulk fermentation?
No. The recipe says to look for about a 75% rise, a domed top and a jiggle like set gelatin.
Can I bake it without a Dutch oven?
This method is written for a lidded Dutch oven, which provides the covered baking stage. A different baking setup would require adapting the method.
How do I know when the dough is ready to bake?
Poke it gently with a floured finger. The recipe’s cue is an indent that springs back slowly and stops halfway.
Why should the bread cool before slicing?
The recipe calls for at least 2 full hours on a wire rack so the crumb can set. Cutting sooner can leave the centre gummy.
Cook it from the original
This recipe comes from pantsdownapronson.com. Their page has the author’s own photos, notes and tips — the best place to cook it from.
Open the recipe on pantsdownapronson.com