
Simple Millet Porridge (小米粥)
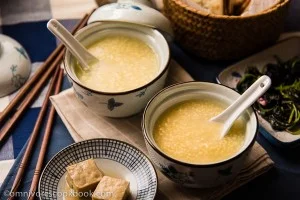
A simple Chinese millet porridge cooked until the grains are tender while still holding their shape. Serve it plain as a side, or season each bowl with sugar, pickled vegetables, fermented tofu or Parmesan.
Ingredients
- 120 g (½ cup)millet
- 2 litres (8 cups)water
- to tastesugar
- to tastefermented tofu
- to tastepickled vegetables
- to tasteParmesan cheese
Instructions
- 1
Rinse millet
Rinse the millet a few times under the tap, then drain it.
- 2
Boil water
Pour the water into a medium-sized pot and bring it to the boil.
- 3
Add millet
Add the millet to the pot gradually.
- 4
Skim the foam
Let the water return to the boil, then turn the heat down to low. Skim the foam from the surface with a ladle to help prevent the porridge from spilling over.
- 5
Cook gently
Keep the porridge at a gentle boil for 30 minutes. After 20 minutes, stir it several times to stop the millet sticking to the bottom of the pot.
- 6
Thicken if desired
For thicker porridge, continue cooking after the first 30 minutes, stirring constantly as it thickens, for about 10 minutes.
- 7
Check the grains
The porridge is ready when the millet is tender but still holds its shape.
- 8
Serve sweet
For a sweet version, spoon the porridge into serving bowls and add sugar to taste.
- 9
Serve savoury
For a savoury version, serve the porridge warm with pickled vegetables or fermented tofu.
- 10
Add Parmesan
For a cheesy version, grate Parmesan into the porridge while it is still hot.
What is millet porridge?
Millet porridge, or xiaomi zhou, is a simple Chinese grain dish often served as a side at dinner. This version uses just millet and water, leaving the seasoning to the table.
Its mild flavour makes it easy to pair with sweet or savoury accompaniments. A gentle simmer cooks the grains through while allowing them to retain their shape.
Nutrition and macros by portion
The nutrition label shows one serving as written: 76 calories, 2g protein, 15g carbs, 1g fat.
| Portion | Adjustment | kcal | Protein | Carbs | Fat |
|---|---|---|---|---|---|
| Lighter | Use less Parmesan | 53 kcal | 2g | 10g | 1g |
| This serving | As written | 76 kcal | 2g | 15g | 1g |
| Hungry | Serve a larger bowl | 114 kcal | 3g | 22g | 1g |
Millet supplies most of the carbohydrates, while the water adds volume without contributing macros. The listed porridge has little fat and a modest amount of protein; toppings such as Parmesan or fermented tofu will change the balance. Pair a bowl with a protein-rich main and vegetables for a more rounded plate.
Choosing the millet
Millet: rinse it a few times and drain it before cooking. This is the only grain in the recipe, so the finished porridge’s texture depends on cooking it gently and checking for tenderness.
Managing the simmer
Start with boiling water, then add the millet gradually. Once the water returns to the boil, lower the heat and skim off the foam so the pot is less likely to boil over.
Gentle heat: keep the porridge bubbling without letting it boil too fiercely. Stir several times after 20 minutes to help keep the grains from sticking to the bottom.
Getting the texture right
For the basic version, cook for 30 minutes and look for tender grains that still hold their shape. If you prefer a thicker consistency, cook for about 10 minutes longer and stir constantly as the porridge thickens.
Seasoning each bowl
Sugar: add it to taste for a sweet bowl. Pickled vegetables or fermented tofu give the porridge a savoury accompaniment.
Parmesan: grate it into the porridge while it is hot so it mixes through. These are serving choices rather than ingredients that need to be added to the whole pot.
What to serve with it
Serve the porridge warm alongside a main dish, as a mild counterpoint to more strongly seasoned food. Put the suggested toppings on the table so everyone can choose a sweet, savoury or cheesy finish.
Recipe notes & tips
- Use a medium-sized pot with room for the porridge to bubble.
- Add the millet gradually after the water reaches a boil.
- Skim the foam once the pot returns to the boil.
- Keep the heat low enough for a gentle simmer.
- Stir several times after the first 20 minutes to help prevent sticking.
- Stir constantly if you cook the porridge longer to make it thicker.
Variations
- Sweet bowl: stir sugar into each serving to taste.
- Pickled vegetables: serve them alongside the warm porridge for a savoury topping.
- Fermented tofu: add it to a savoury serving at the table.
- Parmesan finish: grate cheese into the porridge while it is hot.
- Thicker porridge: continue cooking for about 10 minutes, stirring constantly.
Common mistakes to avoid
- Boiling too hard: lower the heat after the water returns to the boil to help prevent spills.
- Leaving foam on top: skim it with a ladle once the pot comes back to the boil.
- Stirring too little: stir several times after 20 minutes to reduce sticking.
- Cooking uncovered by attention: watch the pot as it simmers so it does not spill over.
- Stopping too soon: check that the millet is tender before serving.
- Letting thickened porridge catch: stir constantly during the extra cooking time.
How to store
Refrigerate leftover porridge in a covered container and use within 3 days. Reheat gently in a saucepan, stirring; add a little water if it has thickened in the fridge.
Frequently asked questions
How long does millet porridge take to cook?
The main cooking time is 30 minutes after the porridge returns to the boil. For a thicker result, cook for about 10 minutes more, stirring constantly.
How can I tell when the millet is done?
The grains should be tender but still hold their shape.
Can I make it thicker?
Yes. Continue cooking after the first 30 minutes for about 10 minutes, stirring constantly as it thickens.
What can I serve with millet porridge?
The recipe suggests sugar, pickled vegetables, fermented tofu or Parmesan. Serve it warm and choose a topping to suit the meal.
Can I make the porridge ahead?
Yes. Refrigerate it in a covered container and reheat gently. Stir in a little water if needed to loosen it.
Cook it from the original
This recipe comes from omnivorescookbook.com. Their page has the author’s own photos, notes and tips — the best place to cook it from.
Open the recipe on omnivorescookbook.com