
Low Carb Peanut Butter Dessert - Layered Dream
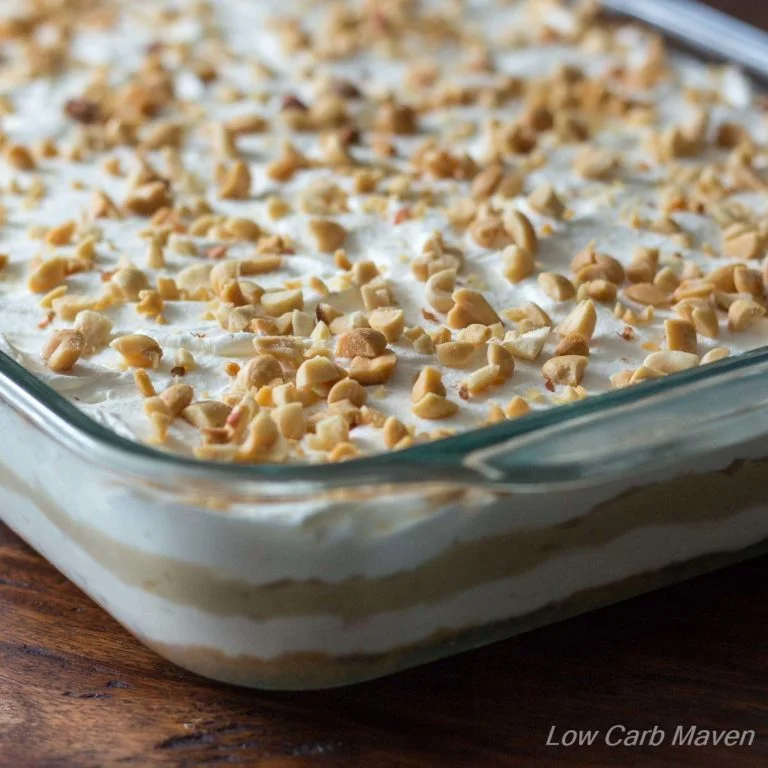
This American layered dessert stacks a buttery nut-and-peanut-flour crust with peanut butter pudding, a light cream cheese layer and whipped cream. It is a make-ahead treat with contrasting creamy and crisp textures.
Ingredients
- 2 cups (180 g)almond flour
- ½ cup (40 g)low-fat peanut flour
- ⅓ cup (35 g)whey protein powder
- ⅓ cup (35 g)low-carb icing sugar
- ¼ teaspoonsalt
- 7–8 tablespoons (113.4 g), meltedsalted butter
- ¾ cup (177.4 ml)almond milk
- ½ cup (118 ml)double cream
- ½ cup (115 g)low-carb icing sugar
- 1 tablespooncornflour
- ¼ teaspoonxanthan gum
- 4 largeeggs
- 2 teaspoonsvanilla
- ¼ teaspoonsalt
- ⅔ cup (345 g), smoothpeanut butter
- 1 packet (8 oz/227 g)cream cheese
- 2 tablespoonsalmond milk or double cream
- 2 tablespoonslow-carb icing sugar
- ⅛ teaspoonstevia glycerite
- 1½ cupswhipped cream, to fold in
- 2 cups (473 ml)double cream for whipping
- 2 tablespoonslow-carb icing sugar
- 1 teaspoonvanilla
- ⅛ teaspoonstevia glycerite
- The remaining whipped creamwhipped cream
- ⅓ cup (1.5 oz/43 g), optionalchopped roasted peanuts
Instructions
- 1
Heat the oven
Preheat the oven to 180°C and position a rack in the lower third.
- 2
Bake the crust
Whisk the crust's dry ingredients together in a medium bowl. Add the melted butter and stir with a spatula until combined. Transfer to a 23 × 33 cm glass baking dish, cover with waxed paper and press firmly into an even layer using the flat bottom of a glass. Remove the paper and bake for about 15 minutes, until the crust starts to brown. Leave it to cool completely.
- 3
Prepare the station
For the peanut butter pudding, set a sieve, whisk and rubber spatula beside the hob.
- 4
Warm the liquids
Pour the almond milk and double cream into a medium saucepan and warm over a medium heat. In a heatproof bowl, whisk together the dry pudding ingredients, then mix in the eggs. If the liquid has not started simmering around the edge, raise the heat to medium-high until it does, then turn off the heat.
- 5
Temper the eggs
Slowly pour the hot milk mixture into the egg mixture, whisking continuously. Return the saucepan to the hob, pour the mixture back into it and scrape in as much as possible. Place the sieve over the now-empty bowl.
- 6
Thicken the pudding
Set the saucepan over a medium heat and whisk continuously. It may take at least 5 minutes for the mixture to warm and begin thickening. Once it loosens and then thickens, lower the heat slightly and whisk for 1 minute; it should bubble gently if you briefly pause. Turn off the heat, move the pan to a cool hob ring and whisk for 1 more minute.
- 7
Finish the pudding
Pour or scrape the pudding through the sieve to catch any cooked egg, gently pressing it through with a spatula and scraping the underside. Stir in the vanilla, then the peanut butter. Taste and add more powdered sweetener or stevia if you prefer it sweeter; add salt if it needs a more pronounced salty peanut flavour. Cover the surface with cling film and refrigerate until completely cold.
- 8
Whip the cream
Put the double cream for whipping, vanilla and sweeteners in a medium bowl. Use a hand or stand mixer to whip until it forms half-peaks. If using xanthan gum to stabilise the cream, add it at this point and continue whipping until the cream holds stiff peaks and clings to the beaters.
- 9
Make the cheese layer
Soften the cream cheese in the microwave. Beat it with the sweeteners and almond milk until light. Fold in the 1½ cups of whipped cream, adding it ½ cup at a time. Spread the mixture evenly over the cooled crust and refrigerate.
- 10
Add the pudding
Whip the chilled peanut butter pudding until light and fluffy, then spread it evenly over the cream cheese layer.
- 11
Finish and chill
Gently spread the remaining whipped cream over the pudding. Add the optional chopped peanuts, then chill before serving.
What is a layered peanut butter dessert?
This American-style dessert is assembled in a baking dish as a sequence of crust, cream cheese, pudding and whipped cream layers. Its appeal is the contrast between a firm base and soft, rich fillings.
This version brings together almond and peanut flours for the crust, then uses peanut butter to flavour a cooked pudding. Making the components ahead gives them time to cool and set before assembly.
Nutrition and macros by portion
The nutrition label shows one serving as written: 367 calories, 11g protein, 7g carbs, 34g fat.
| Portion | Adjustment | kcal | Protein | Carbs | Fat |
|---|---|---|---|---|---|
| Lighter | Smaller dessert square | 257 kcal | 8g | 5g | 24g |
| This serving | As written | 367 kcal | 11g | 7g | 34g |
| Hungry | Larger dessert square | 551 kcal | 17g | 11g | 51g |
The almond flour and sweeteners contribute most of the listed carbohydrate, while butter, peanut butter and cream account for much of the fat. Eggs, whey protein, cream cheese and peanut butter contribute protein. Balance a serving with fresh berries, or serve a smaller piece after a meal with fruit.
Build a sturdy crust
Dry ingredients: whisk them thoroughly before adding butter so the flour and sweetener are evenly distributed.
Pressing: use waxed paper and a flat-bottomed glass to compact the mixture into an even base. Bake until it begins to colour, then let it cool completely before adding the soft layers.
Cook the pudding gently
Tempering: whisk the hot milk mixture into the eggs gradually rather than adding it all at once. This helps the eggs warm evenly before the mixture goes back into the pan.
Whisking: keep stirring as the pudding heats, especially as it begins to thicken. Straining it catches any small pieces of cooked egg and leaves a smoother filling.
Check the texture
Pudding: it should thicken and bubble gently, then be strained and chilled until fully cold. Whipping it after chilling makes it lighter before spreading.
Cream: whip to stiff peaks so it holds its shape, but stop before it turns grainy. Fold the measured portion into the cream cheese gently to keep the layer light.
Assemble in order
Base first: the crust needs to be completely cool before the cream cheese mixture goes on top. Chill that layer before spreading on the pudding.
Finish last: use a light touch when spreading the remaining cream over the pudding so the layers stay distinct. The chopped peanuts add a crunchy topping if you choose to use them.
Plan the chilling time
The oven time is only part of the preparation: both the crust and pudding need to cool, and the assembled dessert needs chilling before serving. The recipe suggests making the crust and pudding the day before assembly.
For the cleanest layers, keep the pudding cold and give the assembled dish time to chill. This makes the dessert easier to portion.
What to serve alongside
Serve chilled squares on their own as a rich dessert, or pair them with fresh berries for a tart contrast. If serving after a meal, a smaller square can work well because the cream and peanut butter layers are substantial.
A plain cup of tea or coffee also suits the sweet, nutty flavour without adding another rich element.
Recipe notes & tips
- Bake the crust and cook the pudding ahead so both are completely cool for assembly.
- Press the crust firmly and evenly to help it hold together when cut.
- Whisk continuously while heating the pudding to reduce the chance of lumps.
- Pass the cooked pudding through a sieve before adding the peanut butter.
- Fold the whipped cream into the cream cheese in stages to keep the mixture airy.
- Chill the assembled dessert before slicing for neater portions.
Variations
- Roasted peanut topping: scatter the optional chopped peanuts over the cream for extra crunch.
- Stronger peanut flavour: use a well-stirred smooth peanut butter for an even, nutty pudding.
- Berry contrast: serve each portion with fresh berries for a tart accompaniment.
- Vanilla emphasis: add the vanilla as directed and keep other flavourings simple to let it show.
- Cream topping: reserve the remaining whipped cream for a generous final layer, as in the recipe.
Common mistakes to avoid
- Warm crust: adding the cream cheese layer before the base is cool can soften it; cool the crust completely first.
- Rushing the tempering: pouring the hot liquid in too quickly can cook the eggs; add it slowly while whisking.
- Leaving the pudding unattended: it can thicken suddenly; whisk steadily and watch for gentle bubbling.
- Skipping the sieve: cooked egg pieces may remain in the pudding; strain it before adding the vanilla and peanut butter.
- Overwhipping the cream: it can turn grainy; stop once it holds stiff peaks.
- Spreading too firmly: pressing hard can mix the layers; spread the cream topping gently.
How to store
Cover and refrigerate leftovers, keeping the dessert chilled between servings; use within 3 days for the best texture. Serve cold rather than reheating.
Frequently asked questions
Can I make this dessert ahead?
Yes. The recipe recommends making the crust and pudding the day before assembly, and the finished dessert can also be assembled ahead and chilled before serving.
How do I know when the pudding is thick enough?
It should thicken after becoming looser, with gentle bubbling when you briefly pause whisking. Follow the method's additional whisking time, then strain it.
Does the pudding need to be cold before assembly?
Yes. The method says to refrigerate it until completely cold before whipping it and spreading it over the cream cheese layer.
Can I leave off the chopped peanuts?
Yes. They are optional and can simply be omitted from the top.
How should I cut neat portions?
Chill the assembled dessert before slicing. A clean knife between cuts can help keep the layers distinct.
Cook it from the original
This recipe comes from lowcarbmaven.com. Their page has the author’s own photos, notes and tips — the best place to cook it from.
Open the recipe on lowcarbmaven.com