
Southern Green Beans
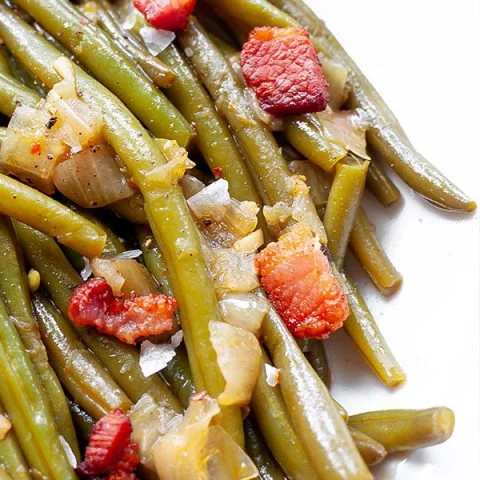
These Southern-style green beans are slowly simmered with bacon, onion, garlic and savoury seasonings until very tender. They make a comforting side dish for a family meal, with the cooking broth carrying flavour through the beans.
Ingredients
- 3 pieces, cut into 6 mm piecesthick-cut bacon
- 1 mediumyellow onion, chopped
- 2 medium clovesgarlic, minced
- 475 ml (2 cups), plus more if neededwater
- 2 teaspoonsroasted chicken bouillon paste
- ½ teaspoon, plus more to tastefine sea salt
- ¼ teaspoon, plus more to tasteground black pepper
- ¼ teaspoonground paprika
- ¼ teaspoongranulated sugar
- A pinchred pepper flakes (optional)
- 680 g (1½ pounds)fresh green beans, washed and trimmed
- 1 tablespoon (optional)butter
Instructions
- 1
Brown the bacon
Heat a Dutch oven or another large, heavy-based lidded pot over medium heat. Add the bacon and sauté until golden. Lift it out, leaving the rendered fat in the pot, and drain the bacon on a paper-towel-lined plate.
- 2
Soften the aromatics
Add the onion and sauté for about 3–5 minutes, until it begins to soften and turn translucent. Add the garlic and cook for about 30 seconds to 1 minute, until aromatic, then turn off the heat.
- 3
Drain the grease
Remove the onion and garlic from the pot, then pour off the excess grease.
- 4
Make the broth
Return the pot to the hob over medium-low heat. Add the water and scrape the bottom with a spatula to loosen any browned bits. Stir in the bouillon, salt, pepper, paprika, sugar and red pepper flakes, if using. Return the onion and garlic to the pot and stir.
- 5
Pack in the beans
Arrange the green beans tightly in the pot, all pointing in the same direction to help them cook evenly. Add more water if needed: the beans need not be submerged, but should be about 90% covered.
- 6
Simmer until tender
Cover the pot and lower the heat until the contents simmer gently. Occasionally use tongs to move the beans so those on top reach the bottom and cook in the broth. Simmer for 1–2 hours, until the beans are as tender as you like.
- 7
Finish and serve
Drain the beans, then toss them with the bacon and butter, if using. Taste and add more salt and pepper as desired. Serve hot.
What are Southern green beans?
Southern-style green beans are commonly cooked slowly with smoky meat and seasonings, rather than served crisp and lightly dressed. This version uses bacon, onion, garlic and chicken bouillon to flavour the cooking liquid.
The method reflects a comfort-food approach found in American Southern cooking: give the beans time to soften and take on the savoury broth. Here, packing them closely in the pot helps keep them evenly surrounded by the liquid.
Nutrition and macros by portion
The nutrition label shows one serving as written: 262 calories, 17g protein, 11g carbs, 17g fat.
| Portion | Adjustment | kcal | Protein | Carbs | Fat |
|---|---|---|---|---|---|
| Lighter | Skip the finishing butter | 183 kcal | 12g | 8g | 12g |
| This serving | As written | 262 kcal | 17g | 11g | 17g |
| Hungry | Serve a larger portion | 393 kcal | 25g | 17g | 25g |
The green beans contribute most of the carbohydrates, while bacon and optional butter provide much of the fat; bacon and bouillon also supply protein. Pair a serving with a protein-rich main and another vegetable or a modest portion of potatoes to make a balanced plate.
Build flavour in stages
Bacon: Browning the bacon first renders fat for cooking the onion and garlic. Removing the pieces before the long simmer lets them be added back at the end.
Aromatics: The onion softens before the garlic goes in, since garlic needs less time and can scorch. Scraping up the browned bits when adding water brings those flavours into the broth.
Keep the simmer gentle
Heat: Once the pot is covered, lower the hob setting until the liquid simmers gently. A steady, quiet simmer gives the beans time to become tender without boiling the broth vigorously.
Position: The beans should be closely packed and about 90% covered by water. Move them around occasionally with tongs so the top layer also gets time in the broth.
Choose your tenderness
Doneness: The recipe gives a range of 1–2 hours, but the beans themselves are the best guide. Start checking for tenderness during the simmer and continue until they reach your preference.
Texture: These beans are intended to become very soft, not crisp-tender. If they are still firmer than you want, keep simmering and check them again.
Season at the end
Salt: The bouillon and bacon both add savoury seasoning, so taste the beans after cooking before adding more salt. A final adjustment of black pepper can sharpen the flavour.
Butter: Tossing with optional butter at the end adds richness. Drain the beans first, as directed, so the finishing butter coats them rather than being diluted in the cooking liquid.
What to serve alongside
These beans suit a meal with roast or grilled meat, or another hearty main, and work well with potatoes or cornbread to catch the savoury flavours. They can also sit alongside other vegetable sides for a more varied plate.
Because the beans are cooked until soft and seasoned with bacon, serve a crisp or fresh side alongside them if you would like a contrast in texture.
Recipe notes & tips
- Use a pot wide enough to hold the beans in a snug, even layer.
- Keep the heat low enough for a gentle simmer once the lid is on.
- Move the beans with tongs now and then so the upper ones reach the broth.
- Check the beans for tenderness during the stated 1–2-hour cooking window.
- Taste before adding extra salt, as the bacon and bouillon are already seasoned.
- Drain the beans before tossing them with the bacon and optional butter.
Variations
- More heat: Increase the red pepper flakes to suit your preference.
- No chilli: Leave out the optional red pepper flakes for a milder pot.
- Richer finish: Toss the drained beans with the optional tablespoon of butter.
- Different beans: Use trimmed frozen green beans, adding them while still frozen and checking their texture as they cook.
- Smokier flavour: Use smoked thick-cut bacon in place of unsmoked bacon.
Common mistakes to avoid
- High heat: A vigorous boil can cook the liquid away quickly; lower the heat to maintain a gentle simmer.
- Uneven packing: Loosely stacked beans may cook at different rates; arrange them closely in the same direction.
- Too little liquid: The beans should be about 90% covered; add more water if the level falls short.
- Skipping the movement: Beans on top can cook less evenly; turn them occasionally with tongs.
- Over-seasoning early: Bouillon and bacon bring salt; taste before adding extra at the end.
- Expecting crisp beans: This recipe aims for tenderness; continue simmering if the beans are still too firm.
How to store
Cool leftovers promptly and store them in a covered container in the fridge for up to 3–4 days. Reheat gently in a saucepan with a splash of water, or microwave covered, until hot throughout.
Frequently asked questions
Can I make these green beans ahead?
Yes. Cook them, cool them promptly and refrigerate in a covered container. Reheat gently with a splash of water, then check the seasoning before serving.
How do I know when the beans are done?
Taste one during the simmer. They are ready when they have softened to your liking; the method allows 1–2 hours.
Do the beans need to be completely covered with water?
No. The recipe calls for them to be about 90% covered, with the lid on during cooking. Add more water if needed.
Can I leave out the red pepper flakes?
Yes. They are optional, so omit them for a milder result.
Can I leave out the butter?
Yes. The butter is optional and is tossed with the drained beans at the end.
Why drain the beans before serving?
Draining removes the cooking liquid so the bacon and optional butter can be tossed directly with the beans, as the method specifies.
Cook it from the original
This recipe comes from keytomylime.com. Their page has the author’s own photos, notes and tips — the best place to cook it from.
Open the recipe on keytomylime.com